
How to Install Aeromotive Stealth Fuel Kit - A1000 (10-14 GT) on your Ford Mustang
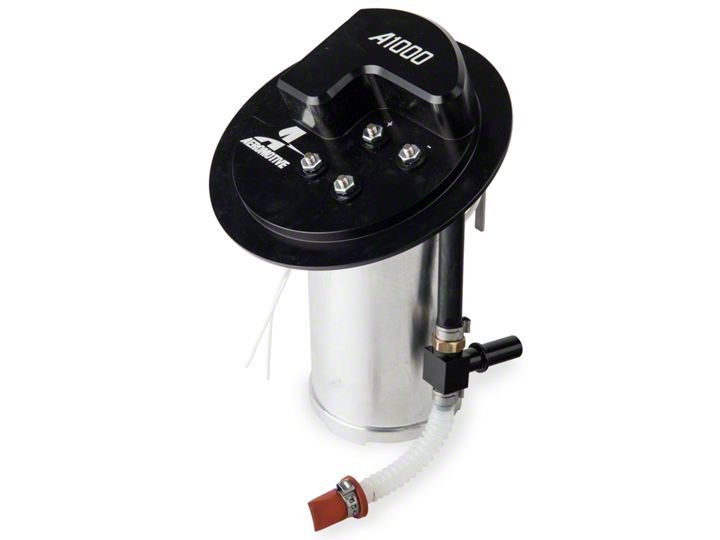
Shop Parts in this Guide
WARNING!
The fuel system is under pressure. Do not open the fuel system until the pressure has been relieved. Refer to the appropriate vehicle service manual for the procedure and precautions for relieving the fuel system pressure.
This pump assembly is a high performance factory replacement unit. Key features:
• Drops directly into the factory fuel tank (NO CUTTING REQUIRED).
• Utilizes the factory jet siphon system so it operates just like Ford intended.
• High flow pre-filter built into inlet of pump.
• Includes fuel level mounting bracket for factory leveling unit.
NOTE: The use of Teflon braided line with machine crimped hose ends is recommended. This eliminates the possibility of fuel vapors permeating through the fuel line. The use of a 16306 speed pump controller is also highly recommended, this will keep the fuel cool and reduce noise inside the passenger compartment.
CAUTION:
Installation of this product requires detailed knowledge of automotive systems and repair procedures. We recommend that this installation be carried out by a qualified automotive technician.
Installation of this product requires handling of gasoline. Ensure you are working in a well ventilated area with an approved fire extinguisher nearby. Extinguish all open flames, prohibit smoking and eliminate all sources of ignition in the area of the vehicle before proceeding with the installation.
Maximum continuous operating pressure should not exceed 70 psi.
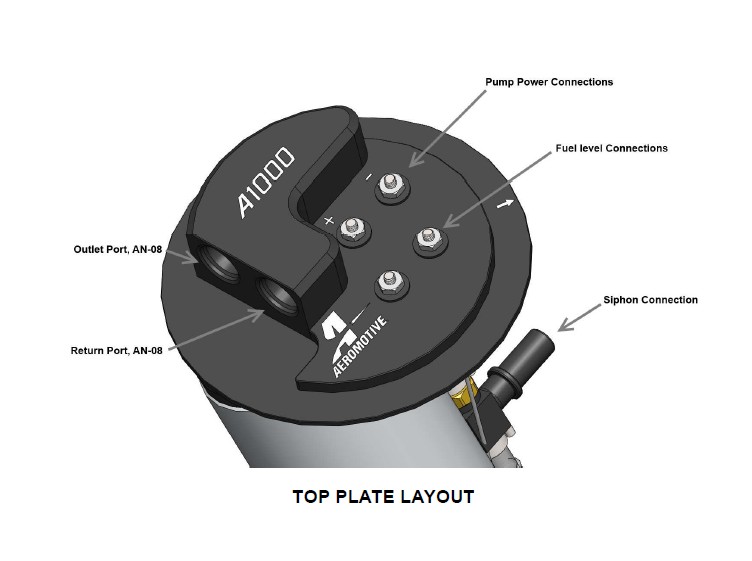
The enclosed Aeromotive fuel pump utilizes AN-08 ORB (O-ring Boss Ports) style outlet port and AN-08 return port; these ports are NOT PIPE THREAD and utilize NO THREAD SEALANT.
NOTICE TO INSTALLER:
Installation of this fuel pump requires fuel system conversion to a return style fuel system (use of a bypass style regulator). Also note that a check engine light may be present after installation due to the factory returnless system being modified. This can be turned off with tuning software. Not for use on California vehicles.
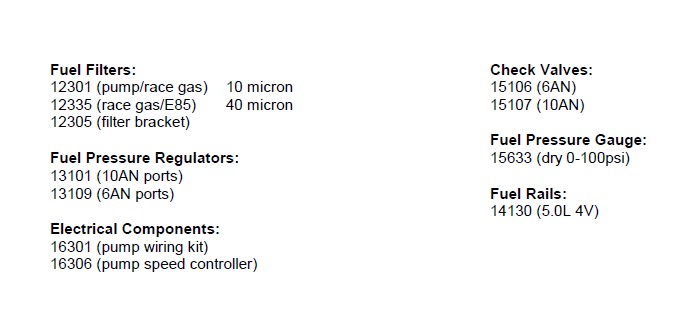
Aeromotive Related Mod Motor Components:
The following steps are typical of most installations:
1. Drain the fuel tank and disconnect the negative battery cable.
2. Raise and support the vehicle.
3. Remove the back seat from vehicle. Do this by pressing forward on the two retention clips underneath the seat cushion with a small screwdriver. You can carefully find them at the edge of the cushion when looking at eye level. When depressed far enough, the seat can be raised and removed easily.
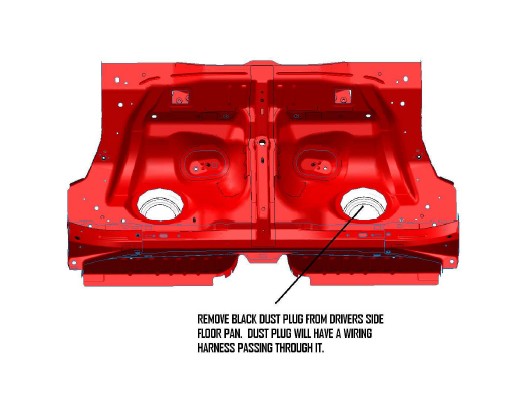
4. Remove black dust plug from driver’s side.
5. Disconnect all electrical connection on the fuel pump top plate and move out of the way.
6. Before removing the factory feed line, relieve system pressure (refer to service manual for proper procedure). Once system pressure has been relieved, disconnect the feed line from top plate.
7. Remove lock ring from top of tank (pump is spring loaded and will pop up when ring is removed).
8. Slowly pull the fuel pump unit up until you see the quick disconnect fitting and tube. Press the tab and pull the line to remove. Pay close attention not to bend the float level arm as you remove the hanger assembly.
9. Once the unit is removed, cover the opening in tank so dirt and debris will not enter the tank.
10. Only one part will be used off the hanger assembly, the fuel level sensor.
11. Now carefully remove the fuel level sensor and install it on the Aeromotive fuel level sensor bracket. Cut the two wire connector off of the fuel level sensor and crimp them onto the two wires provide on the pump. NOTE: The sensor is a resistance output only, wiring polarity is bi-directional.
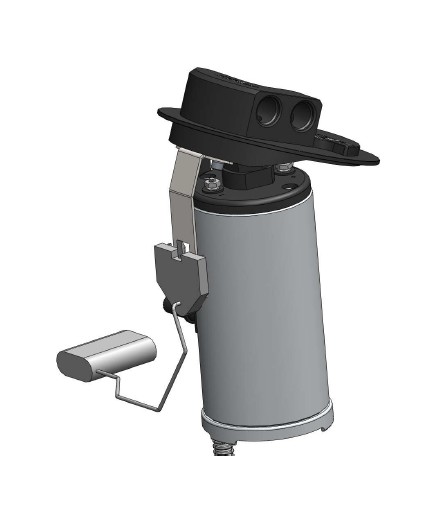
12. Before placing your new Aeromotive Stealth fuel pump in your tank, make sure the factory pump seal is clean and positioned correctly.
13. Pull the jet siphon tube up out of the tank and hold to one side as you lower the pump into the tank. It will be a tight fit, just take your time. You may have to rotate the quick disconnect on the siphon tube to get it to line up with the Aeromotive Stealth pump. NOTE: While installing the pump assembly, make sure that the siphon tube is routed as to not interfere with the float level sensor. Align the arrow on the Aeromotive pump cap with the arrow molded in the tank (located at approx. the 4-o'clock position), the outlet port will face the driver side when installed.
14. Once the pump is in the desired position, install the factory lock ring.
15. Connect the factory fuel level wiring to the Aeromotive fuel level terminals. NOTE: You must install a by-pass style regulator (Aeromotive part # 13101 or 13109) with return line in order for the fuel pump to function correctly. Failure to do so will result in poor performance and fuel pump/system failure.
16. Feed and return lines need to be plumbed into the vehicle now. It’s recommended to run AN-08 feed and return line. In most installations utilizing 45-deg hose ends coming out of the pump work best.
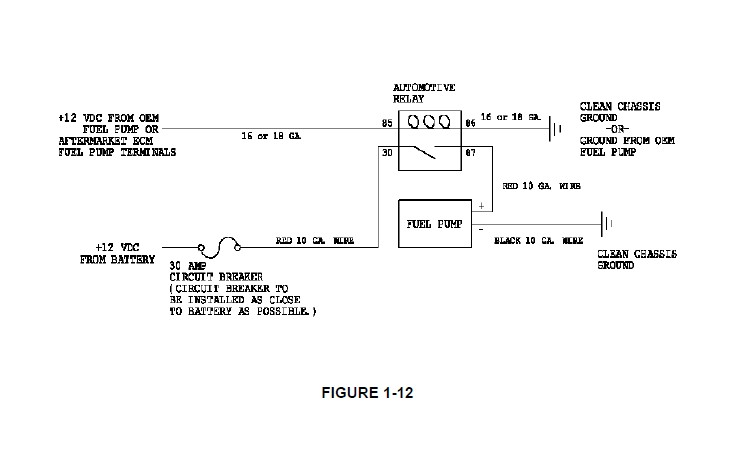
17. The Aeromotive fuel pump needs its own relay and 12V power wire. The use of Aeromotive fuel pump wiring kit (part # 16301) is recommended. Since the factory Ford fuel pump is pulse modulated you can not use the factory fuel pump wires to trigger the relay. Find a suitable 12V key on ignition source for the #85 connection on the relay. FIGURE 1-12
Hooking the factory wiring directly up the Aeromotive unit could result in wiring damage or pump failure.
18. Route the fuel lines under the vehicle noting to keep it away from heat and moving suspension components.
19. Find a suitable place in the engine bay to mount a return style regulator. Plumb the regulator per the manufactures installation instructions.
20. Key on to check for leaks and to set fuel pressure. If any leaks are found, immediately discontinue use of vehicle and repair the leak(s)! This finishes up the installation of your new Aeromotive Stealth fuel pump.

