Top Sellers in Mustang
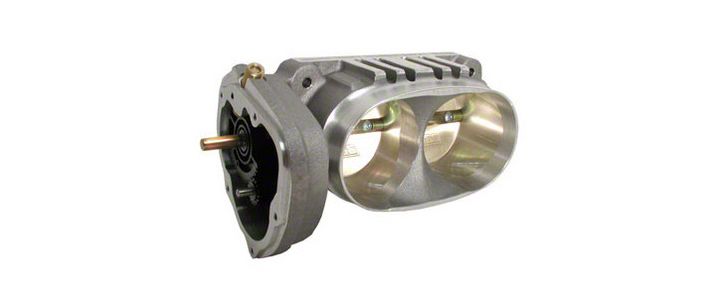
How to Install a BBK Twin 65mm Throttle Body on a 2007-2010 Mustang GT500

Shop Parts in this Guide
Installation
Step 1 Disconnect negative battery terminal. If these instructions are followed closely, , this will prevent the CHECK ENGINE light from coming on after the installation.
Step 2 Unplug the throttle body electric motor, TPS, and mass air meter by sliding the red colored locking clips back, and then squeezing the tabs on each wiring connector while pulling them from their connections.
Step 3 Loosen the hose clamps at the throttle body and at the air filter box. Disconnect the PCV tube on the inlet hose by gently twisting the green locking tab and pulling the tube away from the hose and remove the intake hose from the vehicle.
Step 4 Unbolt and remove the throttle body. Note: be careful not to damage the throttle body motor housing as you will be re-using it.
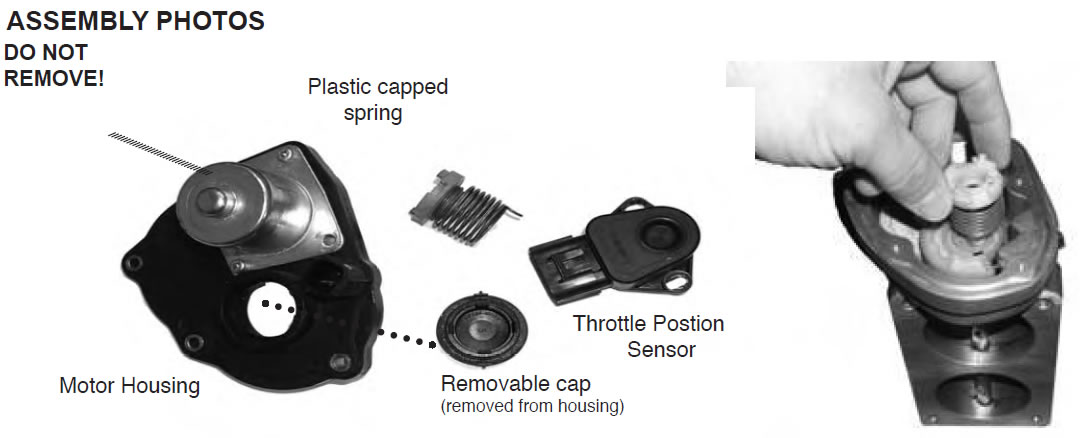
Step 5 Using the T-20 Torx remove the motor housing, plastic capped spring, and TPS from the stock throttle body. WARNING! Do not attempt to rotate the TPS. It has a limited range of travel.Over-rotating it will destroy the internals and render the car undriveable. Step 6 Pop the removable circular cap off of the motor housing. (This is easily done with a finger .)
Step 7 Place the plastic capped spring over the end of the throttle shaft of the BBK throttle body and line the pigtail hook on the spring up with the catch slot in the gear.
Step 8 Install the motor housing minus the removable cap onto the BBK throttle body over the plastic spring cap and tighten screws.
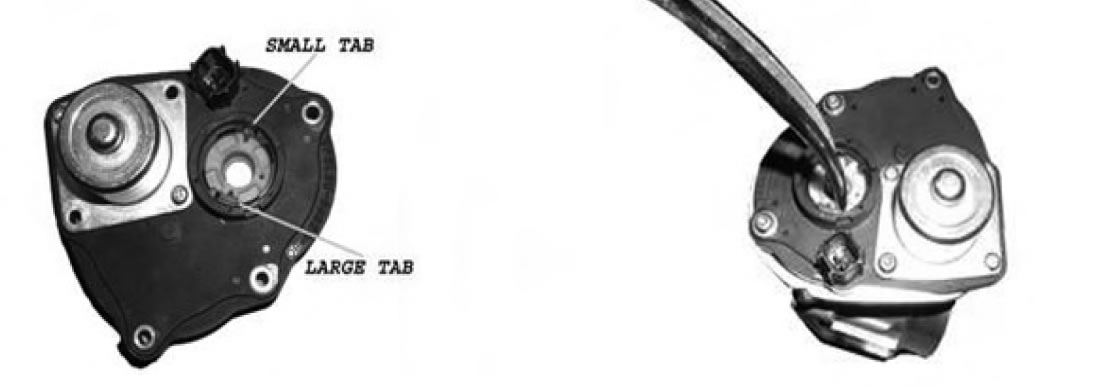
Step 9 Using needle nosed pliers rotate the plastic spring cap COUNTER-CLOCKWISE (approximately 180°) until the 2 tabs line up with their matching landings in the motor housing, then gently pull up on the cap until it pops up into a latched position.
Step 10 Align the tabs on the removable cap with the slots on the motor housing and snap it into place.
Step 11 Install the TPS onto the BBK throttle body by lining up the locating tab and tightening the screws. Do not rotate the TPS! Just put it straight onto the throttle body.
Step 12 Check the throttle body for smooth action by opening and closing the flaps a few times with your fingers.
You should feel a slight drag from the electric motor, but it should never bind or stick.
Step 13 V-10 truck applications- install the supplied adapter plate and all (4) supplied bolts. Refer to to engraving on adapter plate for corrrect mounting. GT 500- Install the throttle body onto the intake manifold using (2) of the shorter supplied bolts on the top mounting holes, and the original nuts on the bottom then re-establish the wiring connections.
Step 14 Re-install the intake hose and re-attach the PCV tube.
Step 15 Connect the (–) negative battery terminal


If, after installing your BBK 1763 ‘05 throttle body, you experience a FAILSAFE mode or CHECK ENGINE light, try the following procedure:
First be sure that the plastic capped spring is hooked into the gear and rotated approx 180° COUNTER-CLOCKWISE until it pops into locked position.
If that is verified and correct and you are still having issues then follow the directions for checking TPS voltage.
CHECKING TPS VOLTAGE
To check the TPS voltage you must have a DIGITAL voltmeter.
1. Re-assemble and install the stock throttle body.
2. LEAVE THE THROTTLE BODY MOTOR UNPLUGGED (the small connector on the driver side of the throttle body).
3. Ground the black wire of your meter and poke the probe of the red wire on the meter into the YELLOW wire of the TPS sensor which is the bottom wire on the plug located on the passenger side of the throttle body. You DO NOT need to break the wire to read voltage. The best way to probe the yellow wire is to poke the probe into the plastic harness plug (while it’s plugged in to the TPS). You will need to penetrate the blue insulator the goes around the end of the yellow wire (hidden inside the harness plug) to reach the bare metal end of the yellow wire. Touch the probe to the bare metal end of the yellow wire
4. Turn the ignition to the ON position but do not start the car.
5. Read the meter display. You should see a voltage reading between 1.19-1.31 volts. Write the voltage down.
6. Now re-install the BBK throttle body and repeat steps 2-5.
7. If the TPS voltage on the BBK throttle body varies from the stock TPS voltage then follow the next steps to adjust the BBK to stock settings. This is easily done with the throttle body bolted to the car.
ADJUSTING TPS VOLTAGE
- With your meter still connected, loosen the mounting screws on the TPS sensor and gently rotate it until the desired voltage is achieved, then tighten the screws.
- Once the desired voltage is acheived, plug the throttle body motor in.
- Turn the ignition key to the OFF position, then cycle the ignition key from the ON position 4 times to allow the car to "self check" the throttle body and sensors for proper operation.
If the throttle body voltage and sensors are correct then the CHECK ENGINE and FAILSAFE warnings should be gone when you turn the key on for the 4th time.


