FREE 1 to 3-Day Delivery on Orders $119+ Details
Best Sellers


How to Install a Mirrored Round Mustang Shift Knob - Black on Your 2011-2014 Mustang GT or V6
SHIFT KNOB COMPONENTS
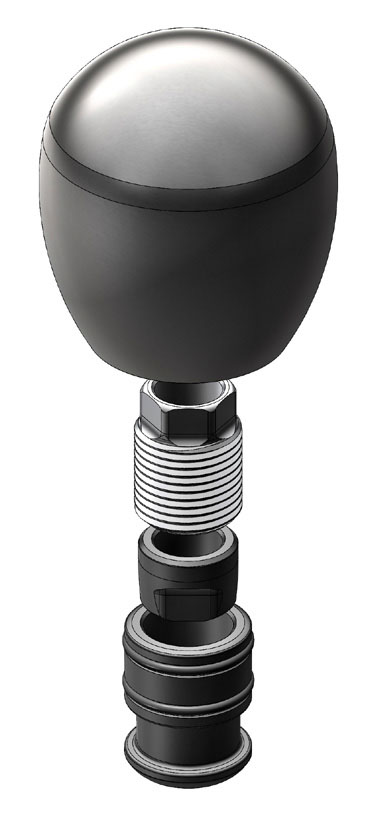
Top to Bottom: Shift Knob, Threaded Adapter, Adapter Lock Nut, Boot Retainer (Optional)
SHIFT KNOB INSTALLATION STEPS
1 Remove the factory shift knob by turning it counter-clockwise.
2 If you purchased a boot retainer, slide it over the shifter arm with the o-rings up.
3 Then, install the adapter lock nut by threading it onto the shifter arm.
Make sure the flats are facing down. Reference step 2 image.
4 Install the threaded adapter by threading it onto the shifter arm. Align
it with the top of the shifter arm. Due to varying shifter arm lengths, the threaded adapter might not be able to be aligned with the top of the shifter arm. Try to get the threaded adapter to have as much thread engagement with the shifter arm as possible. Reference step 3 image.
NOTE The threaded adapter drives the installed height and orientation
of the shift knob.
5 Thread the adapter lock nut up and into the threaded adapter. Then
tighten the components into each other using a 15mm wrench on the
threaded adapter and a 14mm wrench on the adapter lock nut. Make
sure the threaded adapter and adapter lock nut are tight.
6 Test fit the height and orientation of the shift knob by threading it onto the threaded adapter and do not overtighten. If you have a car with
a reverse lock out or a shift knob with a gate pattern, follow the next steps. If not, finish the installation of the shift knob by tightening it.
7 If you purchased the boot retainer, slide it up and into the bottom of
the shift knob and slide your boot over it. Some applications may require
you to zip tie the underside of the shift knob boot to the retainer.
REVERSE LOCKOUT CARS
If you have a car with a reverse lockout, make sure the reverse lockout
lever has enough travel by trying to put the car into reverse. If the shift
knob is sitting too low, loosen the threaded adapter and adapter lock
nut. Unscrew the threaded adapter so it sits higher on the shifter arm.
Tighten the adapter lock nut into it and check again for reverse lockout
travel.
SHIFT KNOB ORIENTATION STEPS
The orientation of the shift knob is determined by the threaded adapter.
As the shift knob is threaded onto the threaded adapter, it will bottom
out in the shift knob.
Perform the following steps to adjust the shift knob orientation.
1 Take a visual picture of how many degrees the orientation is off and in
which direction (clockwise or counter-clockwise) then remove the shift
knob. Reference step 2 image.
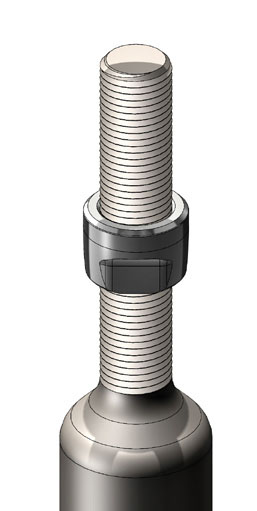
SHIFT KNOB ORIENTATION IMAGES
STEP 2
Note how the shift knob is about 20 degrees counter-clockwise off in
orientation. To correct this, the
threaded adapter must be turned in the same direction and amount the
shift knob orientation is off by.
2 Do not let the threaded adapter spin by holding a 15mm wrench on it. Then use a 14mm wrench to loosen the adapter lock nut by turning it clockwise.
3 Looking down at the top of the shifter arm, precisely turn the threaded adapter the same amount and direction the shift knob orientation was off by. Tighten the adapter lock nut into the threaded adapter and thread on the shift knob till it bottoms out.
4 Repeat this process until the correct shift knob orientation is achieved.
NEED TECH HELP?
Email us [email protected]
Call our tech team 610.336.0206
RACESENG.COM