Last Day! Guaranteed Free Delivery 12/24. Order by 3pm EST available on most items - Details
Maximum Motorsports Caster/Camber Plates Installation Guide ('94-'04)
Tools Required
- Floor Jack
- Jack Stands
- 1/4" and 1/2" Ratchets
- Socket Wrench
- 14mm, 15mm, 17mm and 24mm Sockets
- Lug Wrench or 21mm Impact Socket (optional)
- Other Impact Tools (optional)
- Drill
- 1/8" Drill Bit for Metal
- 13/32" Drill Bit for Metal
- Scribing Tool

Shop Parts in this Guide
Installation
1. As with any engine bay mechanical work, begin by disconnecting the negative terminal from the car’s battery.
2. Before you begin to put the car on jack stands, it is a good idea to loosen the strut top nut while the car is on the ground and there is still a load on the vehicle’s suspension. Do not completely remove the strut top nut just yet.
a. Using impact tools is the best choice for this step, but if they're unavailable, a 24 mm socket or a combination of either 2 wrenches (one the hold the strut in place and one to turn the top nut) would be effective. Or, in some cases, a 24 mm wrench and a flat head screwdriver to hold the strut in place may be needed.
3. Lift the front of the vehicle high enough to completely relieve the load from the front suspension, and then place the vehicle securely on jack stands.
a. WARNING: NEVER work under a vehicle supported only by a floor jack!
4. Remove the front wheels using a lug wrench or impact tools, the 21 mm impact socket wrench.
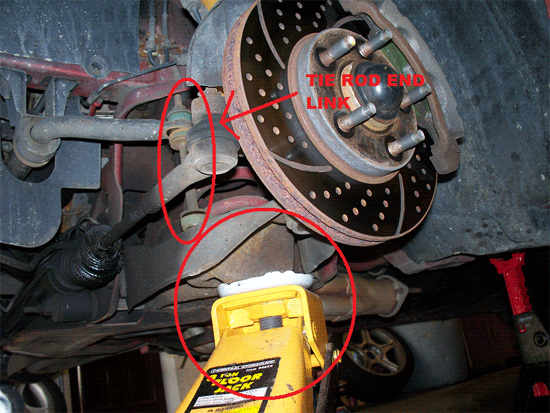
5. Place a floor jack under the vehicle’s control arm and jack it up, until a slight load has been placed on the lower control arm. DO NOT lift the car from the jack stands!
6. Disconnect one end of the tie rod end links, to allow the control arm to fully drop when the floor jack is later lowered.
7. Before beginning work under the hood, place a large towel over the fender to prevent any damage to the paint.
8. Remove the strut top nut.
9. Slowly lower the floor jack supporting the lower control arm, allowing the strut to lower into the fender well. Be careful NOT TO ALLOW the front spring to eject from where it is seated. This has the potential to do damage to the vehicle as well as cause bodily harm.
10. Remove all factory bushings, washers, and sleeves from the strut shaft.
11. Collapse the strut shaft into the strut body far enough to remove the stock bottom plate and dust boot. Save the dust boot for later use.
12. Allow the strut shaft to relax, extending outside of the fender.
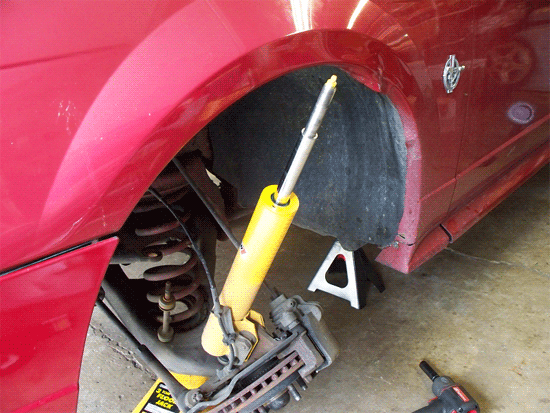
13. Cut and remove the steel band clamp securing the plastic dust boot tube to the molded rubber/steel top mount. Separate the dust boot tube from the rubber/steel top mount. Discard the rubber/steel top mount, but save the dust boot tube. (MaximumMotorsports)
14. Place the dust boot tube back over the strut shaft.
15. Lubricate the provided MM bump stop and place it over the strut shaft with the conical portion facing upward. It is easiest to attach the bump stop to the boot later in the installation process.
16. Remove the three bolts that hold the existing strut mounting plates in place with the 14 mm socket wrench. If removing stock mounting plates, be sure to keep the factory plate handy, as it will be needed later.
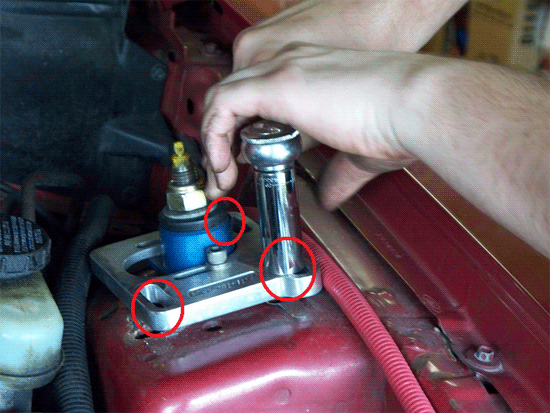
17. Finish removing any remaining components of the old strut mounting plates.
18. Now you must drill a fourth hole to allow the 4-bolt pattern of the MM kit to fit properly.
19. Use the Ford top plate removed earlier as a template. Rotate it 180° from the stock position. Align the Ford top plate with the inside edge of the factory cut holes in the strut tower. Scribe the position of the fourth hole into the paint of the strut tower.
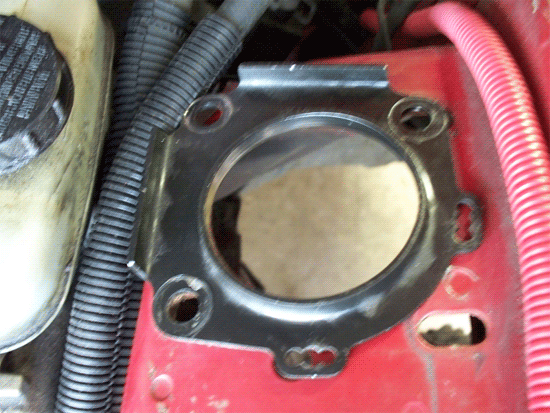
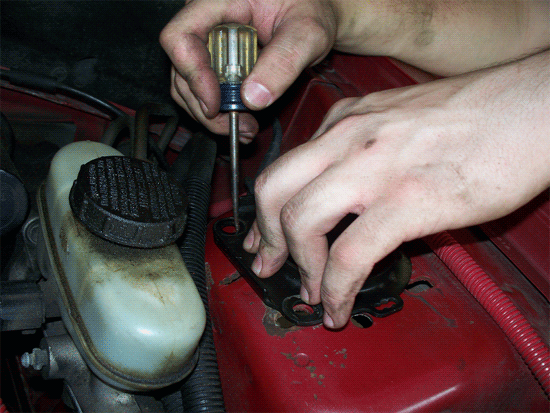
20. Now align the Ford top plate with the outside edge of the factory cut holes in the strut tower. Once again, scribe the position of the fourth hole into the paint of the strut tower.
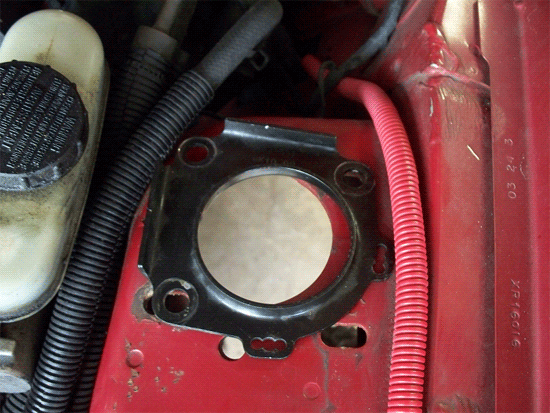
21. After scribing with the Ford top plate in both positions, find the intersection created by the 2 markings.
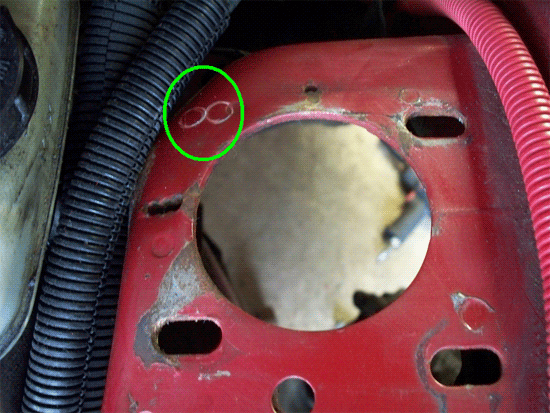
22. Center punch at the intersection of the two scribed markings.
23. Drill a 1/8” pilot hole at the intersection point. Then, drill the 1/8” pilot hole to a 13/32” hole. Debur the top and bottom of the hole.
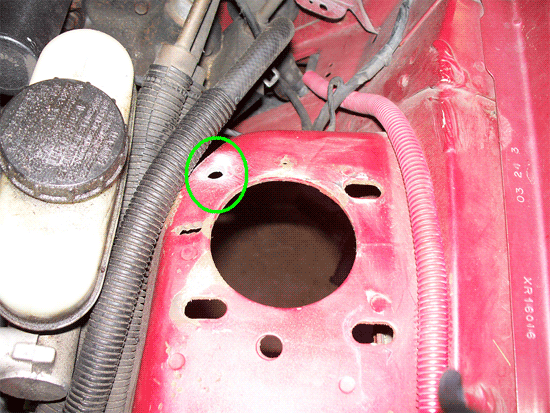
24. Install the MM Bottom plate under the strut tower, with the 3/8” bolts protruding up through the 4 holes, including the one you had just drilled. Use the illustration below provided by Maximum Motorsports to ensure proper orientation.
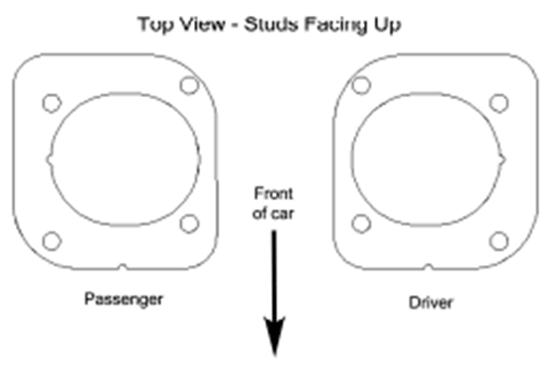
25. Place one of the provided 1/4” thick washers over each of the four studs. The washers will rest directly on top of the strut tower.
26. Install the MM main plate over the 4 studs and the ¼”thick washers. Place a provided 3/8” washer, followed by a provided hex nut (14 mm) over each of the four studs. Turn the 4 hex nuts down, but do not fully tighten yet to allow for later adjustment. Use the below image provided by Maximum Motorsports to correctly orient your two provided main plates.
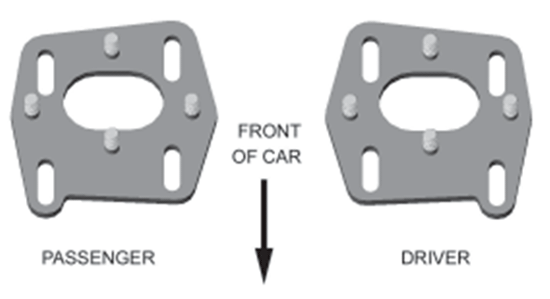
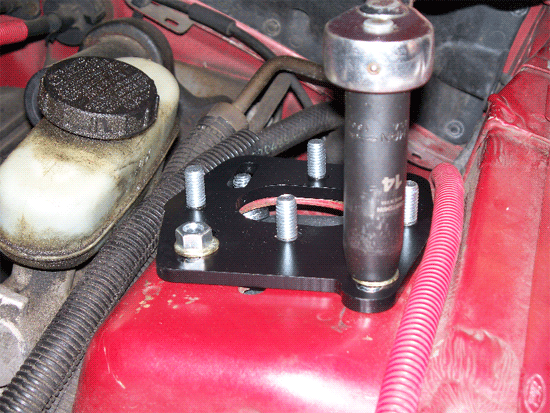
27. Place a provided 3/8” washer over each of the studs protruding from the MM main plate.
28. Install the MM bearing plate over the four studs of the main plate, followed by another provided 3/8” washer and hex nut (14mm) over each of the four studs.
a. Note: It is important that you correctly choose the orientation of your MM bearing plates. They may be oriented in either a positive or negative fashion. Most street cars will be oriented positively while most race cars will be oriented negatively.
b. Use the below images provided by Maximum Motorsports to choose the orientation of your bearing plates.
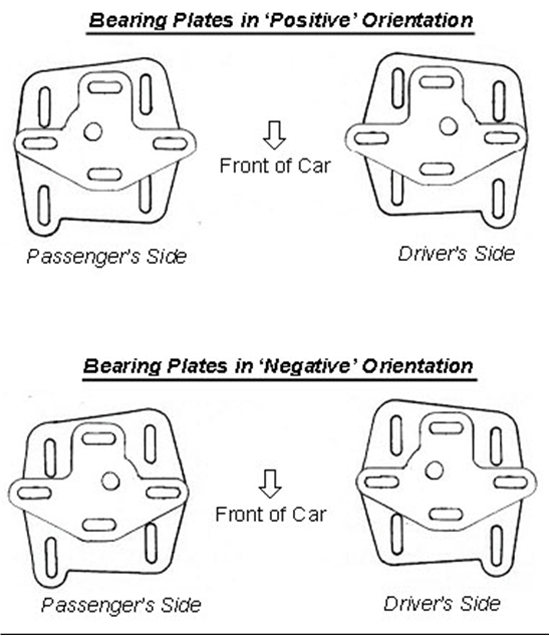
29. Turn down the 4 hex nuts on the bearing plate’s four studs, but do not fully tighten to allow for later adjustment.
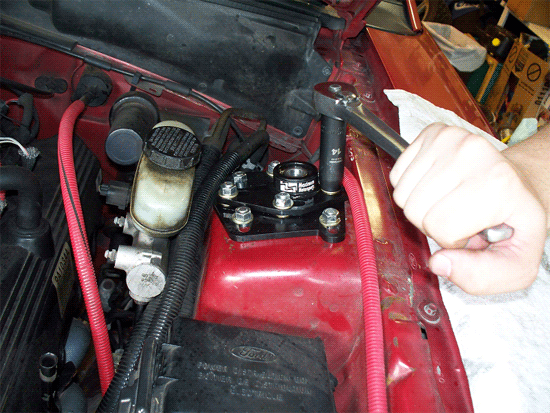
30. Guide the strut shaft back through the center hole of the bearing plate, after selecting the proper type and number of spacers to be applied below and above the bearing plate, along the strut shaft.
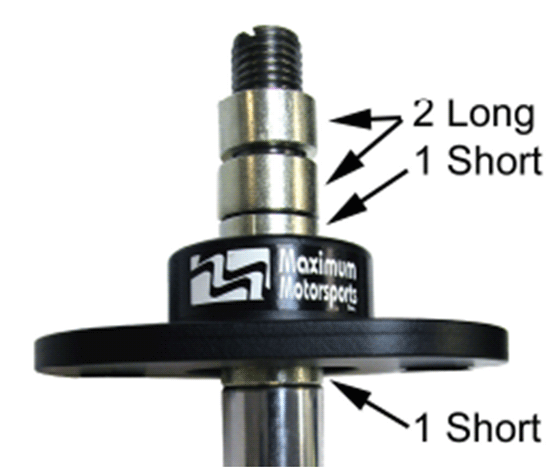
a. The manufacturer suggests that for vehicles at stock ride height, 2 long spacers and 1 short be placed below the bearing plate, while 1 short spacer is placed above the plate.
b. Before reinstalling the strut top nut, be sure to very carefully check hood clearance with the new components. It is wise to use a small amount of "Play-Doh" or silly putty placed on top of the strut shaft while closing the hood. The amount of smashed in putty will clearly show how much hood clearance you have. If there is too little clearance you can relocate one spacer from above the bearing plate to below the bearing plate, thus lowering the strut shaft relative to the spherical bearing plate.
c. NOTE: Hood clearance may change after an alignment. Be sure to recheck clearance after an alignment has taken place!
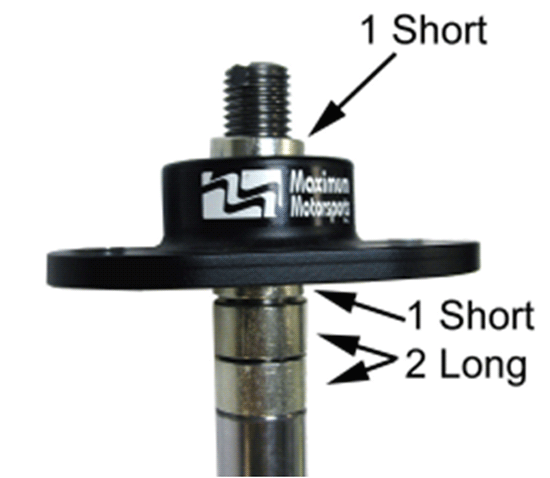
For vehicles at a lowered ride height, it is suggested that your place 1 short spacer below the bearing plate and 2 long spacers, as well as 1 short spacer above the bearing plate.
31. Reinstall the strut top nut and torque it down to the strut manufacturer's specifications.
32. Slide the MM Urethane bump stop up as far as possible and slip the dust boot tube up over the bump stop. Secure the two with one of the provided zip ties.
33. Slide the bump stop/dust boot combo down the strut shaft slightly, to ensure that they will not interfere with the alignment process of the caster/camber plates.
34. Make any desired adjustments to your caster and camber settings using the new MM caster/camber plates. Torque all hex nuts down to part manufacturer’s specifications.
35. Repeat steps 5-34 for passenger side.
36. Reinstall the wheel and torque the lug nuts down to factory specifications.
37. Reconnect negative battery terminal.
38. Carefully remove jack stands and place vehicle back on the ground.
39. It is STRONGLY recommended that you have your vehicle professionally realigned after installing this product!
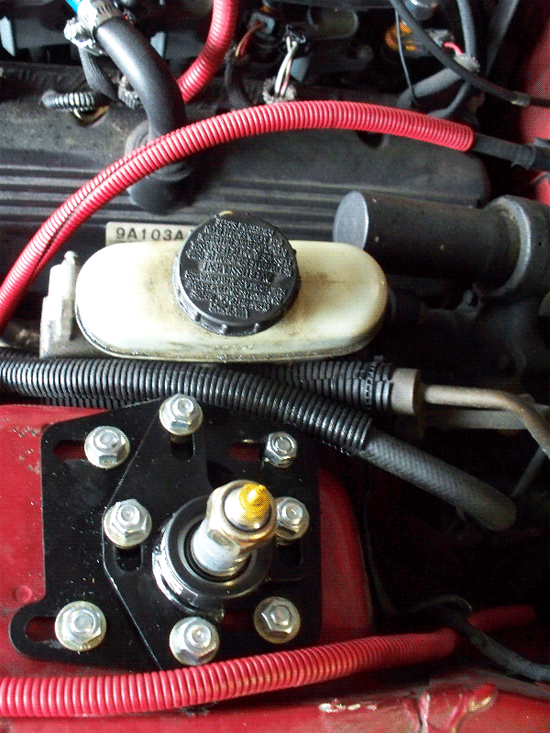
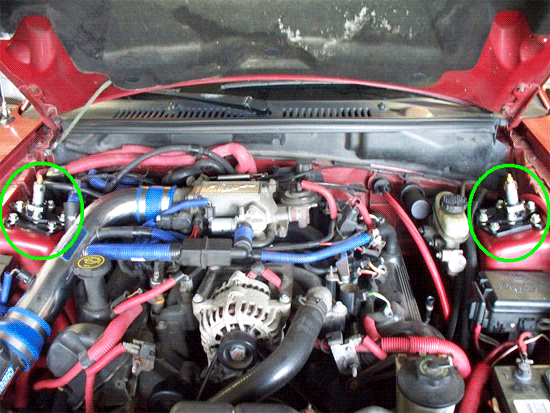
40. Enjoy your new Maximum Motorsports Fully adjustable Caster/camber plates provided to you by the unmatched excellence in customer service from American Muscle at americanmuscle.com!
Installation instructions provided by AmericanMuscle customer Steve Feldmeier 8.11.08
