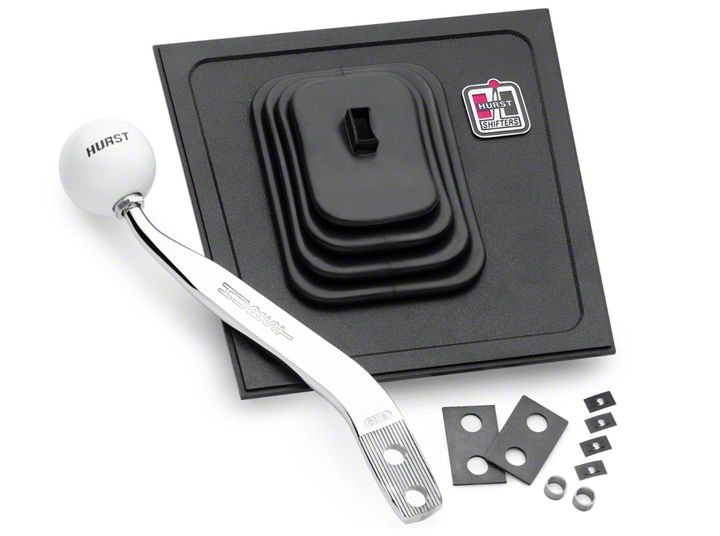
How to Install a Hurst Competition Shifter Handle - White Knob on your 1987-1993 Mustang

Shop Parts in this Guide
WORK SAFELY
Perform this installation on a good dean level surface for maximum safety and with the engine turned "off". Place blocks or wedges in front of and behind both rear
wheels to prevent movement in either direction.
CAUTION: To avoid any possibility of bodily injury or damage to car, do not attempt shifter stick installation until you are confident that vehicle is safely secured and will not move.
FACTORY SHIFTER STICK REMOVAL
1. Apply emergency brake. Turn ignition key to "unlock" and place shifter stick in "neutral" positon. Remove shifter knob from stick.
2. Using both hands, place fingers inside of console top plate on each side of shifter boot, grasping underneath and pulling up to remove top plate and shifter boot from console.
NOTE: Check bottom of console top plate, if factory mounting clips are attached to the tabs on underside of top plate, carefully remove clips and set aside.
3. Using a 13mm socket, loosen and remove two (2) factory mounting bolts located at the bottom of shifter stick and set aside, these factory mounting bolts will be re-used.

HURST SHIFTER STICK INSTALLATION
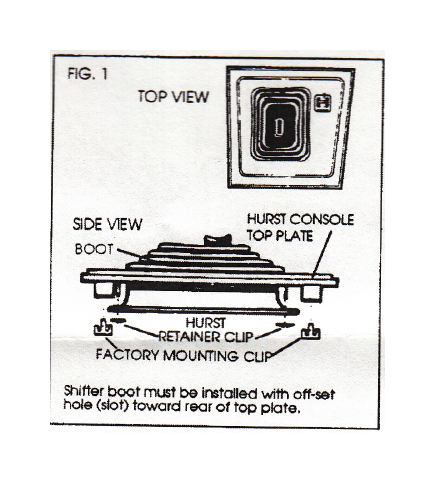
1. Place Hurst Console top plate on a clean fiat surface with logo facing upward. Fold mounting flange comers of shifter boot inward and insert through opening in console top plate. Off- set opening (slot) for shifter stick must be positioned toward rear of top plate.
Attach shifter boot flange onto mounting pins located on underside of top plate and fasten boot using four (4) retainer clips supplied. Push clips completely on pins to secure boot.
Install factory mounting clips (previously removed) onto tabs located on underside of top plate (Refer to Fig.1).
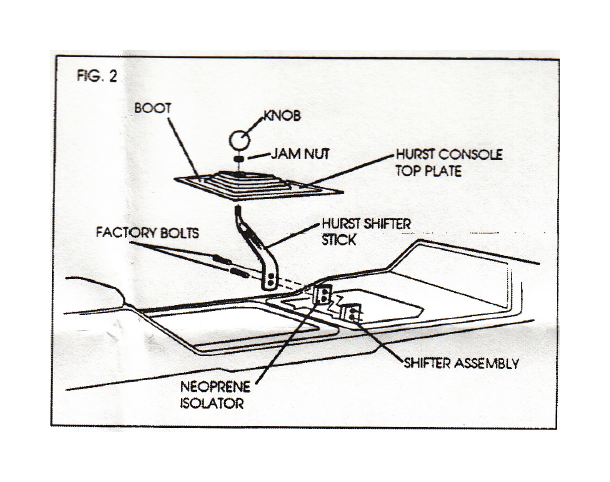
2. Place neoprene isolator between shifter assembly and Hurst stick, fasten stick to shifter assembly re-using the two (2) factory mounting bolts. Tighten bolts securely (Refer to Fig.2)
3. Place console top plate over shifter and slide boot down over stick. Position top plate onto console and carefully push bown until top plate is flush with console and firmly in place.
4. Install jam nut and knob onto shifter stick, turn to desired position and tighten but against knob.
NOTE: Retain this instruction sheet for future reference

Technical Service
A highly trained technical service department is maintained by Hurst Performance to answer your technical questions, provide additional product information and offer various recommendations.Technical service calls, correspondence, and warranty questions should be directed to the following address:

