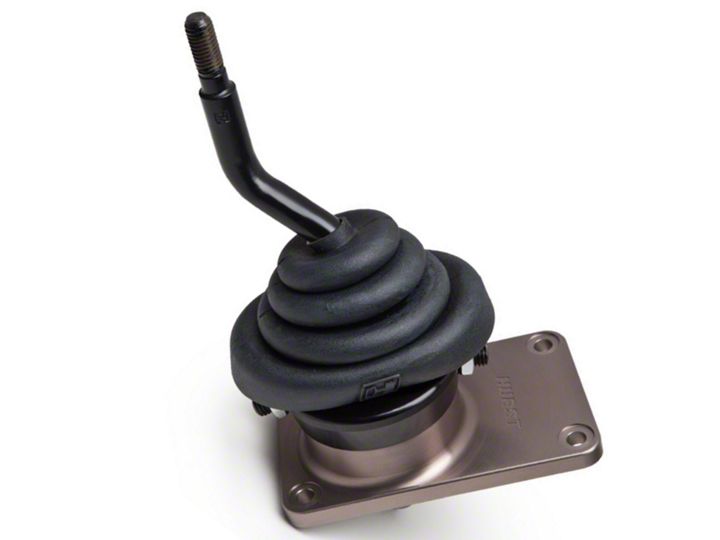
How to install a Hurst Black Billet Plus Shifter on your Mustang

Shop Parts in this Guide
Installation
WORK SAFELY! For maximum safety, perform this installation on a clean, level surface and wi th engine tuned off. Place blocks or wedges in front of, and behind both rear wheels to prevent movement in either direction.
CAUTION: To avoid any possibility of bodily injury or damage to vehicle, do not attempt shifter installation until you are confident t vehicle is safely secured and will not move.
NOTE: In some cases the factory console will have to be removed in order to install the Hurst Billet Plus shifter. Due to differences in design and model year changes, we recommend that you refer to a factory service manual for your specific model year to determine the proper preocedure for console removal.
FACTORY SHIFTER REMOVAL
1. Place the shifter into the neutral position.
2. Remove the shifter knob from the stick by turning it counter-clockwise
3. Using both hands, place your fingers underneath each side of the shifter boot grasping console top plate, and pull up to remove the top plate from the console. On some models there is a layer of sound deadening material inside the console. Remove and save it for reassembly to reduce engine and road noise.
4. Remove the four screws that secure stock shifter boot to the floor tunnel, and remove the boot. Also, remove the additional rubber boot(inner dust cover)located underneath the stock shifter boot.
5. Using a 13 mm socket , remove the four hex head bolt that fasten the stock shifter assembly to the transmission. Discard the bolts; new ones are supplied. Lift the shifter assembly straight up and off. (Note: you may have some difficulty in removing the stock shifter from the transmission due to the adhesive sealant at the factory.)
6. Remove and inspect the plastic cup bushing inside the transmission, replace it if it's worn or damaged (This part available from Ford dealers). Re - Install the bushing in the transmission.
BILLET /PLUS SHIFTER INSTALLATION IMPORTANT: CHECK YOUR TRANSMISSION
On vehicles equipped with Borg - Warner T-45 transmissions, you MUST use the metal spacer provided between the BilletIPlus Ishifter mounting base and transmission mounting surface. On vehicles equipped with Borg-Warner T-5 transmissions, DO NOT use the spacer.
1. Clean the shifter mOlfting surface on the transmission and apply RTV or similar sealant provided between the Billet Plus shifter mounting base and the transmission. NOTE: On applicantions with Borg - Warner T-45 transmissions, use spacer provided and apply sealant to both mating surfaces of spacer.
2. Install the Billet Plus Shifter assembly onto the transmission, making sure that the ball on the stick bottom fits properly into the plastic cup bushing.
3. Fasten the Billet Plus Shifter to the transmissions using the new hex head bolts and flatwashers supplied. DO NOT USE THE ORIGINAL BOLTS. Tighten the bolts evenly to 15-20 lbs.ft. torque.
4. Loosen hex nuts on shifter stop screws and using a hex key wrench, turn screws out until they are flush with with inside of aluminum collar.
5. Test shifter operation. Move the stick through the entire gear shift pattern, making sure it engages each gear fully and that the stick moves freely from side to side in the neutral position.
OPTIONAL ADJUSTMENT OF SHIFTER STICK TENSION
CAUTION: WEAR SAFETY GLASSES FOR EYE PROTECTION. Shifter operation can be made "softer" by removing the inner (smaller) spring from each side of shifter stick.
CAUTION: SUDDEN RELEASE OF SPRINGS THAT ARE UNDER COMPRESSION IS DANGEROUS. RELEASE SPRINGS CAREFULLY.
IMPORTANT: REMOVE SPRINGS ONE SIDE AT A TIME. SIllFTER CAN BECOME DESASSMBLED IF BOTH SIDES ARE REMOVED AT THE SAME TIME.
Loosen and carefully remov both of the socket head cap screws. Rremove the retainer plate to expose the springs. Remove the inner (smaller) spring only. Replace the retainer and screws. Tighten both screws to 125 - 150 inch pounds. Repet this procedure on the opposite side.
NOTE: If you are not satisfiid with the "softer" shifter stick tension, re-install inner springs.
6. Adjust the shifter stop scJws. Pull the stick firmly into 2nd gear and hold it securely. Tum the rear stop screw in until the head contacts stick. then rotate the screw one half turn "out" (away from stick). Hold the screw with the hex key wrench and tighten the jam nut.
Repeat adjustment on the forward stop screw. Push the stick firmly into 3rd gear, and hold it securely. Turn the forward stop screw in until the head contacts stick, then rotate the screw one half turn out (away from stick). Hold the screw secure with the hex key wrench and tighten the jam nut.
7. Slide the rubber boot (supplied) over the shifter stick and down over the collar. Secure it at the bottom using the supplied plastic tid strap.
IMPORTANT: This boot must be installed to prevent dirt and moisture from entering shifter base housing which can cause premature ear of shifter.
8. Replace the factory inne dust cover and the stock factory rubber boot. Secure to floor tunnel with four

