
How to Install a K&N FIPK Cold Air Intake on Your 1994-1995 5.0L Mustang
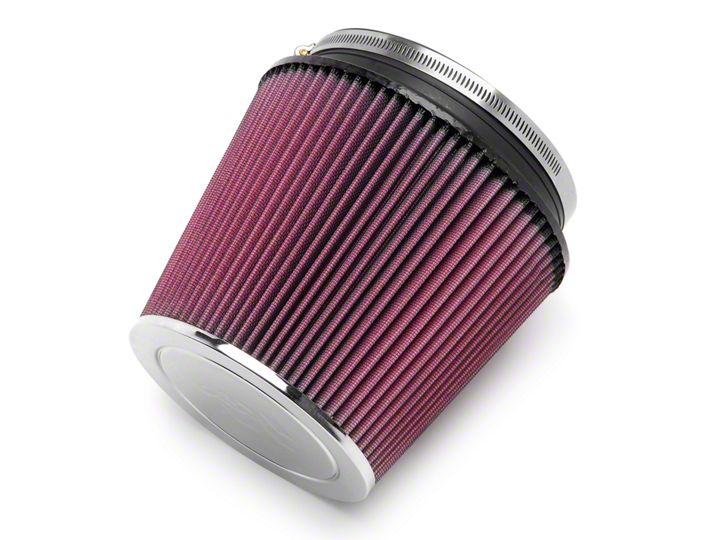
Shop Parts in this Guide
Installation
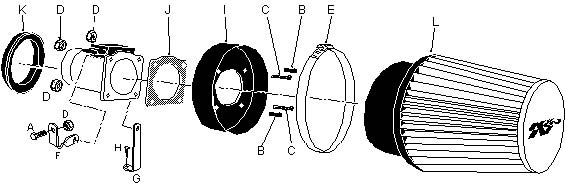
PARTS LIST:
| Desc | Qty. | Part # | |
|---|---|---|---|
| A | 6mm-1.00 x 12mm hex bolt | 1 | 07863 |
| B | 6mm-1.00 x 20mm allen bolt | 2 | 07852 |
| C | 6mm-1.00 x 25mm allen bolt | 2 | 07859 |
| D | 6mm-1.00 nylock nut | 5 | 07553 |
| E | Size 104 hose clamp | 1 | 08697 |
| F | Twist bracket | 1 | 07954 |
| G | Large "L" bracket | 1 | 07089 |
| H | Metal screw | 1 | 07788 |
| I | Adapter | 1 | 08831 |
| J | Gasket | 1 | 09330 |
| K | Intake adapter | 1 | 21537-1 |
| L | Air filter element | 1 | RF-1014 |
NOTE: FAILURE TO FOLLOW INSTALLATION INSTRUCTIONS AND NOT USING THE PROVIDED HARDWARE MAY DAMAGE THE INTAKE TUBE, THROTTLE BODY AND ENGINE.
INSTALLATION
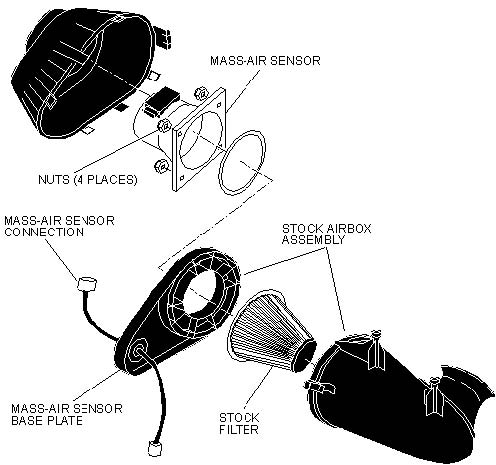
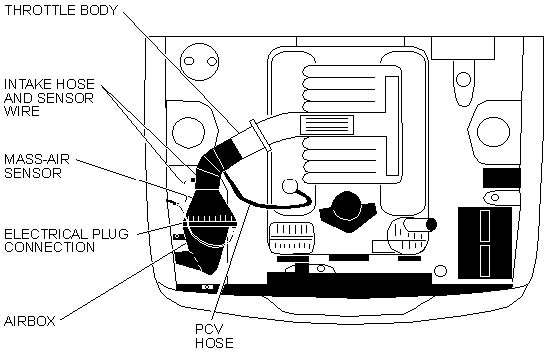
See the figure below for stock part locations.
See the exploded view for finished kit locations.
NOTE: K&N recommends that customers do not discard their factory air intake.
1. Disconnect the vehicles negative battery cable.
2. Loosen the hose clamp where the rubber intake hose connects to the throttle body.
3. Carefully remove the electrical plug connections from the airbox and intake hose, also remove the PCV hose at the intake hose.
4. Unbolt the airbox and firmly pull upward to release the airbox from the rubber grommets in the fenderwell.
NOTE: K&N recommends that customers do not discard their factory air intake.
5. Unclip the airbox and remove the mass-air sensor which is held by four nuts (see fig. 1).
6. Remove the intake hose from the airbox, also remove the mass air connection from the mass air base plate (see fig. 1).
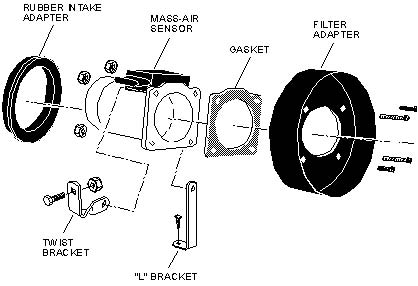
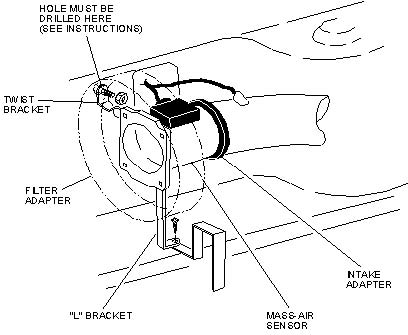
7. Using the provided fasteners assemble the filter adapter, gasket, mass-air sensor and both brackets as shown in (fig. 2).
8. Slide the rubber adapter onto the mass-air sensor (see fig. 2).
9. Loosely attach the original intake hose onto the rubber adapter, and attach the K&N Air filter loosely as well.
10. Install the assembly attaching the intake hose to the throttle body and tightening the lower "L" bracket only (see fig. 3)
11. Position the filter / assembly for best fit & clearance. At this time line up the "twist" bracket with the fender and mark the bracket hole for drilling (see fig. 3).
12. Remove the assembly and drill the hole in the fender using a 1/4" drill bit (see fig. 3).
13. After the hole has been drilled, you can now re-install the assembly (see fig. 3).
14. Now re-connect all electrical connections and re-route all loose wiring under the mass-air sensor. At this time also tighten all hardware.
15. Install K&N Air filter onto adapter, do not over tighten hose clamp.
16. Re-connect the battery cable. Double check to make sure everything is tight and properly positioned before starting vehicle.
17. The C.A.R.B. exemption sticker must be placed in a visible area under the hood, so that an emissions inspector can see it when the vehicle is required to be tested for emissions. California requires testing every two years, other states may vary.
ROAD TESTING
Start the engine with the transmission in neutral or park, and the emergency brake on. Listen for any air leaks or odd noises. If there are air leaks, make sure the hose connections are secure. If there are any odd noises, check for the cause and repair before proceeding. The K&N air filter Injection Performance Kit will function identically to the factory air filter with the exception of being slightly louder than stock and much more responsive. If all preliminary checks are okay, then a road test is necessary. Listen carefully for rattling or other odd noises and fix as necessary. If the road test is fine, you can enjoy driving as normal with the added response and power. We suggest that the air filter element be checked periodically for dirt. This is now very easy due to the open element configuration. If the filter material is overly dirty, service it according to the instructions that are in the Recharger service kit, part number 99-5050 or 99-5000. If you have any questions or problems, inquire at your nearest K&N dealer, or direct to K&N Engineering at (909) 684-9762.
FORD MUSTANG ENGINE COMPARTMENT
Related Guides
-
Installation
-
Installation
-
Installation

