How to install a Maximum Motorsports Adjustable Panhard Bar w/ Spherical Rod Ends on your 2005-2012

Shop Parts in this Guide

Read all instructions before beginning work. Following instructions in the propersequence will ensure the best and easiest installation.
Installing the MM Panhard Rod
1. Jack the rear end of the car up and place it safely on jackstands.
2. Remove the Panhard Rod Cover from the driver side end ofthe Panhard Rod by inserting a screwdriver through the access hole and releasing the retainer clips.
3. Remove the Panhard Rod bolts at both ends of the rod.
4. Remove the OEM Panhard Rod from the vehicle. NOTE: The MM Panhard Rod has been preset to the OEM length. This make installation easier. Length adjustments should be made later.
5. Place one end ofthe MM Panhard Rod in place. Slide the mounting bolt through the hole and start the nut by hand.
6. Swing the other end of the rod in place and install the bolt and nut.
7. Torque the bolts to 129 ft-lb.
8. Reinstall the Panhard Rod Cover by snapping it into place. Do not do this if you plan to adjust the rod length.
9. Lower the car safely to the ground.
Centering the Axle Underthe Body
Ford designed their Panhard Rod length so that the axle would be centered under the car at full bump. This will maximize tire clearance inside the fender-well at full bump. This means that the axle is not centered under the car at ride height. If you wish to center the axle under the body, you may do so via the following procedure.
1. After completing the installation, cycle the suspension to settle the car. Simply backing out of the driveway and pulling back in should be sufficient.
2. Using a plumb line hung off the rear fender, measure the distance from the Driver side fender to the wheel rim. Record this distance.
3. Repeat the procedure for the Passenger side.
4. Subtract the larger number from the smaller number to get the offset distance. At stock Pan-hard Rod Length, the axle is biased toward the Driver side, indicating that the Panhard Rod will need to be shortened.
5. Divide the total offset by2,to split the difference.
6. Loosen the jam nuts on both ends of the Pan-hard Rod.
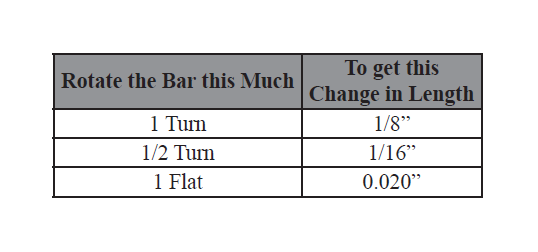
7. Adjust the length by the amount calculated in Step 5. Use a piece of tape or a paint pen to make a reference mark on the Rod. This will help you keep track of the initial orientation of the rod for counting the number of turns.

8. Tighten the jam nuts.
9. Make sure that the rod ends on the Panhard Rod are centered relative to each other. You can check by grabbing the rod by hand and rotating it so that one rod end is centered up. Verify the other end is oriented the same. If it is not, loosen thejam nut on the misoriented rod end. Center the rod end, and retighten the jam nut. Failure to do this step may result in the rod ends binding up at the extremes of suspension travel.
10. Reinstall the Panhard Rod Cover by snapping it into place.
11. Test drive and enjoy. 12. Recheck the jam nuts after 500 miles.
