How to Install Maximum Motorsports Low Profile Front Control Arm Bolts (97-04 All) on your Ford Mustang
Installation Time
30 minutes
Tools Required
- T-55 Torx Socket (MMF-2 Bolt)
- 21mm 1/2” Drive (Stock FCA Bolt)
- 24mm 1/2” Drive for (Stock FCA Nut)
- 15mm socket 3/8” Drive (Steering Rack Bolt)
- 18mm Deep 3/8” Drive (Steering Rack Nut)
- Ratchets (assorted)
- Sockets (assorted)
- Wrenches (assorted)
- Torque Wrench

Shop Parts in this Guide

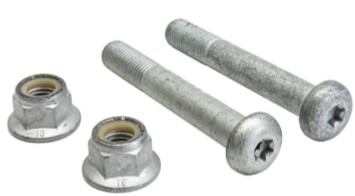
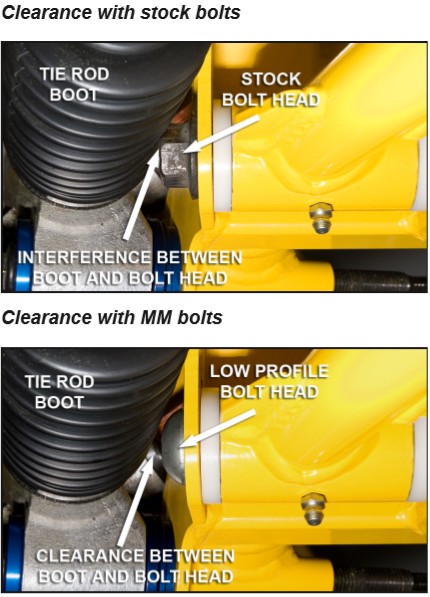
Thank you for purchasing Maximum Motorsports’ MMF-2 Low-Profile Front Control Arm Bolts for 1979-04 Mustangs. The low-profile head of these MM-designed front control arm mounting bolts improves clearance to the rubber steering rack boots when using the MMST-6 Spherical Rack Bushings in conjunction with an MM K-member. The low profile and rounded contour of this bolt head is also less likely to damage the steering rack’s rubber boots when the rack is mounted as far rearward as possible, versus the stock bolt’s taller and sharper-edged hex head. These bolts are included with all current MM K-members for 1979-2004 Mustangs.
These bolts are a direct replacement for the forwarmost front control arm pivot bolts. While new nuts are included in this kit, you may still reuse the stock hex nuts. The bolts are made of high-strength steel, Grade 10.9, and are coated with an OEM quality corrosion inhibitor. Installation requires a T-55 Torx tool.
Please consult the latest MMST-6 Aluminum Spherical Rack Bushing installation instructions (available at www.maximummotorsports.com) when installing these bolts. If you are not currently using the MMST6 rack bushings with your Maximum Motorsports K-member, we highly recommend upgrading to them at this time.
Read all instructions before beginning work. Following instructions in the proper sequence will ensure the best and easiest installation.
This Kit Contains

Instructions
1. With the parking brake engaged and the rear wheels chocked, jack up the front of the car and support it with jack stands.
NOTE: Make sure the front suspension is unloaded.
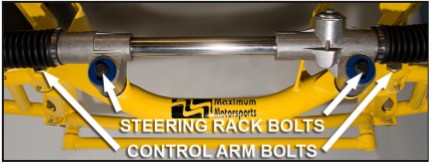
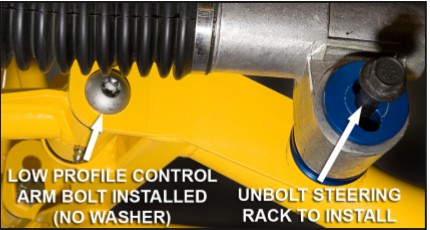
2. In most cases, the steering rack will not allow the forward control arm mounting bolts to be removed completely. If this is the case, the steering rack will need to be unbolted and moved forward and upward in order for the control arm bolt to be removed. Unbolt the steering rack as necessary.
NOTE: Only the mounting bolts need to be removed. Fluid lines, hoses, tie rods, steering shaft, etc. can remain attached.

3. Unbolt and remove the forward bolts connecting the front control arms to the K-member.
4. Insert one of the MM Low-Profile Front Control Arm Mounting Bolts into the K-member and control arm with the rounded bolt head toward the front of the car. Do not use a washer under the head of the bolt.

5. Place the provided hex nut on the MM Low-Profile Front Control Arm Mounting Bolt and tighten by hand to make sure the threads engage properly.
6. Hold the head of the bolt in place with a T-55 Torx socket and tighten the nut.
NOTE: Do NOT turn the Torx head to tighten. Instead, hold the bolt still with the T-55 socket and turn the nut to tighten.
7. Torque the nut to 148 ft-lbs.
8. Repeat the process for the other control arm bolt.
9. Re-attach the steering rack to the K-member. NOTE: Consult the latest MMST-6 Aluminum Steering Rack Bushing or MM K-member installation instructions for the proper rack spacer arrangement. It’s now possible to move the steering rack further rearward to increase Ackerman steering geometry when using any of the MM Forward-Offset Front Control Arms.
10. Torque the steering rack mounting bolts to 55 ftlbs.
NOTE: Refer to the latest MMST-6 Aluminum Steering Rack Bushing installation instructions (www.maximummotorsports.com) for the proper rack bushing alignment procedure before torquing the bolts.
11. Lower the car to the ground.
NOTE: If you chose to move the steering rack rearward using the MM Forward-Offset Front Control Arms, the toe must be reset to proper spec.
12. After 500 miles, recheck the bolt torques and tighten if necessary.


