Guaranteed Free Delivery by 12/24! available on most items - Details
Mustang Arm Rest Cover ('05-'09) - Installation Instructions
Installation Time
60 minutes
Tools Required
- Phillips Head Screwdriver
- Staple Gun
- 1/4 staples
- Scissors

Shop Parts in this Guide
Installation
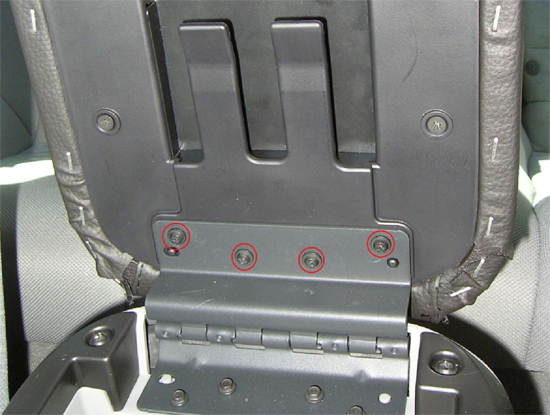
1. Open your arm rest. Using your Phillips screwdriver, remove the 4 screws located at the bottom of the arm rest to remove it from your Mustang. The screws to be removed are circled in red in the picture below.
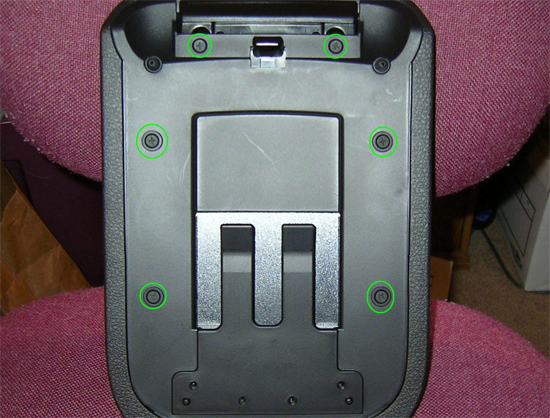
2. After removing the arm rest from your Mustang, place it on a flat table. You will now have to remove the inner plastic casing so that your arm rest cover will be able to have a nice seal and give off that professional look to it. Below is a picture of the plastic casing along with the six screws that need to be removed, using the Phillips screwdriver. The screws that need to be removed are circled in bright green.
3. After removing the inner plastic casing, it is now time to attach your new arm rest cover. The most important part in this step is to make sure that your new arm rest is aligned in both the vertical and horizontal directions, and that it is also very, very tight, because you do not want to have any bubbles or wrinkles in your finished product. So first off, position your new arm rest cover face down on the table and place the stock arm rest on top of it, like in the picture below.
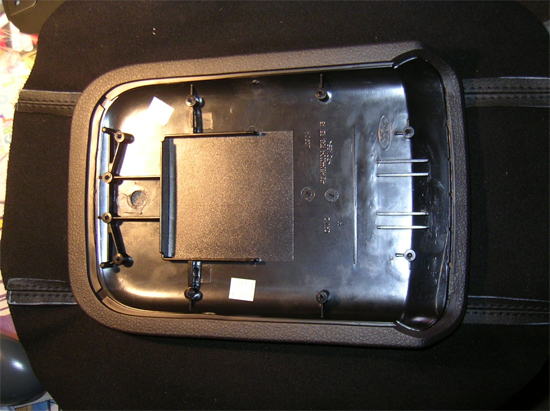
4. A good guide for you to use is the leather stitching on your arm rest cover. If both are aligned evenly, both at the top and bottom of the arm rest, you are in good shape and your arm rest cover will be positioned fine.
5. Now that you have your arm rest cover correctly aligned, it is now time to attach the cover to the existing arm rest. This step is the most critical because this will determine the final appearance of your cover. The first step is to fold the left and right sides of the cover over onto to actual arm rest.
6. You then should cut four holes using your scissors, so that the screw holes will be able to pop through. Look at the picture below to see a visual explanation of this step.
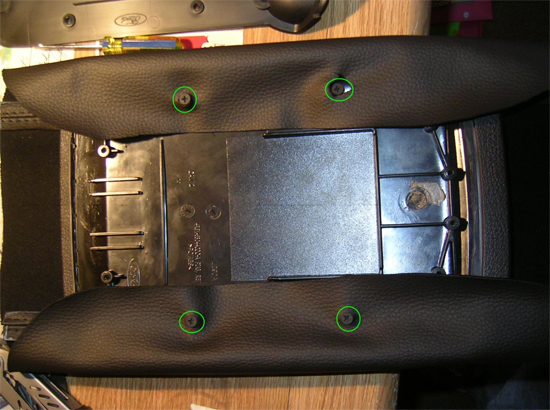
7. After you make the four holes for the screws as pictured above, take your staple gun, along with 1/4 ” staples, and secure the arm rest cover to the actual arm rest. The best anchoring spot for the staples is the lip that overhangs from the top of the original cover. That seemed to work the best for me because of the much softer material. As you move further down the line as you anchor the staples, be sure to continue to pull the leather cover nice and tight, because you do not want any bubbles or wrinkles in your final product.
8. Now that you have both the left and right sides of your arm rest completed and attached, it’s now time to secure the top and bottom of the arm rest cover. Remember to pull firmly on the leather as you begin to staple and work from the middle towards the outside edges.
9. As you get closer to the edges, the corners become very tricky. Take you scissors and cut each corner of the leather diagonally only one time. This will allow you to secure the top and bottom edges and then be able to secure the remaining four edges to the arm rest and give you that professionally finished look that we all desire.
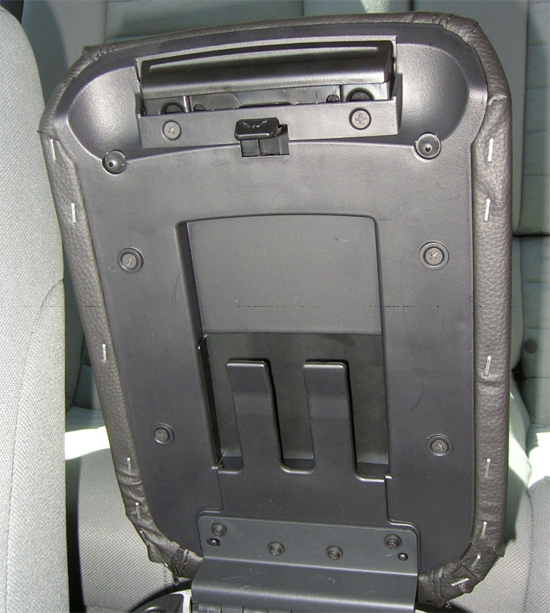
10. After all of your edges are stapled and secured to the existing arm rest, put the plastic covering back on and screw into place. Because of those holes we had made in the beginning, the plastic covering will go on very easily.
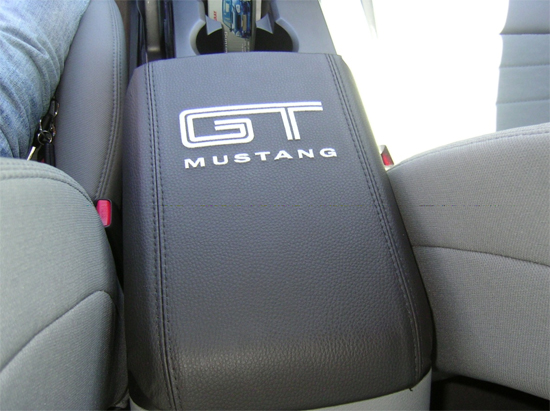
11. Finally, attach the finished product back onto your Mustang’s console and "Voila", you now have one very beautiful looking console!
Installation instructions provided by AmericanMuscle customer Joe Forrest 3.25.09
