
How to Install Optima Yellow Top Performance Battery on your Mustang
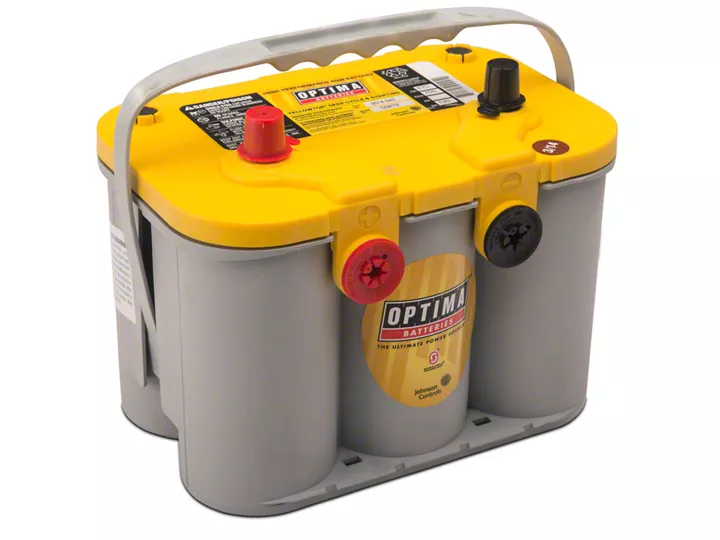
Shop Parts in this Guide
Congratulations!
You now own one of the world's most sophisticated batteries produced by the leaders in battery power technology. Optima® batteries are ultra high performance AGM products with advanced Spiralcell® Technology that can outperform all other lead-acid batteries.
Benefits of Optima Spiralcell Technology:
• High power density
• Rapid recharge capability
• Maintenance-free
• Higher, more consistent voltage under load
• Increased vibration resistance for longer life
• NONSPILLABLE classification
Optima Facts
• Optima batteries are high performance AGM, not gel
• You can use a high performance alternator with an Optima battery
• You can charge an Optima battery
• You can jump start a car with an Optima battery
What is the difference Between RedTop, YellowTop and BlueTop batteries?
RedTop: Use this for normal engine starting where an alternator immediately monitors the state of charge and provides energy to the battery whenever it is needed. This would describe most stock vehicles.
• Automotive & RV under-hood starting
• Heavy equipment where starting is primary function
• Diesel powered vehicles with no aftermarket electronics
YellowTop: Use this when electrical loads are higher than average, or when the discharge cycle is more than typical engine starting, such as vehicles with multiple electronic accessories and vehicles without alternators. This can also include vehicles with a lot of factory electronics, such as a minivan with power sliding doors and a DVD player.
• Racing vehicles without a charging system (alternator or generator)
• Dedicated drag racing vehicles
• Diesel powered vehicles with aftermarket electronics
• Car audio/video applications exceeding 250 watts over the OE system
• Vehicles or heavy equipment with inverters, hydraulics, winches or other accessories
• Electric vehicles
BlueTop: The BlueTop starting battery (dark gray case) is to be used when a dedicated starting battery is required and it should never be used for cycling duty. The dual purpose BlueTop (light gray case) can be used for both starting and deep cycling; it is a true deep cycle battery with extremely high cranking power.
• Trolling motors, marine applications with heavy electrical accessories, and RVs should use a Dual Purpose (Starting and Deep Cycle) BlueTop
• Use a BlueTop starting battery for marine applications and RVs when the battery's only function is engine starting
Note: The difference between BlueTop and YellowTop deep cycle batteries is that BlueTop batteries have both automotive (SAE) posts and threaded posts, while YellowTops (other than D31T) only have SAE posts.
Charging Recommendations
An Optima is an AGM battery, not a gel battery or regular flooded acid battery.
Most modern battery chargers, including OPTIMA Chargers, have a built-in AGM charge setting, which should be used for your Optima. If purchasing a new battery charger, make sure it has AGM compatibility or a separate AGM setting. Do not use gel or gel/AGM settings, as this will not fully charge an Optima and can damage it over time.
Repeatedly charging at high current levels can damage your battery. For best results, use the following recommendations:
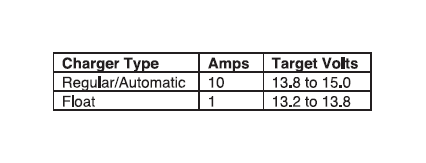
How Long to Charge
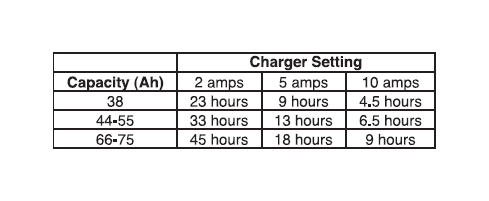
If you have an automatic charger, let it run until the charger indicates the process is complete. If you have a manual charger, estimate charging time for a completely discharged battery (11.2v) by multiplying the capacity (amp hours or Ah) by 1.2 for a rough estimate of charging hours. If your battery is not completely discharged the time will be less.
Deeply Discharged Battery
If an Optima is deeply discharged (below 10.5 volts) most basic chargers will not supply a charge. OPTIMA Chargers are designed specifically to recover batteries discharged as low as 1.25v. To charge the battery, you can wire a 2nd fully charged automotive battery (12V ) to the discharged AGM in parallel ( to and - to -). Then hook up the charger to the discharged battery, setting the charger at 10 amps. Leave for 2 hours, monitoring periodically. When the discharged battery reaches 10.5 volts or above, remove the 2nd battery and continue charging the AGM until fully charged. In most cases the AGM battery will be recovered. It's okay for the AGM battery to get slightly warm during the charging process. Hot to the touch means there's a short and the process should be discontinued. Have your alternator checked immediately.
What are storage recommendations for Optima Batteries?
The most important consideration when storing any battery is to make sure the voltage never drops below 12.4 volts. We recommend using a type of "battery maintainer" - a device that will monitor your battery and keep it at full potential during storage.
There are 2 types of maintenance chargers:
1) Traditional "Float" chargers, which provide constant voltage with tapering amperage to the battery even when it is fully charged. For float charging we recommend 1 amp max, 13.2-13.8v. OK but not preferred
2) Fully automatic "multi stage or multi step" chargers, which monitor the battery and charge it as necessary. Some of these multi step chargers, such as OPTIMA Chargers, are also capable of working well as a battery charger.
If it is not possible to use a maintenance charger, disconnect the battery from the vehicle during storage to prevent the vehicle from discharging the battery. Always provide a full charge with a battery charger prior to storage and then check the battery voltage every 3-6 months and charge if it falls below 12.4v.
Also, when possible, store your battery in a cool, dry location.
Fitments
Direct fit battery recommendations can be found at www.optimabatteries.com/battery_selector/. If an exact fit size is not listed, measure the dimensions of your existing stock battery to see if there's an Optima that will fit the battery compartment.
Detailed dimensions and specifications can be found at www.optimabatteries.com/optima_products/
If using an Optima battery in a custom application, consider the following:
• Hood Clearance — at least 3/4" clearance between terminals tops and underside of hood
• Trunk/Interior Mounting — If battery is mounted inside passenger compartment or trunk, it must be vented to outside of vehicle.
• Side Terminals —If using a dual terminal battery in a vehicle that uses the top terminals, ensure that side terminals cannot come into contact with metal. Keep post protectors on terminals not in use.
• Battery Modifications — Cutting, drilling, trimming or otherwise modifying the battery may present a safety hazard and voids the warranty
• Mounting — Battery must be securely mounted. Terminals are not intended to be used to secure battery.
• Heat - Protect the battery from any high heat source such as a turbocharger
Troubleshooting battery/electrical issues
- Why is my battery dead?
Fully charged starting batteries should measure —12.8v. Deep cycle batteries should measure —13.1v. When the engine is running this measurement should be 13.7-14.7v. If you don't have a multimeter you can test this by starting the car and turning on the headlights. If they are dim, it indicates the lights are running off the battery and that little or no juice is being produced by the alternator. If the lights get brighter as you rev the engine, it means the alternator is producing some current, but may not be producing enough at idle to keep the battery properly charged. If the lights have normal brightness and don't change intensity as the engine is revved, your charging system is probably functioning normally.
If this checks out okay, you should check whether or not the battery is holding a charge, or if something on the vehicle is discharging the battery.
There are 3 likely scenarios to explain the problems you're having:
1) A high parasitic draw ("key off" load).This can quickly discharge a battery and decrease its service life. This may be caused by a trunk light, cigarette lighter, clock/radio, alarm system or any other electrical device. Current drain on the battery can be checked with an ammeter. With the ignition of, disconnect one of the battery cables. Connect one ammeter lead to the battery and the other to the cable. The normal current drain on most vehicles should be about 25 milliamps or less. If the key-off drain exceeds 100 milliamps, there's an electrical problem that requires further diagnosis. If you don't want to take your car to a mechanic, the easiest way to isolate the problem is to pull one fuse at a time from the fuse panel until the ammeter reading drops.
2) A problem with your battery is causing it to not hold a charge. To check this, wait 12-24 hours after charging to the full voltage, keep battery out of the vehicle and measure its voltage (another faster but less preferable way to do this is to turn on the high beam headlights for 15 seconds, turn them off, wait 5-10 minutes, then check the voltage). If you measure the voltage of the battery the next day, week, or even a month later, the voltage should be close to the max voltages listed above. If the voltage holds when not installed in your vehicle, but drops when it is in your vehicle, see #1 above.
3) The battery was somehow discharged, and your maintenance charger is not able to properly charge your deeply discharged battery. Please see the directions for charging a deeply discharged battery
Connecting Multiple Batteries in Parallel
If your battery application requires more starting power or reserve capacity than one Optima battery can provide, you can install multiple batteries in parallel ( to and — to —). Each time you add a battery in parallel you increase the CCA and reserve capacity while voltage remains the same.
Suggestions for connecting batteries in parallel:
• Use batteries of identical make, model, and age
Make sure cable gauge is sufficient enough to handle the higher current
flow
• Prevent cables from shorting
• Use only high quality connectors and clean all contacts prior to installation
• Periodically check all connections to ensure a firm connection
• Contact your automotive service center if you are unsure of how to handle these procedures
• Connect cable to first battery and - cable to last battery to more evenly distribute current flow.
Battery Installation Tips
• Check adapter requirements for your application
• Check package to see if the required adapter is included
• If adapter is not included call 1-888-8OPTIMA to request the proper adapter
• Install battery using proper adapter, following diagrams in this guide
• Check mounting surface for objects or protrusions that could cause damage or wear to the case or cover
• Ensure battery is properly secured to prevent movement or vibration wear. Do not over-tighten the hold down bracket, as this can damage the plastic case and cover
• Use top terminals for accessory and vehicle starting applications. Only use battery side terminals for automobile starting applications
• Never connect a winch to the side terminals
• Replace cables and connectors that show signs of corrosion, rust or other damage
• Do not lift or handle battery by the terminals
• Do not over-tighten terminal bolts; the following values are recommended:
• SAE (tapered) automotive terminal: 50-70 inch-lb.
• Side terminal (3/89 nut): 70-90 inch-lb.
• Threaded stud terminal: 120-180 inch-lb.
• The hold down should be tightened so that it is snug.
• Top bar or top frame hold down: 30-50 inch-lb.
• Bottom recess hold down: 60-80 inch-lb.
• Bottom ledge type holddown: 70-90 inch-lb.
Warranty:
For the complete Optima Battery Limited Warranty please visit www.optimabatteries.com.
Here are some important items to remember:
• You must retain your original receipt for proper issuance of credit. Claims without proper identification of purchase date are not valid. Warranty service is provided by your original retailer. To evaluate your battery for warranty, take the battery along with your original receipt to the place of purchase for testing. If you have any questions please contact the OPTIMA Customer Service Center at 888-8OPTIMA (888-867-8462)
OPTIMA® BATTERIES ADAPTER INSTRUCTIONS (FOR CONSUMER VEHICLE USE)
Your OPTIMA battery may or may not include an adapter kit. If induded, you may need one, some or none depending on your application. However, you must remove all top adapters prior to beginning installation. See instructions below to match your application with the correct adapters. Always check hood clearance.
Group 34, 34/78 and 78 (RedTop and YellowTop)
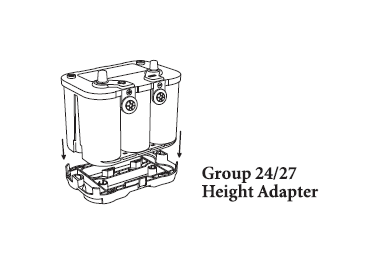
Use the height adapter to accommodate installations where a group 24 or group 27 is required. Always check for height (hood clearance) before installation.
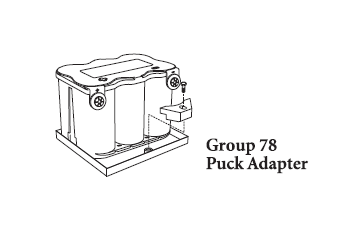
The puck adapter is required for most GM installations where the side terminals are used.
Position the puck against the center cylinder of the battery and bolt to the battery tray as shown.
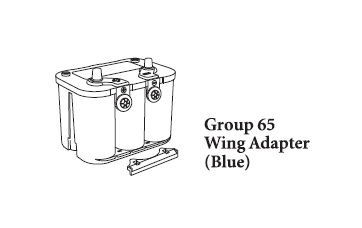
The wing adapters may be needed for some Ford, Lincoln, or Mercury applications (when replacing a group 65).
Attach the wing adapters by snapping into the openings on both sides of the battery base.

The wing adapter may be needed for some applications when replacing a group 48 or DIN battery with a side holddown.
Attach the wing adapter by snapping it into the battery base on the side opposite the holddown. Some vehicles will use the group 78 puck adapter with the group 48 adapter.
Group 35 and 75/25 (RedTop and YellowTop)
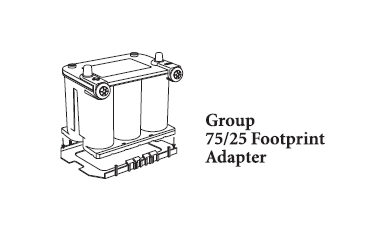
The footprint adapter is needed for some Ford and Mercury applications. Check hood clearance.
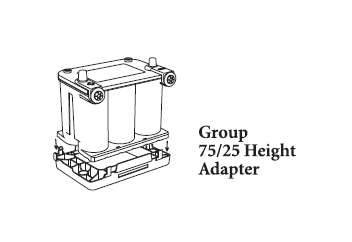
The height adapter, which is located on the top of the battery may need to be applied to the bottom of the battery. This depends on the style of the vehide hold down of the battery you are replacing. Check hood clearance.

