Guaranteed Free Delivery by 12/24! available on most items - Details
How to Install a PA Performance Replacement High Torque Starter Solenoid on your Mustang
Installation Time
2 hours
Tools Required
- 2x Jack Stands or Ramps
- 8mm, 10mm, 13mm sockets (1/4" or 3/8" drive)
- Assorted 1/4" or 3/8" socket extensions
- 1/4" or 3/8" u-joints or wobble extensions
- Phillips Head Screwdriver
- Torque Wrench

Shop Parts in this Guide
Installation
Introduction:
If you are having issues with your starter related to your solenoid, the PA Performance High Torque Starter Solenoid offers a great solution at an incredible price. With a little bit of time and standard tools, you can replace your starter’s dead solenoid for considerably less than buying a brand new starter. The installation below is on an 2005 Mustang GT however the same general steps should be applicable and can be followed for most other models.
1. Start by jacking the car up from the front at your Mustang's appropriate lifting point. This will vary by model and year. You can jack the rear up as well if additional clearance is needed however it may not be required.
2. Disconnect the negative battery cable from the battery using an 8mm socket and place the cable off to the side.
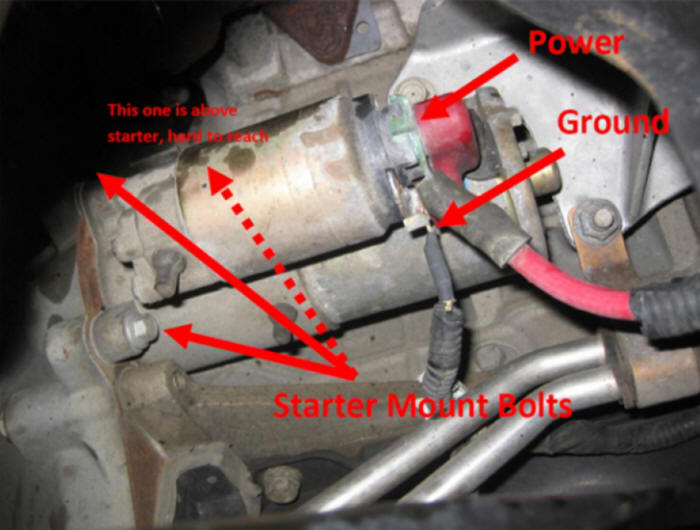
3. Move under the vehicle and locate the starter. On a ‘05 Mustang GT, it is on the passenger side just behind the engine K-member.
4. Pop the red cap off the starter power wire and remove the nut using a 13mm socket or wrench. Remove the ignition relay wire using a 10mm socket or wrench. Note that I mislabeled it as “Ground” in the photo below.

5. Remove the 3 starter mounting bolts using a 10mm socket (shown in photo above). The bottom and side bolts are not too difficult to reach, however the top bolt can be tedious to remove. I’ve found that placing a u-joint or wobble extension on the socket attached to a couple long extension helps because you can then reach up from in front of the K-member and guide the socket onto the bolt. This provides the most room to rotate the ratchet while being able to maintain a fairly good angle and pressure, keeping the socket on the bolt.
6. Once all 3 bolts are removed, drop the starter down and slide it back to remove it. It may take some rotating to get it to come out but you do not need to loosen or remove anything else.
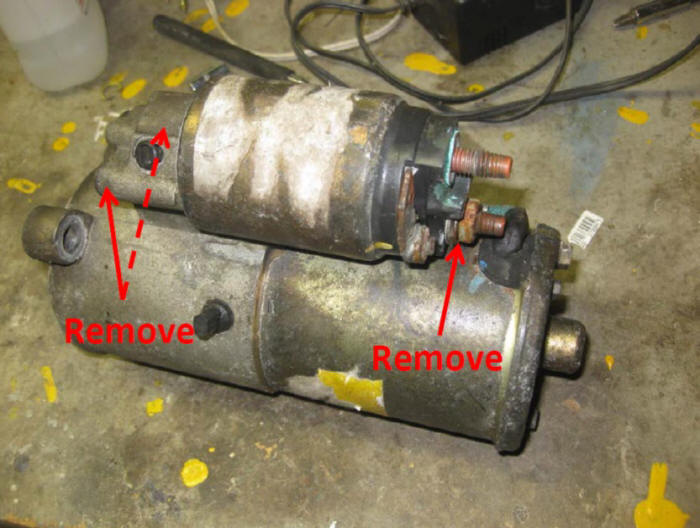
7. Place the starter on a work surface. Remove the 3rd and final nut from the solenoid that holds the wire strap down using a 13mm socket.

8. Using a Phillips head screwdriver, remove the two screws that hold the base of the solenoid to the starter (shown in photo above).
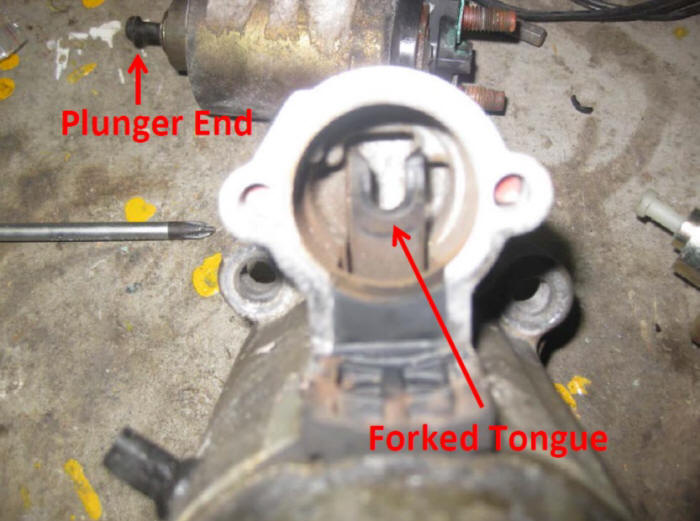
9. The plunger at the end of the solenoid has a “T” on the end of it. It slides into a forked tongue inside the starter housing. To remove the old solenoid, tilt the plunger end up so that the plunger disengages from the tongue, and then pull it away from the housing.

10. A cardboard gasket is provided with the kit. After speaking with PA Performance, they said that using the gasket is optional depending on the application. Since my stock solenoid did not have a gasket between it and the starter housing, I elected not to use it. If you decide to use it, place the gasket on the plunger end of the new solenoid.
11. Install the new solenoid by reversing the removal procedure, sliding the plunger over the tongue and then straighten it so it sits parallel to the starter housing. Make sure to orientate the terminals as they were with the stock solenoid. Tighten down the two Phillips head screws to secure the solenoid to the housing,
12. If you haven’t already, remove the new nuts and lock washers from the new solenoid. Slide the wire strap from the starter housing over the respective terminal followed by the lock washer, then the nut and tighten securely.
13. At this point, the starter is ready to be re-installed. Return under the vehicle and slide the starter back in to position. Reinstall the 3 starter bolts. Finger-tighten each bolt initially. Make sure the starter fully engages the flywheel and sits flush against the housing. You may need to wiggle the starter back and forth a bit to get it to mesh and fully seat. Once it looks good and is sitting flush, tighten each bolt to 18 lb-ft.
14. Re-attach the starter solenoid power and ignition relay wires followed by the lock washers, and then tighten the nuts securely.
15. Once that is complete, the starter should be tested before finishing up. Clean up anything from underneath the vehicle. Back on top, re-attach the negative battery cable then hop in the driver’s seat and give the motor a quick crank to make sure everything is reconnected properly. If you do not hear the starter click and engage, remove the negative battery cable again and check your work.
16. If everything checks out with the starter, jack the car up and remove the jack stands then lower the vehicle back down to the ground. Enjoy!
Installation Instruction written by American Muscle customer Jonathan Glennie 1/08/13

