How to install a Pypes Violator Catback Exhaust on your 1999-2004 Cobra Mustang

Shop Parts in this Guide
Installation

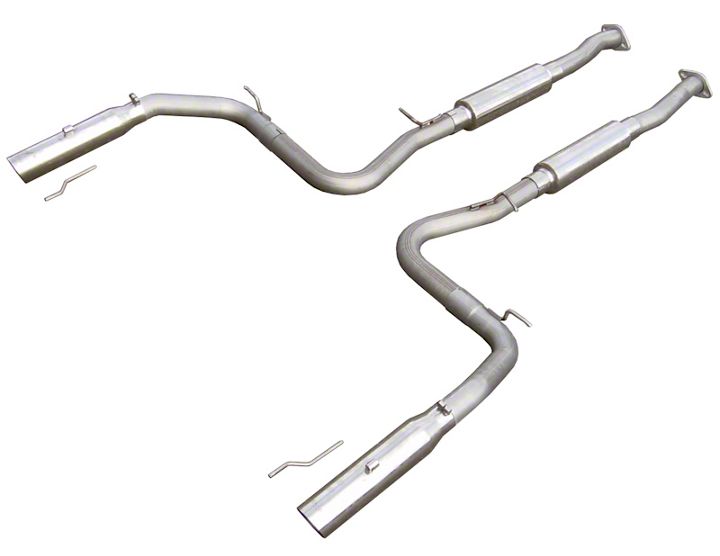
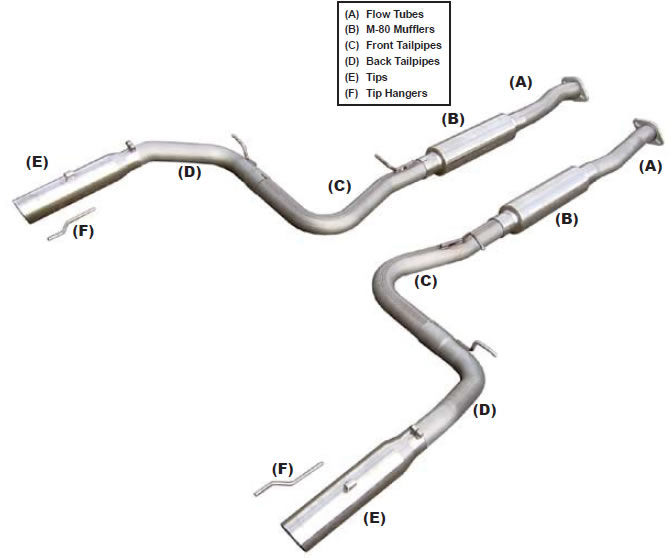
Thanks again for purchasing your new 409 stainless steel Pypes Performance Exhaust Ford Mustang cat–back system. Please be sure to confirm all the components in the kit were received in your shipment before beginning installation. These kits will include (2) M80 mufflers, (4) tailpipes marked LF (driver front) RF (passenger front) LR (drivers rear) and RR (passenger rear), (2) tips, (4) tip hangers, (2) flow tubes, (2) flow tube flanges, 4) clamps (2) band clamps and (1) bolt kit. If you find any component missing, please contact our office at 800-421-3890 for replacement. Installation of this kit will require a few simple tools; jack stands, 9/16” wrench, deep socket w/ ratchet, 1/2” wrench, hex keys and a saws-all. For a quicker and tighter installation, air tools are recommended. Technical assistance is available both online at www.pypesexhaust.com or 800-421-3890.
1. Begin by placing the vehicle on a lift or four jack stands at maximum height. This will aid in an easier installation.
2. Unbolt the factory cat-back from the rear of your hpipe or x-pipe. If you still have a factory system on the car, you may need to cut the mufflers out of the system using a hack saw or a saws-all. Finish by removing the tailpipes from the rubber hangers. Be sure to check the rubber hanger to see if they are in good shape. Old stretched out rubber hangers will only make your new system hang and fit poorly. If new hangers are required, please contact your local Ford dealer, or auto parts store for replacements. Pypes Exhaust only offers the rear tailpipe hangers (TPHV6).
3. Now it’s time to install your new cat-back. Begin with the tailpipes first. Assemble the corresponding tailpipe sections using the supplied band clamps. Next mount the tailpipe wire forms into the factory rubber mounts, slide the tips on to the tailpipes. Next, install the tip hangers through the boss on the tip and slide the other end through the rear hanger. Make sure to leave the clamping bolt and set screw loose until the entire kit is installed. A small amount of grease or liquid soap will allow the hanger to slide through easier.
4. Next install the mufflers on to the tailpipes. Again, a small amount of grease in the muffler inlet and outlet will allow for easy rotation when adjusting for the perfect fit.
5. Next, install the flow tube flanges on to the flow tubes and slide them into the inlets of each muffler. A small amount of grease will also help here too. The shorter flow tube belongs on the driver side of the vehicle. Once the flow tubes are in place, you can install the bolts to connect them to your h-pipe or x-pipe. If you vehicle still has a factory h-pipe, you will just re-use the factory bolts and nuts as the bolt is an integral part of the h-pipe. Snug the hardware just enough to allow rotation for adjustment. Now install the four clamps on the muffler necks, snug the nuts, and DON’T TIGHTEN. Once these clamps are tightened you will not be able to adjust any of the components.
6. Last, make all your final adjustments for fit. Make sure the mufflers are parallel to the ground. Rotate the flow tubes for the best fit. Also, make sure the tailpipes/tips are positioned in the correct location under/in the rear bumper. Once you are satisfied with the fit, tighten all six clamps, tip clamp, hanger set screw (a small weld tack is recommended where the tip hanger slides into the tip boss to maintain alignment) and the connection points at the h-pipe. Air tools will allow the tightest clamping possible. Now it’s time to fire up your Mustang. Remember to listen and check for exhaust leaks. Also, periodically check all connections points as they may come loose.
Now it’s time to fire up that muscle car and enjoy your new Pypes Performance Exhaust.

