Top Sellers in 10-15 Camaro
How to Install QA1 Adjustable Rear Shock on your Mustang
Installation Time
2 hours
Tools Required
- Floor Jack
- Jack Stands
- Wrenches (SAE and/or Metric)
- Socket Set (SAE and/or Metric)
- Snap Ring Pliers
- Spanner Wrench Set (QA1 P/N T114W or T115W)
- Permatex® Anti-Seize Lubricant
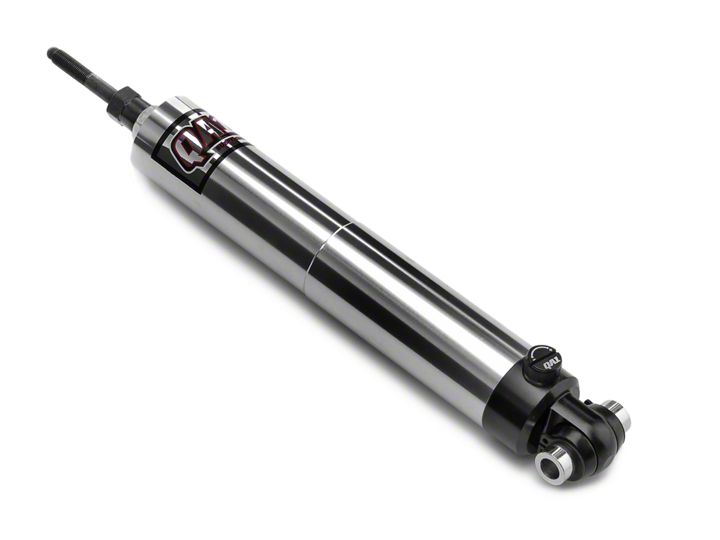
Shop Parts in this Guide
READ ALL INSTRUCTIONS CAREFULLY AND THOROUGHLY PRIOR TO STARTING INSTALLATION. PRODUCTS THAT HAVE BEEN INSTALLED ARE NOT ELIGIBLE FOR RETURN. USE PROPER JACKING LOCATIONS. DEATH OR SERIOUS INJURY CAN RESULT IF INSTRUCTIONS ARE NOT CORRECTLY FOLLOWED. A QUALITY CHASSIS MANUAL, AVAILABLE AT YOUR LOCAL PARTS STORE, MAY ALSO AID IN YOUR INSTALLATION.
• DISCLAIMER / WARRANTY •
QA1 WARRANTS THAT THE PRODUCTS WILL BE FREE FROM DEFECTS IN MATERIAL AND WORKMANSHIP FOR ONE YEAR FROM DATE OF SALE TO THE ORIGINAL PURCHASER. QA1 MAKES NO OTHER WARRANTY OF ANY KIND, EXPRESSED OR IMPLIED. QA1 SHALL HAVE NO OBLIGATION UNDER THE FOREGOING WARRANTY WHERE THE DEFECT IS THE RESULT OF IMPROPER OR ABNORMAL USE, YOUR NEGLIGENCE, VEHICLE ACCIDENT, IMPROPER OR INCORRECT INSTALLATION OR MAINTENANCE, NOR WHEN THE PRODUCT HAS BEEN REPAIRED OR ALTERED IN ANY WAY. QA1’S LIABILITY IN THE CASE OF DEFECTIVE PRODUCTS SUBJECT TO THE FOREGOING WARRANTY SHALL BE LIMITED TO THE REPAIR OR REPLACEMENT, AT QA1’S OPTION, OF THE DEFECTIVE PRODUCTS.
THE USER UNDERSTANDS AND RECOGNIZES THAT RACING PARTS, SPECIALIZED STREET ROD EQUIPMENT, AND ALL PARTS AND SERVICES SOLD BY QA1 ARE EXPOSED TO MANY AND VARIED CONDITIONS DUE TO THE MANNER IN WHICH THEY ARE INSTALLED AND USED. QA1 SHALL BEAR NO LIABILITY FOR ANY LOSS, DAMAGE OR INJURY, EITHER TO A PERSON OR TO PROPERTY, RESULTING FROM THE INSTALLATION, DIRECT OR INDIRECT USE OF ANY QA1 PRODUCTS OR INABILITY BY THE BUYER TO DETERMINE PROPER USE OR APPLICATION OF QA1 PRODUCTS. WITH THE EXCEPTION OF THE LIMITED LIABILITY WARRANTY SET FORTH ABOVE, QA1 SHALL NOT BE LIABLE FOR ANY CLAIMS, DEMANDS, INJURIES, DAMAGES, ACTIONS, OR CAUSES OF ACTION WHATSOEVER TO BUYER ARISING OUT OF OR CONNECTED WITH THE USE OF ANY QA1 PRODUCTS. MOTORSPORTS ARE DANGEROUS; AS SUCH, NO WARRANTY OR REPRESENTATION IS MADE AS TO THE PRODUCT’S ABILITY TO PROTECT THE USER FROM INJURY OR DEATH. THE USER ASSUMES THAT RISK!
DO NOT VOID YOUR WARRANTY!
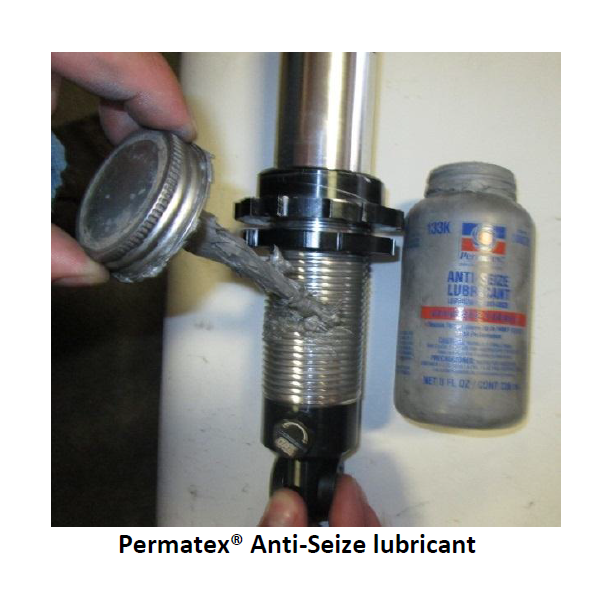
Permatex® Anti-Seize Lubricant should be used on coil-over threads to prevent galling. Failure to lubricate the coil-over threads with Anti-Seize prior to making ride height adjustments will cause damage to your shock absorber and will void any warranty. All ride height adjustments must be made with the vehicle weight completely unloaded from the suspension. Please call QA1 Technical Support with any questions.
Stocker Star Stock Mount shocks
QA1 Stocker Star shocks are designed to bolt into the factory shock mounting location on stock ride height vehicles. Shock length should be verified if the ride height has been altered to ensure adequate shock travel. Refer to a repair manual for shock installation for your specific vehicle. Note: The shock openings in the factory lower control arms may need to be enlarged on certain applications to fit QA1 adjustable shocks (1967-1969 Camaro/ Firebird and 1968-1974 Nova).
Shocks with Spherical Bearing Mounts
Using a snap ring pliers, install a snap ring into one of the grooves in each shock eye followed by the spherical bearing and the other snap ring. If pressing the bearing in, only press on the race of the bearing.
Coil-Over Shock Assembly
1. Thread the aluminum lock nut (shoulder up) and the spring seat adjuster nut (shoulder up) down to the last thread - NO FURTHER. Now is a good time to lubricate the threads of the shock with Permatex® Anti-Seize lubricant.
2. QA1 highly recommends using Thrust Bearing Kit (QA1 P/N 7888-109) for ease of adjustment. If the thrust bearing kit is used, coat both sides of the washers with Permatex® Anti-Seize lubricant. Install the stainless steel spring seat washer, followed by the bearing and finally, the second washer.
3. If the thrust bearing kit is not used, coat one side of the stainless steel spring seat washer with Permatex® Anti-Seize lubricant. Place the lubricated side of the washer down on the spring seat.
4. With the piston rod fully extended, slide the spring over the shock down to the spring seat adjuster and install the spring cap. Note: xx401 and xx402 shock require 10” springs to be compressed about ½” for installation.
5. Make all ride height changes with the car off the ground and the suspension unloaded. Apply Permatex® Anti-Seize lubricant before making any adjustments to the ride height. Once you have the ride height set, tighten the lock nut against the spring seat adjuster using spanner wrench part number T114W or T115W.
Note: A four wheel alignment should be performed by a qualified alignment shop after any changes to the suspension system.
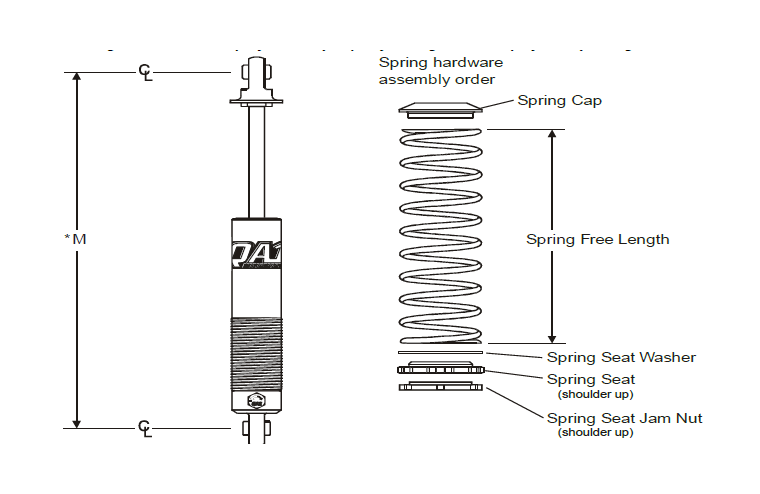
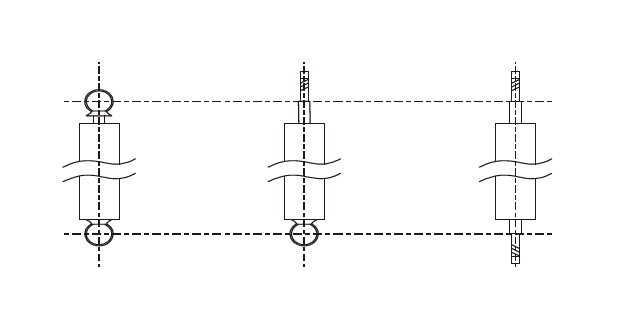
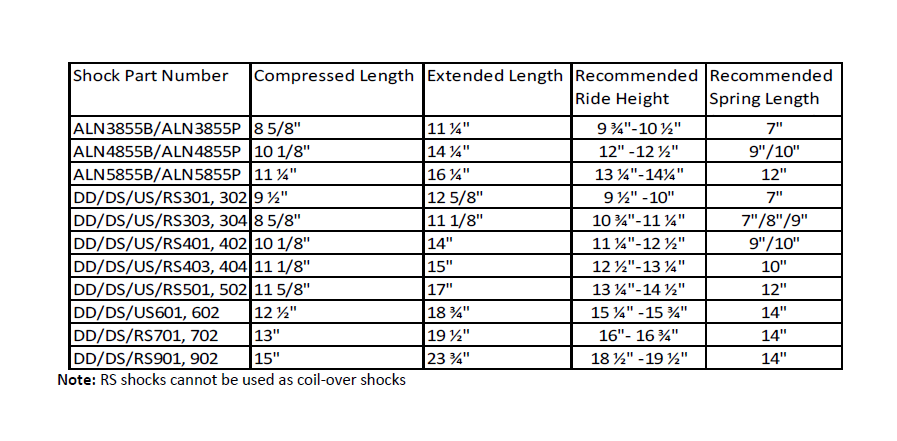
*M - Proper measurement of shock lengths, extended, compressed and shock ride height are taken from the center of the top shock mount to the center of the bottom shock mount.
• For proper measurement of other style shock mountings see diagram below.
Shock Valving Adjustments
QA1 shocks have 18 damping settings per knob. There are 6 clicks per revolution of each knob, and each knob has 3 complete revolutions. The knob set fully counter clockwise is the softest setting - start your adjustments from that point. Recommended base settings to begin testing with are as follows:


