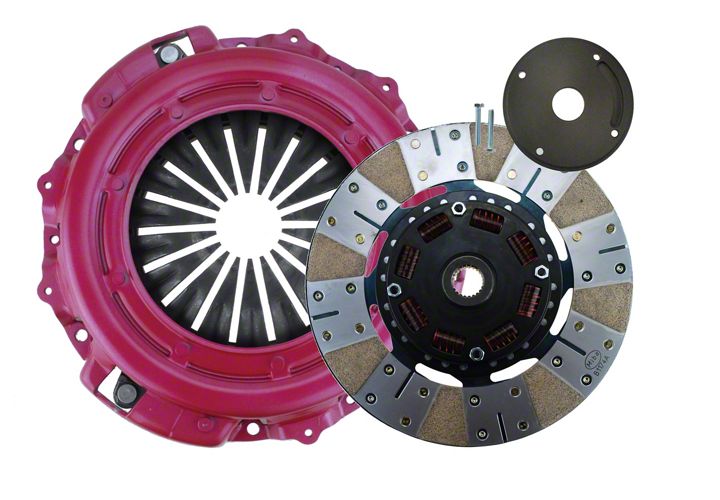
How to Install a RAM Powergrip Clutch on your 2011-2014 Mustang V6

Shop Parts in this Guide
GENERAL CLUTCH INSTRUCTIONS
Congratulations on your purchase of a RAM clutch assembly. You can be assured you have purchased the finest clutch available and with care in use and installation your clutch will perform well over the service life.
It is impossible to provide accurate installation instructions for every vehicle in this instruction sheet. Therefore, we provide key tips and procedures that will help you install and use your clutch properly. If you are performing this install yourself and are unfamiliar with disassembly/reassembly on your particular vehicle, we strongly advise obtaining a factory service manual for your vehicle, or seeking the installation help of a professional.
While RAM technical support will do all they can to help you with an installation, it is impossible for us to know and advise on every specific procedure for a given vehicle. Therefore technical advice must be limited to verifying the components and operation of the clutch itself.
SAFETY TIPS
ALWAYS use jackstands or a lift to support the vehicle you are working on.
Transmission components are very heavy and require the use of a transmission jack for removal/installation of these parts. Failure to do this could cause personal injury, damage to the clutch disc splines during installation, or bend the disc carrier and causing disengagement problems.
RAM always recommends the use of a safety bellhousing with any performance clutch installation.
DISASSEMBLY/PRE-INSTALLATION TIPS
Determine the cause of failure on the original clutch before installing the new one:
• Was the release bearing riding against the fingers of the pressure plate?
• Did the pressure plate warp? Is it hot spotted? Why?
• Was a mistake made on the previous installation?
• Is there a problem with the release mechanism?
Knowing the original cause of failure and correcting it will help avoid having the same problem with your new clutch install.
• Bellhousing alignment is critical to proper clutch operation. If you are using an aftermarket bellhousing, it must be dial indicated to the crankshaft center line and checked for squareness top-to-bottom and side-to-side. Check with your bellhousing manufacturer for specifics on performing this operation. Failure to do so could result in non-release or damage to your clutch system.
• The flywheel must be resurfaced or replaced before installing a new clutch assembly. In addition, run out should be checked on the flywheel once it is reinstalled to insure proper release of the clutch and minimal chatter on takeoff.
• On mechanical linkages, check the release fork and pivot ball, z-bar, and all bushings for excessive wear. Worn components should be replaced now to avoid problems later that could cause the clutch not to release properly.
• Check cable systems for stretch or fraying of the cable, or excessive wear in the pivot ball and fork. Many Ford applications require using an adjustable cable and quadrant for proper release of the clutch system.
• Check hydraulic systems for leakage, pinched lines, or overheated fluid. Fluid that appears brownish or black has been hot and should be flushed and replaced with new fluid.
• Applications that use headers or generate increased underhood temperatures should use heat resistant sleeving on all hydraulic lines.
INSTALLATION TIPS
Inspect your new clutch parts. Verify that the bolt pattern on your new pressure plate matches the old one. Slide the clutch disc onto the input shaft of the transmission and check for proper fit. Remove any burrs that may exist on the spline. If the disc is too tight on the splines, it will be difficult to install the transmission and could cause bending of the clutch disc.
When installing the pressure plate and disc on the flywheel, NEVER use power or air tools. Install the bolts, tightening in a star pattern, one turn at a time, until the cover snugs to the flywheel. Then torque the bolts in place. Using air tools will cause the flanges of the pressure plate to distort, which will lead to uneven finger heights and erratic or no release. Torque 5/16" bolts to 25 ft/lbs, 3/8" bolts to 35 ft/lbs, going around two times in the star pattern.
Proper orientation of the clutch disc is critical. Most clutch discs mount with the hub side (the side with the retainer and hub assembly facing outward) towards the transmission. A few cases install the disc in the opposite position. This includes 1993-97 F-body Camaro and Firebird. Installing the disc backwards will cause non-release and ruin the disc by bending it. Note the mounting position of the old disc when performing the disassembly!
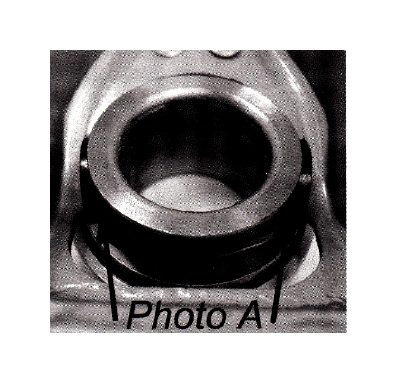
The clutch release bearing must be installed properly in the fork or non-release and accelerated wear will occur. GM and Ford applications with the spring clip in the fork end must have the bearing installed into the clip AND fork ' C so it is able to pivot properly to the clutch (see photo A below). This is the most common mistake we see in clutch fork applications!

When installing the transmission, do not leave it unsupported in the clutch disc splines. This will bend the disc carrier and cause non-release. Having a transmission jack will allow you to avoid this problem.
Never use the transmission bolts to pull the transmission up to the engine. If the transmission will not slide into place, the disc is not properly aligned. Unbolt the clutch cover, re-center the disc, and retry the installation. Failure to do so will result in a bent disc, causing chatter or non-release.
CLUTCH ADJUSTMENT
Two people can best achieve proper clutch adjustment; the clutch can be depressed by one person and release checked by the other.
Correct clutch adjustment is critical attain proper bearing clearance. 90% of all clutch related problems/warranty claims are due to improper release bearing adjustment. Don't become a statistic. Follow these tips for a trouble free clutch life.
Optimum adjustment on mechanical and cable release systems is achieved by keeping the pedal set as low to the floor as possible while maintaining a clean shift. This places the least amount of stress on the release mechanism and clutch fingers and adequate clearance between the bearing and clutch fingers.
Free play cannot be judged by pedal position. Many vehicles can have several inches of pedal free play yet the release bearing is still adjusted tight to the fingers. Actual free play MUST be checked at the bearing.
TEST DRIVE - BREAK IN
When you test drive the vehicle, pay attention to the release point on the pedal and how smoothly the transmission shifts. You may need to re-adjust the linkage to attain the proper release point. If you are using a freshly surfaced or new flywheel, and have selected the proper clutch components for your application, proper break requires 500-1000 miles of non-aggressive driving.
TROUBLESHOOTING PROBLEMS
THE CLUTCH WILL NOT RELEASE
1. Check release bearing adjustment on mechanical or cable release systems. Add release to the system, checking carefully to make sure the bearing still has a minimum 1/4 inch clearance to the fingers of the pressure plate.
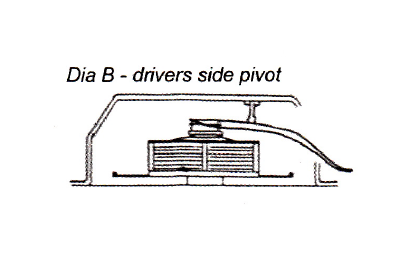
2. Observe the fork angle with the linkage disconnected, and the fork pulled up so the bearing just touches the clutch fingers. At this point, the clutch fork should be angled to the front of the car (drivers side pivot) or rear of the car (passenger side pivot). Improper fork angle can cause non-release or excessive pedal effort. Correct this problem by adjusting the pivot ball height or, in some cases, using a longer release bearing (see dia. B).

3. Check to make sure the release bearing is properly installed in the clutch fork (photo A).
4. On hydraulic systems, re-bleed to insure you are getting full travel from the release bearing.
5. Re-check torque on pressure plate bolts.
IF THIS DOES NOT FIX THE PROBLEM
1. You must verify that the clutch is releasing properly.
2. Remove the clutch system and flywheel.
3. Check the clutch disc for excessive runout by installing it on the transmission and rotating. If the disc wobbles excessively, it may have become bent during the install and can cause non-release.
4. Bolt the pressure plate and disc to the flywheel.
5. Put the assembly into a press and using the release bearing, press the fingers in to a total travel of .400" to .500".
6. View the clutch assembly from the side and verify that the disc is able to move back and forth, and you are seeing light between the disc and pressure plate/flywheel.
7. If doing this test attains release, the non-release is related to some other component in the release mechanism and these components should now be tested/repaired as needed.
8. Some GM LS applications MAY require slave cylinder shim PN 598 for proper release.
VIBRATION
1. Verify that if the clutch originally used dowel pins to locate the pressure plate, they are in place, as the clutch centers itself on these pins.*
2. If you have changed your flywheel, verify that you have installed a flywheel with the proper balance for your engine.
3. Check for bent or distorted flanges on the pressure plate. This will pull the pressure plate down unevenly and could cause a vibration or chatter.
CLUTCH SLIPS
1. Verify release bearing clearance. A minimum of lA inch clearance should be maintained on mechanical or cable linkage systems.
2. For hydraulic bearing applications, verify by measuring following the instruction sheet included with the clutch to be sure the bearing is being loaded the proper distance when the transmission is installed.
3. Was the flywheel resurfaced? Unfinished flywheels will not allow a new disc to mate properly and can cause premature wear or failure.
4. Make sure you have selected a clutch system that is capable of holding the vehicle horsepower level and gearing.
CLUTCH CHATTER
1. Different friction materials react differently as heat in the clutch increases. Organic clutches offer the smoothest engagement,, while metallic based materials get more aggressive as the clutch heats up. Expect some chatter with metallic based discs.
2. Gearing and tire size have a huge effect on clutch engagement. Taller rear gears (lower numerically) require the clutch to be slipped more on takeoff to get the car moving, and will cause metallic discs to chatter
3. Check for a bent clutch disc. If the transmission does not slide in smoothly on install, or if you have to 'rock' the transmission to get it installed, the clutch disc can become bent and cause chatter.
4. Using power or air tools to install a pressure plate can distort the mounting flange, causing the clutch to pull down unevenly and creating chatter on engagement.
5. Worn or broken engine or transmission mounts will amplify a chatter situation. Check them even if they are new. Urethane or solid mounts will also amplify chatter, as they are not able to absorb this shock.
6. Aftermarket bellhousings must be dial indicated to the engine. If the bellhousing is not centered or square, the transmission will cock on install and cause the disc to run out, thus causing chatter.
7. Flywheels must be resurfaced or chatter can occur, especially when changing from an organic based clutch system to a metallic system. Aftermarket flywheels that are unground require surfacing before use.
METALLIC CLUTCH DISC TIPS
Paddle style metallic discs are produced slightly undersized. An 11-inch disc will measure closer to 10.5 inches. This is intentional and your clutch disc is not mispackaged.
Metallic clutch discs can provide greatly increased life over stock organic clutches, however they can be trickier to drive in street applications. Because of the increased aggressiveness of metallics, it may be necessary to 'slip' the clutch more on takeoff to avoid chatter. Using a lighter static pressure clutch or lower gearing will relieve the chatter as well as provide a lighter pedal feel.
Metallics are recommended for use only with steel or explosion resistant clutch components. Always use a safety bellhousing with these clutches. After initial break in, recheck all adjustments.
WARRANTY INFORMATION
RAM technical support will help you select a clutch for your given application by providing several options. Ultimately, the decision on which product to use lies with the end user. Since we cannot possibly know everything about the application, we offer our best recommendations only. No warranty consideration is given for selection of these components based on recommendations of the RAM technical staff.
Complete warranty information is available on our website. If you have a problem with your clutch system:
• Do not remove the clutch from the vehicle.
• First, review these instructions to make sure you have completed the install correctly.
• Next, review the FAQ's in the 'Tech' area on our website to see if your issue is addressed.
• Finally, Visit the 'warranty determination' page and review this information to determine if your clutch qualifies for warranty inspection.
• Follow the instructions provided to return your clutch for inspection.
LIMITED WARRANTY TERMS
OEM Replacement sets - 1 year in stock vehicles, 30 days from date of purchase in modified or commercial vehicles
Powergrip and Powergrip HD sets - 30 days from date of purchase
Competition components - 30 days from date of purchase. No warranty once these items have been used.
Please read the full warranty on our website at http://www.ramclutches.com/warrantv.htm prior to installing your new clutch

