Best Sellers
How to Install Raxiom Fog Light Kit - Lower Valance on your Mustang
Installation Time
1 hours
Tools Required
- Flat head & Phillips screwdriver
- Ratchet & Socket set OR
- Adjustable Wrench
- Small knife
- Torx® T10 bit/driver (optional)
- Black Electrical Tape

Shop Parts in this Guide
| Parts List: | Quantity: |
|---|---|
| Fog light & bulb with bracket | 2 |
| Black bezels | 2 |
| Wiring extensions | 2 |
| PB-3504 Parts Bag | 1 |
Please familiarize yourself with the parts included as well as the instructions before attempting installation. Please seek the help of a certified technician if you feel unable to complete the installation safely and properly. Failure to read and follow the instructions below may result in personal injury or damage to property.
Fog light installation into bumper:
Removing the bumper is not necessary. Driving the vehicle onto ramps or raising the front end of the car will greatly ease installation. Before beginning the steps below, turn off the car, remove key, and engage the emergency brake.
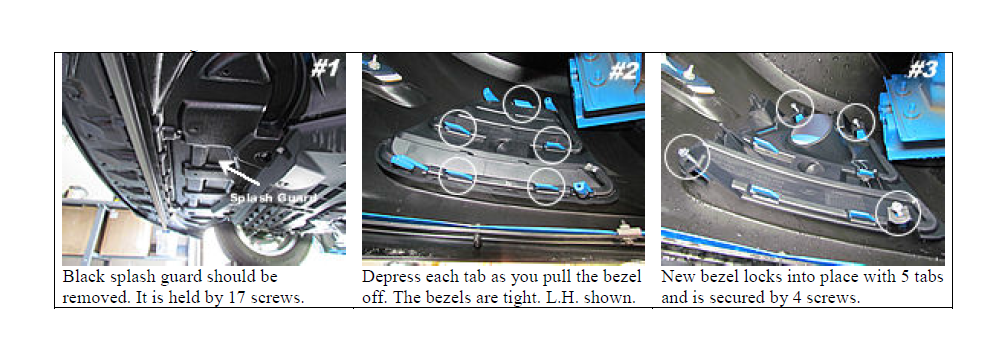
1. Removing the splash/ rock guard will allow you access to fog light mounting points. The splash guard has 17 screws holding it in place. Use a ratchet & 8mm socket OR Phillips screwdriver to remove the 6 screws closest to the front (nose) of the car. Use a 7mm socket to remove the remaining 11 screws. After the 17 screws are removed splash guard can be detached by pulling back/ down gently. Set aside 17 screws and splash guard for re-attachment later. See picture 1.
2. Remove bezel inserts currently in bumper. Bezels will be removed from behind the bumper. 5 body-colored tabs hold on each bezel (see picture 2). Each tab must be depressed one at a time as you begin to pull the bezel off. It is usually best to start at the top and work your way down one side. These bezels will require a large amount of force to remove so it is best to take your time and be gentle.

3. Fog lights come pre-installed in mounting brackets. The foglight/ bracket then seats onto the back of the included bezel. Take a look at how these pieces go together. Now install new bezels. Bezels should be installed from behind the bumper. Each bezel needs to lock onto all 5 of the body colored mounting tabs. See picture 3 above.
4. Use 4 screws to secure each bezel to the bumper. Screws can be tightened with a magnetic flat head screwdriver OR ratchet and 1/4 inch socket. Do not over-tighten screws. See picture 3 above.
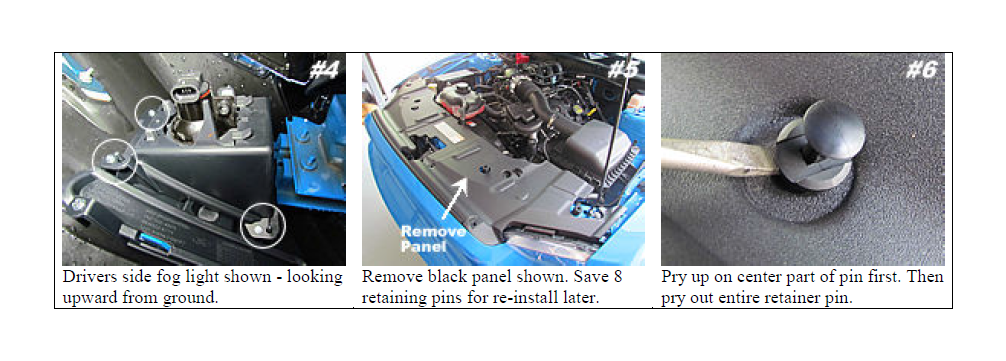
5. Now fog lights/ mounting brackets will be installed. Included is a left & right hand version for each side. The brackets are attached to the backside of the bezel with 4 screws. There are also 2 alignment pins on the bezel that help you attach the bracket properly. It is usually easiest to thread all 4 screws on by hand (see picture 4 below) and then tighten them with a screwdriver or ratchet (1/4 socket). Do not over-tighten screws. Note: picture only shows three screws – 4th screw is hidden from view.

Wiring in Engine Bay:
1. Open hood of car and make sure hood is held open securely.
2. Remove the black panel which covers the radiator/grill (shown in picture 5). The panel is attached by 8 plastic pins. The pins are removed by prying up on center part and then prying up on the body of the pin. See picture 6. Save pins and black panel for re-installation later.
3. Locate the fog light connectors which were plugged into your factory grille mounted fog lights.
4. Plug the matching end of the wiring adapter into the factory 4 pin fog light connector.
5. Route the other end of the wiring adapter to the lower valance and plug into the new fog lights.
Final Installation:
1. Double check everything to make sure it was connected properly. Now test the fog lights to insure they turn on.
2. Use clips located on the wiring extensions to attach wiring. You may also use supplied zip ties.
3. Adjust the lights. This will require a Torx® (aka ‘Star’) T10 bit. This type of bit is very popular and can be found at your local hardware store. We adjusts the lamps from the factory but you may adjust them if you feel it is necessary. This is best done at night or in a garage where there is less light. Turn the lights on and position the car about 15 feet from the wall. On each fog light the Torx® screw can be turned left or right to adjust up and down. Adjust the lights so that the individual light patterns are level on the wall.
4. Re-install the radiator cover and splash guard.
5. Enjoy your new fog lights! The fog lights are activated by pulling the knob outward while the switch is in the running lamps, head lamps, or auto headlamps position.
If you are having trouble with your product, please contact us for technical assistance.


