Guaranteed Free Delivery by 12/24! available on most items - Details
How to Install Raxiom Fog Light Kit on your Mustang
Installation Time
1 hours
Tools Required
- Flat head & Phillips screwdriver
- Ratchet & Socket set
- Adjustable Wrench
- Small knife
- Torx® T10 bit/driver (optional)

Shop Parts in this Guide
Fog light installation into bumper:
Removing the bumper is not necessary. Driving the vehicle onto ramps or raising the front end of the car will greatly ease installation. Before beginning the steps below, turn off the car, remove key, and engage the emergency brake.
1. Removing the splash/ rock guard will allow you access to fog light mounting points. The splash guard has 17 screws holding it in place. Use a ratchet & 8mm socket OR Phillips screwdriver to remove the 6 screws closest to the front (nose) of the car. Use a 7mm socket to remove the remaining 11 screws. After the 17 screws are removed splash guard can be detached by pulling back/ down gently. Set aside 17 screws and splash guard for re-attachment later. See picture 1.
2. Remove bezel inserts currently in bumper. Bezels will be removed from behind the bumper. 5 body-colored tabs hold on each bezel (see picture 2). Each tab must be depressed one at a time as you begin to pull the bezel off. It is usually best to start at the top and work your way down one side. These bezels will require a large amount of force to remove so it is best to take your time and be gentle.
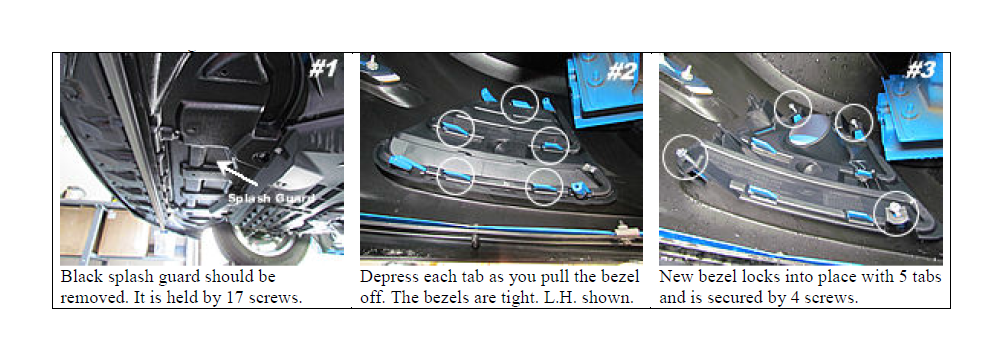
3. Fog lights come pre-installed in mounting brackets. The foglight/ bracket then seats onto the back of the included bezel. Take a look at how these pieces go together. Now install new bezels. Bezels should be installed from behind the bumper. Each bezel needs to lock onto all 5 of the body colored mounting tabs. See picture 3 above.
4. Use 4 screws to secure each bezel to the bumper. Screws can be tightened with a magnetic flat head screwdriver OR ratchet and 1/4 inch socket. Do not over-tighten screws. See picture 3 above.
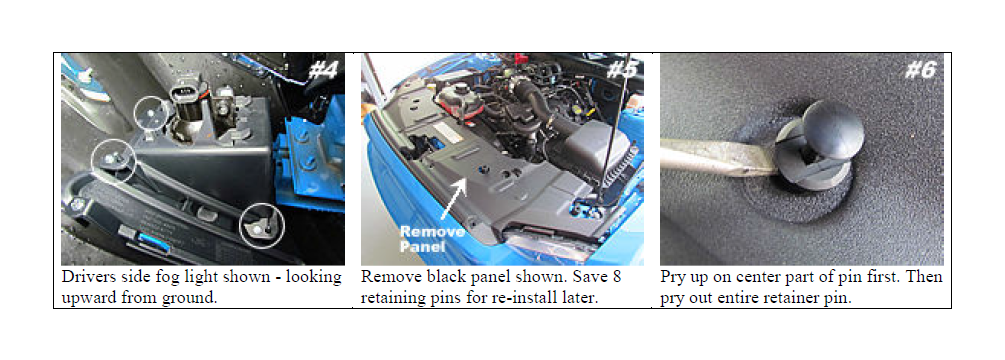
5. Now fog lights/ mounting brackets will be installed. Included is a left & right hand version for each side. The brackets are attached to the backside of the bezel with 4 screws. There are also 2 alignment pins on the bezel that help you attach the bracket properly. It is usually easiest to thread all 4 screws on by hand (see picture 4 below) and then tighten them with a screwdriver or ratchet (1/4 socket). Do not over-tighten screws. Note: picture only shows three screws – 4th screw is hidden from view.
Wiring in Engine Bay:
1. Open hood of car and make sure hood is held open securely.
2. Disconnect negative (black) battery cable from the car battery. This is done by loosening the bolt located on the side of the battery cable terminal with an 8mm socket or wrench. You may let the cable hang off to the side. Make sure the cable has been disconnected! This is important!
3. Remove the black panel which covers the radiator/grill (shown in picture 5). The panel is attached by 8 plastic pins. The pins are removed by prying up on center part and then prying up on the body of the pin. See picture 6. Save pins and black panel for re-installation later.
4. Locate the fuse box. It is located behind the passenger side head light. Open the access cover.
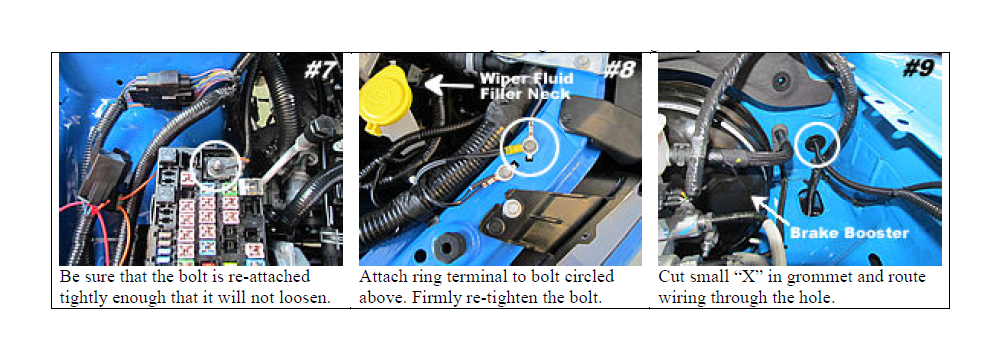
5. Connect the orange wire to the positive ( 12 volt) power cable entering the fuse box shown in picture 7 above. A 10mm socket or wrench can be used to remove the bolt holding the 12v power supply cable. A ring terminal is located at end of the orange wire which will slide over the post. Re-attach bolt tightly. While tightening be careful not to allow your wrench or ratchet to come in contact with any other metal object such as the car body.
6. Use a 10mm socket or wrench to attach the black ground cable ring terminal to the bolt shown in picture 8. Re-attach the bolt so the ring terminal makes proper contact and the bolt is tight.
7. Route the wiring for the driver side fog light and switch over the radiator along the frame of the car. The best way to do this is follow the existing bundle of wiring.
8. Route the wiring for each light down to the fog light locations. Route wiring for the passenger compartment (red/blue/black wire bundle) along the driver’s side fender towards passenger compartment.
9. Plug the fog light connectors into the fog lights.
10. If you are installing this kit on a V6 Mustang, follow step 11. If you are installing this kit on a Boss 302/ GT, skip to step 13.
11. V6 Mustangs - Locate the circular black grommet on the driver’s side firewall about 4 inches to the right of the brake booster. See picture 9 above. Carefully use a razor or knife to cut an “X” in the grommet.
12. Gently push red/blue/black wiring through the firewall into the passenger compartment. Now skip to ‘Installing switch in passenger compartment’ section below.
13. Boss 302/ GT - Open the drivers’ side door and locate black rubber boot to the left of the pedals. Carefully pull to remove from the firewall. It is stiff so a screw driver may help pry the edge up. See picture 6. This is where we want to route the red/blue/black wire bundle into the passenger compartment.
14. The easiest way to do so is to route the wiring down past the sound enhancement tube (black tube which runs from the air intake to the firewall) toward the ground. Follow the existing bundle of wiring. It will be easiest to unbolt the sound enhancement tube so that you can move it a few inches out of the way. Tip: Shine a flash light through the hole in the passenger compartment – this will assist you in feeding the wires down to the proper location from the engine bay.
15. While inside the passenger compartment, pull the red/blue/black wire bundle through the firewall.
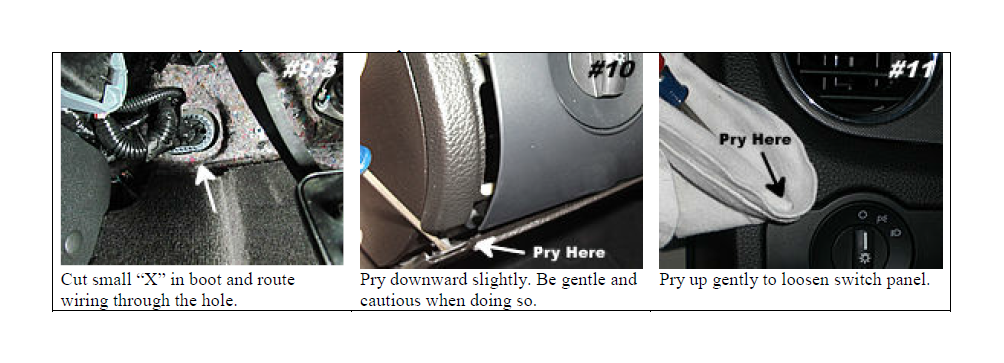
16. Carefully use a razor or knife to cut an ‘X’ in the rubber boot. Then gently feed the wiring through the ‘X’ cut in the boot.
17. Re-install rubber boot in the firewall by pushing it back into the hole firmly. Make sure it seals completely so that no leaks are possible.
Installing switch in passenger compartment:
1. Use a flat head screw driver to gently pry downward about ½ inch on the dash panel located below the switch panel. This will help allow switch removal. See picture 10. You will notice that at the bottom left corner of the switch panel there is a two inch long tab with a screw and clip at the end. The screw will need to be removed with a 7mm socket or adjustable wrench. Save for reattachment later.
2. Using a flat head screw driver wrapped in a rag, carefully pry up on the switch panel from the top left corner. See picture 11 above.
3. Unplug the head light switch panel and remove from vehicle.
4. The head light switch is removed from the switch panel by depressing three tabs around the base of the switch. The switch will then come out of the switch panel. See picture 12.
5. Install the new switch into the switch panel. It should snap into place with very little force. Make sure it is in the correct orientation for it to snap into place (should be right-side up).
6. Felt electrical tape is wrapped around the bundle of wires that plugs into the switch. Carefully unwrap tape several inches so you have better access to individual wires.
7. Using one of the supplied red wire taps, slide the Gray wire with Purple stripe (Pin #5) onto the wire tap. See picture 13 below. The wire should sit in the middle of the two teeth. Squeeze down on the wire tap making sure it snaps closed. Do not cut Wire!
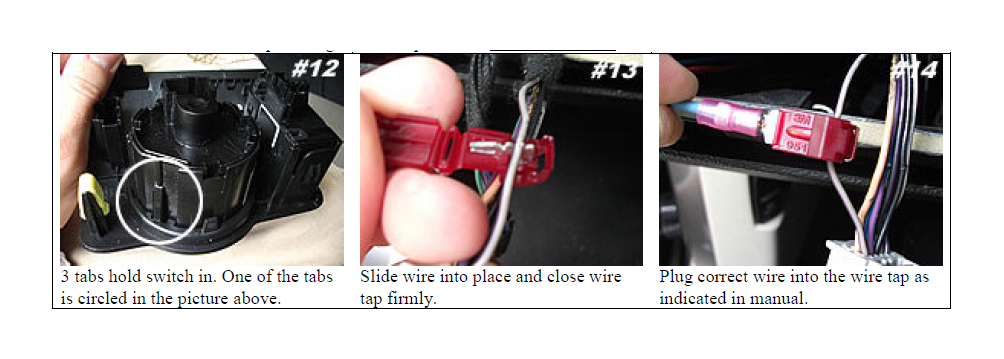
8. Plug the blue wire from the fog light wiring into the back of the wire tap connected to the Gray wire with Purple stripe. See picture 14 above.
9. Using the second red wire tap, repeat the process by sliding the Brown wire with Yellow stripe (Pin #10) onto the wire tap and closing the wire tap.
10. Plug the red wire from the fog light wiring harness into the back of the wire tap connected to the Tan wire with Yellow stripe.
11. Plug head lamp switch wiring into your new OEM head lamp switch.
12. Re-install the head lamp switch panel into the dash.
Final wiring in passenger compartment:
The long black wire that you routed through the firewall earlier must now to routed over the center console to the passenger side of the vehicle.
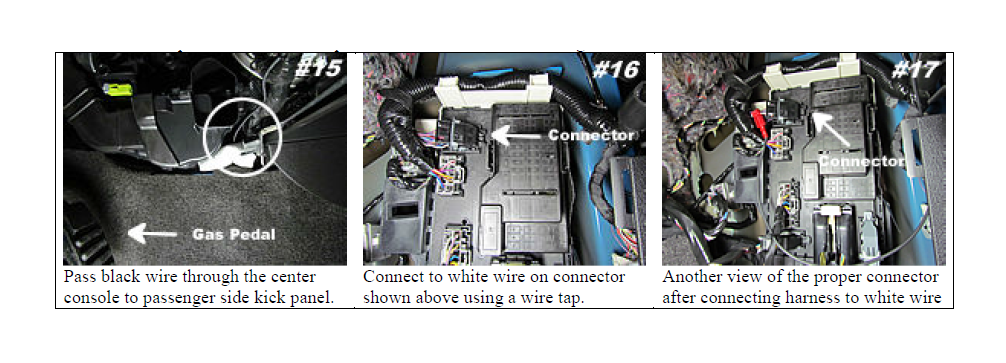
1. A small gap exists where you can route the black wire through. It sits behind the air vent near the drivers feet. Follow the existing bundle of wiring. If you are having trouble getting it to pass through, taping the wire to a clothes hanger or similar object may help you pass the wire through. See picture 15.
2. After you have reached the foot well on the passenger side, locate the interior fuse box. It is located behind the passenger side kick panel directly in front of the door. If you have trouble finding it, refer to your vehicles user manual for the specific location.
3. Remover the access cover. After removing the cover, there may be a piece of black felt paper taped to the box. Simply fold the felt paper up so you can access all of the connectors located on the fuse box.
4. Locate the C2280B connector on the fuse box. If you are looking at it directly, it is the connector located at the top left of the fuse box. It is a 52-pin connector with a total of 29 wires coming out of it. It is black in color with a gray bar across it vertically. Be sure you have located the proper connector. See picture 16 & 17 below. Be very gentle with all wiring.
5. Using a red wire tap, slide the White wire (Pin #13) onto the wire tap and close the wire tap. Be sure you have located the solid white wire. There are several other wires that are similar in color.
6. Plug the black wire from the fog light wiring harness into the back of the wire tap connected to the White wire.
7. Use the supplied zip ties to secure all wiring under the dash. Be sure the wiring will not affect operation of the brake pedal. Failure to secure the wiring under the dash could cause an accident.
Final Installation:
1. Re-connect the negative battery cable to the car battery. Remember to re-tighten the bolt.
2. Double check everything to make sure it was connected properly. Now insert the key and turn it to the “ON” position. Test the switch to make sure the lights turn ON and OFF. The fog lights are activated by pulling the knob outward. If the lights do not power on, visit the trouble shooting section below. Otherwise proceed to the next step.
3. Using the supplied zip ties, secure the kits wiring in the engine bay and passenger compartment. Be sure to securely zip tie any components that may rattle.
4. Be sure you secure all wiring under the dash and near the pedals. Failure to do so could cause damage to the fog light wiring harness or cause an accident.
5. Adjust the lights. This will require a Torx® (aka ‘Star’) T10 bit. This type of bit is very popular and can be found at your local hardware store. The lamps are adjusted from the factory but you may adjust them if you feel it is necessary. This is best done at night or in a garage where there is less light. Turn the lights on and position the car about 15 feet from the wall. On each fog light the Torx® screw can be turned left or right to adjust up and down. Adjust the lights so that the individual light patterns are level on the wall.
6. Re-install the radiator cover and splash guard.
7. Re-install fuse box access cover which is located on the passenger side kick panel.
8. Enjoy your new fog lights! The fog lights are activated by pulling the knob outward while the switch is in the running lamps, head lamps, or auto headlamps position. You may operate the fog lights as daytime running lights by turning them on while in the auto headlamps position. Your fog lights will turn off automatically when the key is removed from the vehicle.
Trouble shooting guide:
Fog lights won’t turn on –
• Check to make sure you connected wire taps to the correct wires outlined in the “Installing switch in passenger compartment” section above. This is the MOST common mistake made during installation. There are many similar color wires so be sure you tapped into the proper wires.
• Check to make sure your ignition key is in the “ON” position. You can be sure it is in the correct position by starting the engine.
• Check to make sure you connected your wire tap to the proper wire/ connector near the passenger side fuse box.
• Check the ground cable you connected under the “Wiring in engine bay” section. Make sure that it is making proper contact and that the bolt is tightened.
• Check the ring terminal you connected to the side of the fuse box to 12v power. Make sure that it is making proper contact and that the bolt is tightened.
• Check the blue fuse installed in the fuse holder (small black box located on orange wire). Make sure it is plugged in completely and has not been blown (On a blown fuse the filament in the middle of the two posts has been broken).
Fog light indicator light (on switch panel) doesn’t come on when I turn the fog lights on –
• Check to make sure you installed the wire tap on the proper wire as indicated above. Also make sure the wire tap cover is closed completely.
• Check to make sure the tan fuse installed in the second fuse holder (connected to red wires) is installed properly and has not been blown (On a blown fuse the filament in the middle of the two posts has been broken).
When I turn the car on or the fog lights on and off I hear a “click” in the engine bay –
• This is normal. The relays click when the lights turn on and off.
If you are still having trouble with your product, please contact us for technical assistance.

