Top Sellers in Mustang
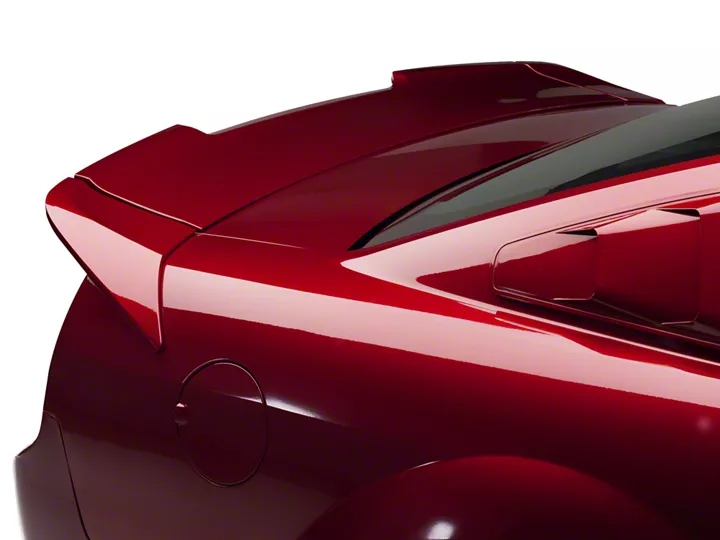
How to install a Roush Rear Wing Spoiler on your 2005-2009 Mustang
Shop Parts in this Guide
Installation
Equipment and Supplies Required for Painting
- DuPont® 2319 Plastic Prep
- DuPont® 2330S or equivalent Adhesion Promoter (for paint)
- Painters Masking Tape
- Sand Paper
- Painters Tack Cloth
- Trim Roller
Equipment and Supplies Required for Installation
- Isopropyl Alcohol Packets
- Center Punch
- Drill
- 1/8” Drill Bit
- 5/16” Drill Bit
- 7/16” Drill Bit
- Masking tape
- Rust Inhibitor (for drilled holes)
- 3/8” Drive Ratchet
- 3/8” Drive Extension
- 10mm Socket- 3/8” Drive
- 13mm Socket- 3/8” Drive
- Torque Wrench (lb-in)
- Shop Vacuum
- Heat Gun
LIMIT OF LIABILITY STATEMENT
The information contained in this publication was accurate and in effect at the time the publication was approved for printing and is subject to change without notice or liability. ROUSH Performance Products (RPP) reserves the right to revise the information presented herein or to discontinue the production of parts described at any time.
SAFETY REQUIREMENTS
STOP! READ IMPORTANT SAFETY CAUTIONS AND WARNINGS BEFORE PROCEEDING.
IMPORTANT SAFETY NOTICE
Appropriate disassembly, assembly methods and procedures are essential to ensure the personal safety of the individual performing the kit installation. Improper installation due to the failure to correctly follow these instructions could cause personal injury or death. Read each step of the installation manual carefully before starting the actual installation.
1. Always wear safety glasses for eye protection.
2. Place ignition switch in the OFF position.
3. Always apply the parking brake when working on a vehicle.
4. Chock the front and rear tires to prevent unexpected vehicle movement.
5. If working without a lift, always consult vehicle manual for correct lifting specifications.
6. Operate the engine only in well-ventilated areas to avoid exposure to carbon monoxide.
7. Do not smoke or use flammable items near or around the fuel system.
8. Use chemicals and cleaners in well-ventilated areas.
9. Batteries produce explosive gases, which can cause personal injury.
Therefore, do not allow flames, sparks or flammable substances to come near the battery.
10. Keeps hands and any other objects away from the radiator fan blades.
11. Keep yourself and your clothing away from moving parts when the engine is running.
12. Do not wear loose clothing or jewelry that can get caught in rotating parts or scratch surface finishes.
13. Allow the engine, cooling system, brakes and exhaust to cool before working on a vehicle.
WORK SAFELY!
Perform this installation on a good clean level surface for maximum safety and with the engine turned off.
Paint Preparation (Pre-painted parts, skip this section)
1. Using sand paper, remove any plastic flash from the part as required.
2. Using painters’ masking tape, mask any surface that will have double sided tape or gaskets applied. Refer to Figures 1 and 2.

fig. 1
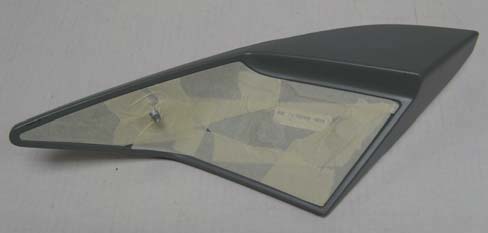
Fig. 2
3. Wipe each part to be painted with plastic prep (DuPont® 2319 or equivalent).
4. Wipe the entire part to be painted with a tack cloth.
5. Apply adhesion promoter (DuPont® 2330S or equivalent) prior to color and clear coat applications. These parts are made of ABS (Acrylonitrile Butadiene Styrene) and require a promoter for paint adhesion.
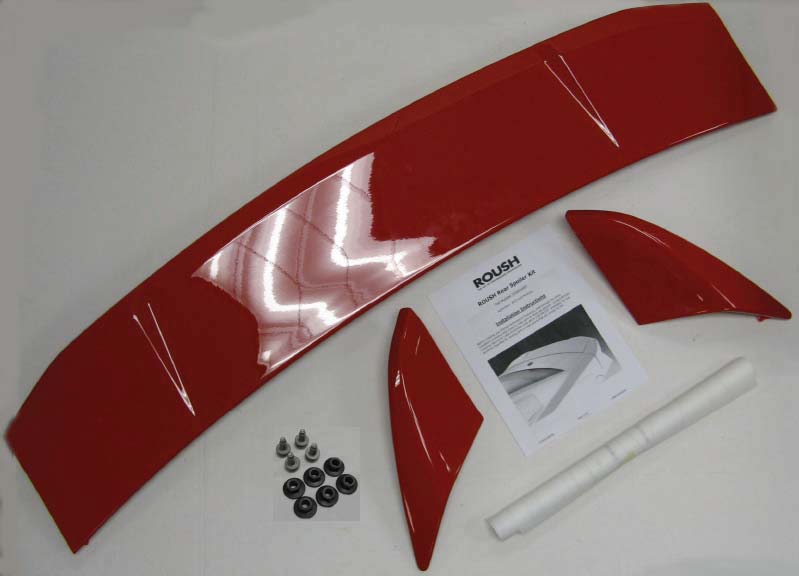
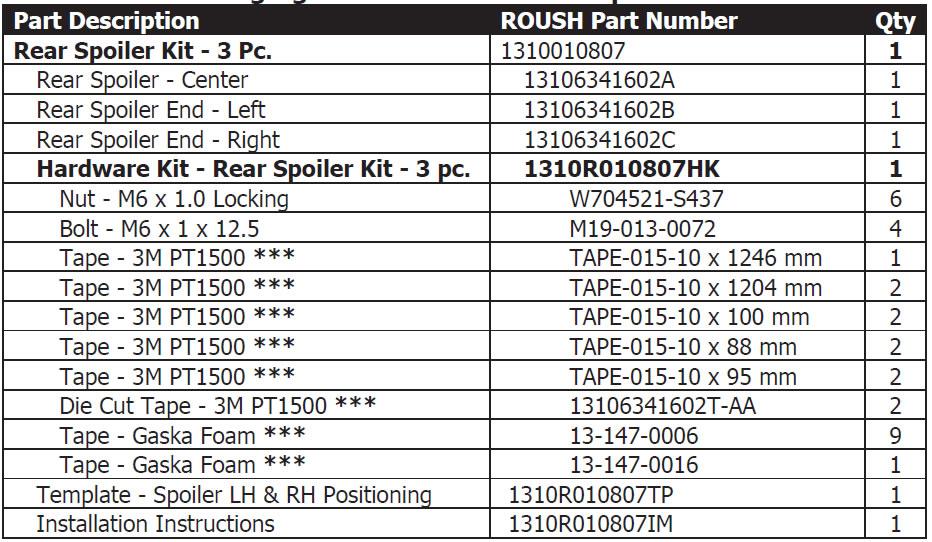
6. Paint the three (3) Rear Spoiler parts.
7. Allow the parts to completely dry.
8. Remove all masking tape.
Apply Foam Gaskets and Tape
1. Wipe surface clean using isopropyl alcohol, or equivalent. Allow to dry.
2. Apply foam gaskets and tape as shown in Figures 3 and 4. After positioning tape apply firm pressure across entire tape surface to ensure a good bond.
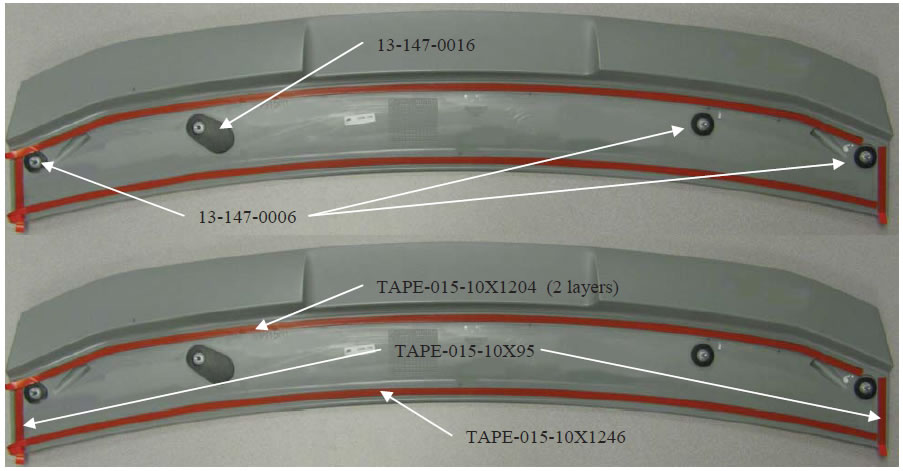
fig. 3
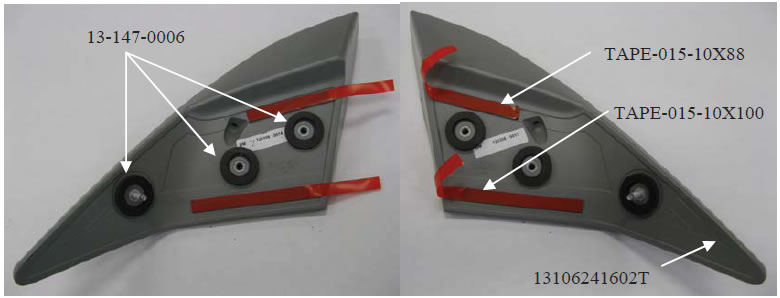
Fig. 4
Rear Spoiler Installation
Assembly Note: If your vehicle has a factory installed spoiler, the holes in the deck lid can be used to install the ROUSH Center Rear Spoiler. Install the Template as shown in Step 6 to align the lines in the fender templates per Step 8. You will only need to drill the three (3) holes in each fender.
1. Open the trunk and remove thirteen (13) push pins indicated with circles. Refer to Figure 5. The push pins are a two (2) part push pin. Remove the center button first to release the barbs and then remove the push pin body. Carefully slide the glow-in-the-dark trunk release handle through the slot in the trunk liner. See arrow. Remove the trunk inner liner.
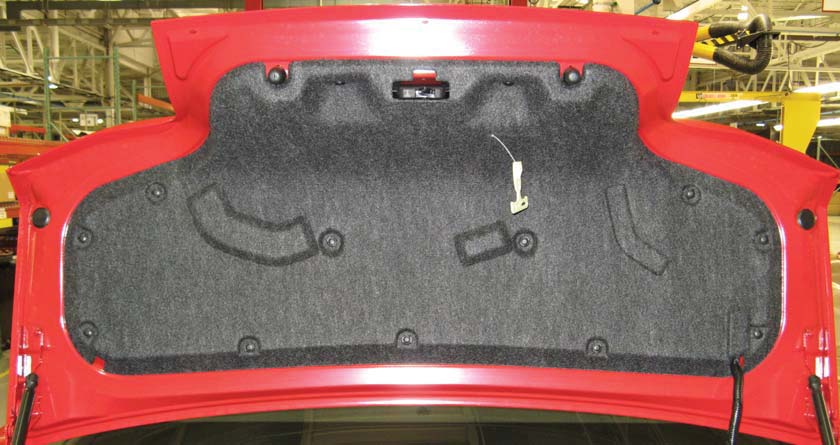
Fig. 5
2. Remove two (2) grommet plugs to access outboard mounting holes. Refer to Figure 6.
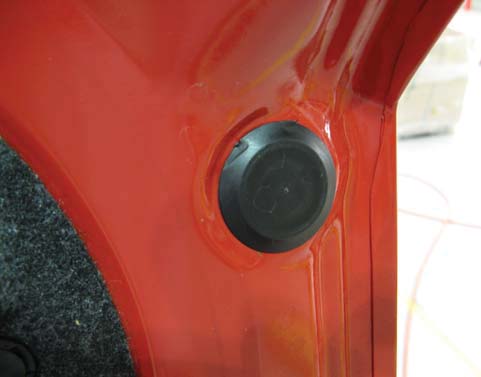
Fig. 6
3. Remove four (4) nuts from factory spoiler (if installed) using a 3/8” drive ratchet with an extension and 10mm socket. Be careful not to drop the nuts in to the deck lid inner structure after removing them from the studs. Do Not reuse these nuts. Refer to Figure 7.
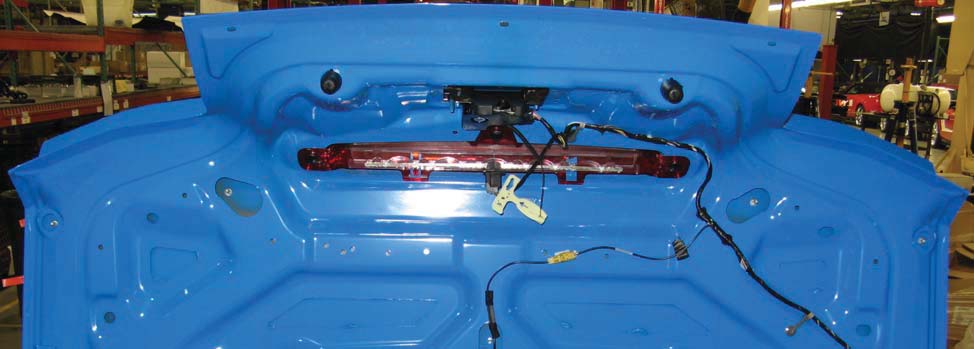
Fig. 7
4. Use a heat gun to heat the entire perimeter of the factory spoiler. As the spoiler becomes warm pull straight up to release the tape from the deck lid. It may be necessary to use a plastic scraper to help tear the tape, but be careful not to scratch the paint on the deck lid. Do not pry off the spoiler, as damage could occur to the deck lid sheet metal.
5. Remove any foam tape residue that remains on the deck lid and clean the area with Isopropyl Alcohol. Allow to Dry.
6. Using the supplied template, cut along the lines for the center and RH/LH spoiler. Apply the template to the trunk deck lid with the indicated alignment features and tape into place. Refer to Figure 8.
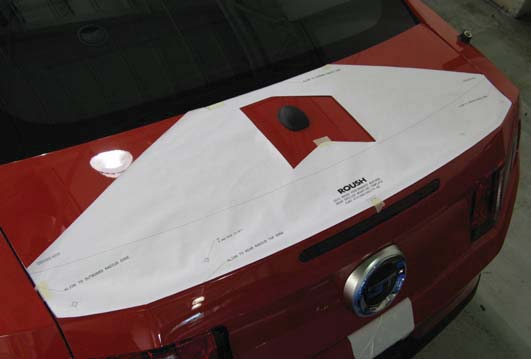
Figure 8
7. Center punch the sheet metal at four (4) locations, as shown on the template. Refer to Figure 9. (Only required if your car does not have a factory installed spoiler)
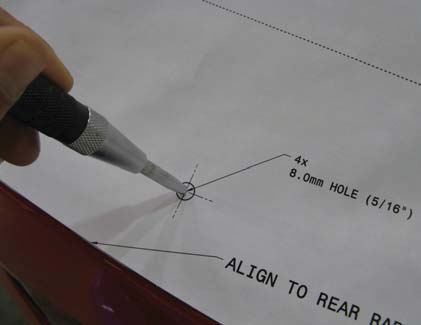
Figure 9
8. Locate the RH/LH spoiler template on the driver or passenger side rear quarter panel with the indicated alignment features. Ensure that the RH/LH template is also lined up with the dashed line on the center spoiler template on the trunk deck lid. Refer to Figure 10.
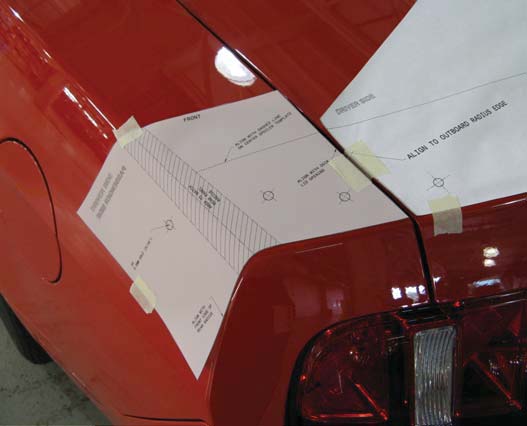
Figure 10
9. Center punch the sheet metal at three (3) locations, as shown on the template.
10. Remove the RH/LH template, flip it over and repeat steps 8 and 9 for the opposite side of the vehicle.
11. Drill ten (10) 1/8” pilot holes at the center punch locations. Four (4) on the trunk deck lid, if required and three (3) per side on the rear quarter panels. Finish with a 5/16” drill bit on the six (6) rear quarter panel holes. If holes were drilled into the deck lid, finish the deck lid holes with a 3/8” hole on the right inboard hole, and 7/16” on the remaining three (3) holes. Refer to Figure 11. Debur the holes and apply rust inhibiter to the bare metal at the ten (10) drilled holes. Use a shop vacuum to remove all metal shavings.
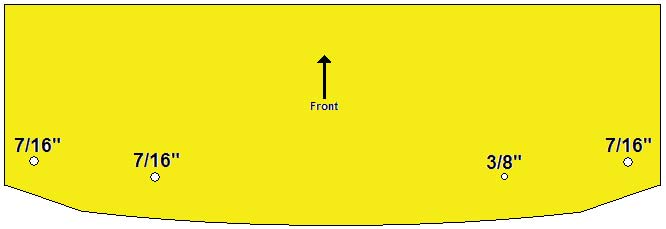
Figure 11
12. Position the center spoiler on the trunk deck lid and tape into place. Refer to Figure 12. Be sure that all of the red pull tabs for the tape are accessible.
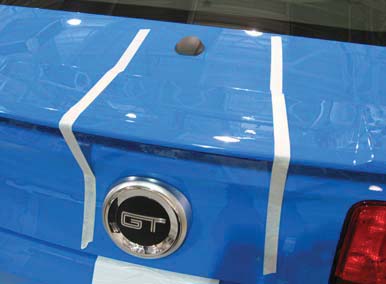
Figure 12
13. Open the trunk deck lid and loosely install four (4) nuts to the Rear Center Spoiler studs.
14. Lower the trunk deck lid and remove the red pull tabs from the tape. Firmly press down on the entire spoiler perimeter with a minimum force of 20 lbs to adhere the tape to the trunk deck lid surface (wet out).
15. Remove the masking tape from the spoiler. Open the trunk deck lid and tighten and torque the four (4) nuts to 5 Nm (44 lb-in). Once they have been torqued, loose the four (4) fastener 3/4 turn. This will allow the rear spoiler to expand in hot weather.
16. Reinstall the trunk inner liner and thirteen (13) push pins. Insert the body of the push pin into the hole and then press in the center button. Ensure that you pass the glow-in-the-dark trunk release handle through the slot in the trunk liner. Refer back to Figure 5.
17. Reinstall the two (2) grommet plugs removed in Step 2. Refer back to Figure 6.
18. Remove one (1) bolt (13mm socket) from each trunk side liner (2 total) and pull the liners away from the rear corners. Refer to Figure 13.
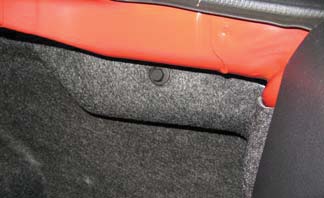
Figure 13
19. Install the Right Spoiler End and loosely install two (2) bolts and one (1) nut, 2-3 turns each. Ensure that the foam tape pull tabs are not hidden under the Spoiler End.
20. Fully close and latch the rear deck lid. While lifting the Right Spoiler End, remove the foam tape pull tabs. Carefully align the Right Spoiler End, inner edge, to the outer edge of the Center Spoiler and press the Right Spoiler End to the body. Refer to Figure 14.
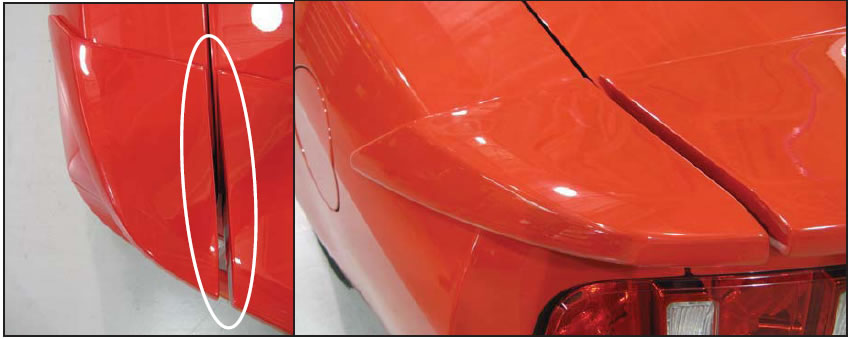
Figure 14
21. Open the trunk deck lid and tighten and torque the one (1) nut and two (2) bolts to 5 Nm (44 lb-in). Do not loosen these fasters after torque is set.
22. Repeat steps 19 to 21 and install the Left Spoiler End.
23. Reinstall each trunk side liner and torque the two (2) fasteners to 5 Nm (44 lb-in).
Congratulations!!! You have completed the installation of the ROUSH Performance Products, Rear Spoiler Kit. It is recommended that you save all parts removed from your vehicle during the installation of this kit.


