Best Sellers
How to install a Caltrend NeoSupreme Front Seat Covers on your Mustang
Installation
Before You Begin ...
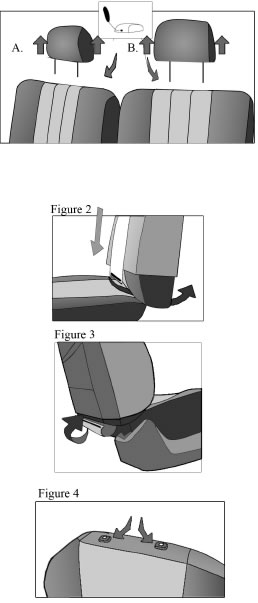
Remove the headrests completely from the seats: There are a couple ways to remove headrests.
A. Press the button on the base of the post and pull the headrest up until it disengages from the seat.
B. If there are no buttons, locate small holes on the base. Insert a wire( or an unbent paperclip) until you hear a click, then pull the headrest up.
Note: The covers will be tight and the fabric will cling to your original upholstery.
-- DO NOT USE EXCESSIVE FORCE--
Seat Backs ...
1. Find the cover for the Seat Back by matching the cut outs on the seat cover with any levers or knobs on the seat.
2. Make sure the flap with Velcro is facing the front of the seat, then slide the cover down over the Seat Back. Once it's pulled all the way down insert the velcro in between the seat. (See Figure 2)
(Note: A. In some installations, the front flap velcro attaches to the original fabric in between the seat.
B. If cover has plastic wedges, they will hook onto the seat once they have been tucked in.
3. Once the cover is secure with a tight snug fit proceed to attaching the velcro to the back of the cover. (See Figure 3)
4. Then follow up by pushing the fabric cut outs under the headrest plastic units. (See Figure 4)

Seat Bottoms ...
1. Find the cover for the Seat Bottom by matching the cut outs on the cover with any levers or knobs.
2. Slide the cover over the front of the seat so that the front of the cover is tightly fitted, make sure the straps are facing the front of the seat.
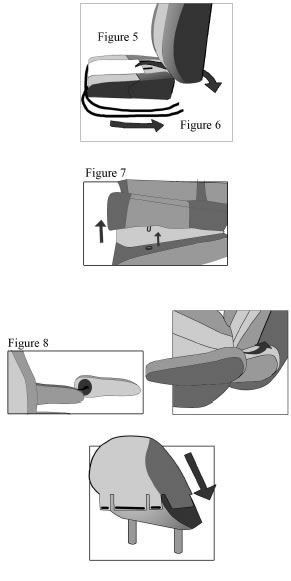
3. Feed the straps under the seat until it reaches the back, if there is a wire beneath your seat, ensure that the straps go above it and doesn't interfere with the movement of the seat. (See Figure 5)
4. Once the cover is applied proceed to attaching the straps to the appropriate buckle. Smooth out the cover with one hand as you do so. (See Figure 6)
*For those of you with 50-50 split backs with solid cushions *
5. The Seat Bottom can be removed from the car by simply detaching the clips in each side. Then follow steps 2 - 4. (See Figure 7)
Armrests ...
1. To attach the armrest simply slip the arm rest cover through the arm of the chair, keep in mind that some force will be needed to pull the cover all the way through. (See Figure 8)
Headrests ...
1. Fit the headrest covers over the headrest by working them down.
2. Secure the cover with the velcro.
3. Reapply the headrest to the seat.

Before You Begin ...
Remove the headrests completely from the seats: There are a couple ways to remove headrests.
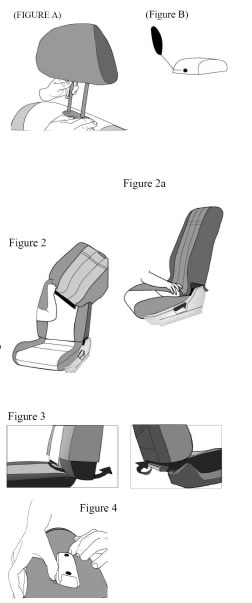
1. Press the button on the base of the post and pull the headrest up until it disengages from the seat. (See Figure A.)
2. If there are no buttons, locate small holes on the base. Insert a wire( or an unbent paperclip) until you hear a click, then pull the headrest up.(See Figure B.)
Note: The covers will be tight and the fabric will cling to your original upholstery.
-- DO NOT USE EXCESSIVE FORCE--
Seat Backs ...
1. Find the cover for the seat back by matching the cut outs on the seat cover with the levers or knobs on Figure 2 the seat.
2. Make sure the flap with Velcro is facing the front of the seat, then slide the cover down over the seat back. Once it's pulled all the way down insert the velcro in between the seat. (Figure 2-2a)
(Note: A. In some installations, the front flap velcro attaches to the original fabric in between the seat.
B. If cover has plastic wedges, they will hook onto the seat once they have been tucked in.
3. Once the cover is secure with a tight snug fit proceed to attaching the velcro to the back of the cover.(Figure3)
4. Then follow up by pushing the fabric cut outs under the headrest plastic units.(Figure 4)

Seat Bottoms ...
Before you begin installing the bottom portion of the seat cover.
1. On the bottom of the seat some newer models have a plastic flap. To remove proceed and reach towards the bottom of the seat and you will.find an elastic band, remove the band or clips. (see .figure Sa)
2. Find the cover for the Seat Bottom by matching the cut outs on the cover with any levers or knobs.
3. Slide the cover over the front of the seat so that the front of the cover is tightly fitted, make sure the straps are facing the front of the seat. (See Figure 5)
*Note- Some seat covers come with the belts facing the front instead of the straps.
4. Feed the straps under the seat until it reaches the back, if there are cables beneath your seat, ensure that the straps go above it and doesn't interfere with the movement of the seat. (See Figure 6)
5. Once the cover is applied proceed to attaching the straps to the appropriate buckle. Smooth out the cover with one hand as you do so.
Headrests.
1. Fit the headrest covers over the headrest by working them down. (See figure 7)
2. Secure the cover with the velcro.
3. Reapply the headrest to the seat.


