Top Sellers in Mustang
How to Install Wilwood CPB Caliper Parking Brake Cable (05-10 All) on your Ford Mustang
Shop Parts in this Guide
Important Notice - Read This First
Before any tear-down or disassembly begins, review the following information:
• Due to OEM production differences and other variations from vehicle to vehicle, the fastener hardware and other components in this kit may not be suitable for a specific application or vehicle.
• It is the responsibility of the purchaser and installer of this kit to verify suitability / fitment of all components and ensure all fasteners and hardware achieve complete and proper engagement. Improper or inadequate engagement can lead to component failure.
• We recommend using an anti-seize lubricant on all aluminum nuts before tightening.
Photographic Tip
Important and highly recommended: Take photos of brake system before disassembly and during the disassembly process. In the event, trouble-shooting photos can be life savers. Many vehicles have undocumented variations, photos will make it much simpler for Wilwood to assist you if you have a problem.
Parts List

General Information
Remove the Original Equipment Manufacturer’s (OEM) parking brake cables:
•Raise the rear wheels off the ground and support the rear suspension according to the vehicle manufacturer’s instructions.
FROM INSIDE THE VEHICLE:
• Be sure parking brake lever is released (off) inside the vehicle.
FROM UNDERNEATH THE VEHICLE:
NOTE: Make note of the existing cable routing. The Wilwood cables will be installed along the same path.
• Detach OEM cables from the OEM rear calipers.
• At the balance bar, detach the OEM cables from the bulkhead (in the driveshaft tunnel). Install a small hose clamp so that it surrounds the spring clip at the bulkhead. Using a long screwdriver, tighten the hose clamp around the spring clip and pull on the cable from the rear until it comes free of the bulkhead and remove. Perform the same technique on the second cable and remove.
• Unbolt and save the brackets holding the OEM cables to the chassis.
• Remove both left and right side cables (do not remove the balance bar, it will be reused with the Wilwood cable kit).
Assembly Instructions
IMPORTANT:
• To ensure maximum performance from your parking brake system, the cables must be routed as straight as possible. Bends in the cable can significantly reduce efficiency and thus reduce pull force at the brake. Tight bends must be avoided with a minimum recommended bend radius of 6" to 8".
• Cables should be properly restrained to prevent "straightening" of bends when tension is applied. Restrain movement of cable by affixing the cable sheath to body or chassis by fitting cable clamps at various points over the length of cable or by using original equipment cable attachments points. The clamping method chosen will require that cable sheath be held tightly without movement, crushing or causing interference to the internal cable.
• Cables must be initially pre-stretched by multiple applications of the brake handle, then re-adjusted to correct tension.
NOTE: The driver and passenger side cables differ in length and must be installed on the correct side of the vehicle. The driver’s side cable is shorter.
FROM UNDERNEATH THE VEHICLE:
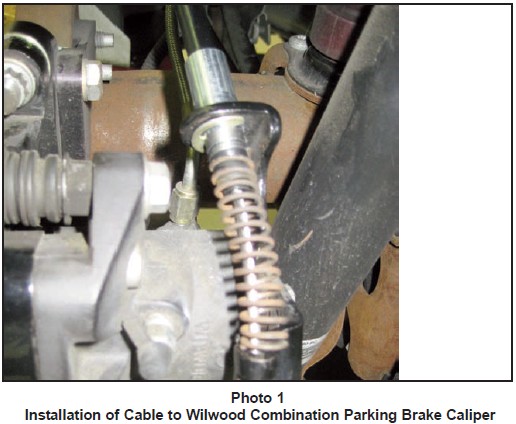
• Install Wilwood CPB kit per its instructions. Install compression spring, P/N 300-10407 (included in CPB brake kit) onto caliper end of cable, as shown in Photo 1
• Install the OEM brackets over the Wilwood cable in the same position that they were removed from the original cables.
• Attach E-clip end of the new cable to the caliper, as shown in Photo 1. Ensure that the E-clip is fully engaged into its groove.
• Route new cable in the same location as the OEM cable, from balance bar to the caliper. Carefully route cable to prevent contact with exhaust or moving suspension, brake or wheel components. NOTE: it’s the installer’s responsibility to properly route and ensure adequate clearance and retention for parking brake cable components.
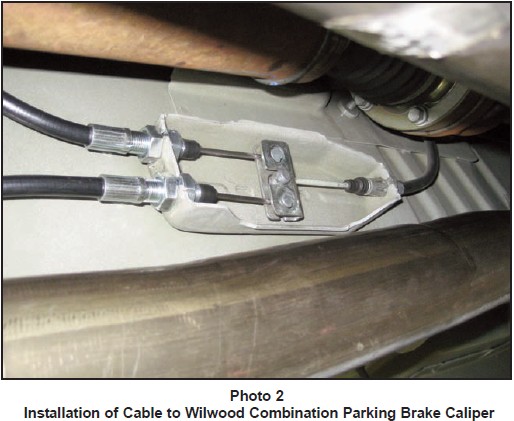
• Attach the other end of the new cable to the balance bar assembly, as shown in Photo 2. Adjust the cable in the bulkhead so it is approximately centered in its adjustment range.
• Repeat the above steps for the other side cable.
• Attach OEM brackets, that were slipped over the new cable, in their original mounting holes. •Tighten all bracket bolts and hardware.
SETTING THE PARKING BRAKES:
• The CPB caliper is a self-adjusting unit, it will require the installer to do the initial adjustment as outlined below.
FROM INSIDE THE VEHICLE:
• Apply light to moderate pressure on the brake pedal and hold.
• Cycle the parking brake lever on and off until the caliper adjusts to the rotor until it no longer gets tighter.
• After bleeding and bedding the brakes per the brake kit installation instructions, carefully test the holding power of the parking brakes. Test parking brake in a safe area, first on a flat surface by pushing on the vehicle, then on a slight incline by applying and releasing handle multiple times.
• For the best results always put pressure on the brake pedal as you set the parking brake.
Brake Testing
WARNING • DO NOT DRIVE ON UNTESTED BRAKES BRAKES MUST BE TESTED AFTER INSTALLATION OR MAINTENANCE MINIMUM TEST PROCEDURE
• Make sure pedal is firm: Hold firm pressure on pedal for several minutes, it should remain in position without sinking. If pedal sinks toward floor, check system for fluid leaks. DO NOT drive vehicle if pedal does not stay firm or can be pushed to the floor with normal pressure.
• At very low speed (2-5 mph) apply brakes hard several times while turning steering from full left to full right, repeat several times. Remove the wheels and check that components are not touching, rubbing, or leaking.
• Carefully examine all brake components, brake lines, and fittings for leaks and interference.
• Make sure there is no interference with wheels or suspension components.
• Drive vehicle at low speed (15-20 mph) making moderate and hard stops. Brakes should feel normal and positive. Again check for leaks and interference.
• Always test vehicle in a safe place where there is no danger to (or from) other people or vehicles. • Always wear seat belts and make use of all safety equipment.
Parking Brake
WARNING • PARKING BRAKE
• Parking brake must be properly adjusted before use and must be manually readjusted for wear if parking brake handle or foot lever travel becomes excessive.
• The holding ability of the brake should be tested by stopping on a sloping surface and applying the parking brake while holding car with the hydraulic foot brake. This should be accomplished both facing up and down hill.
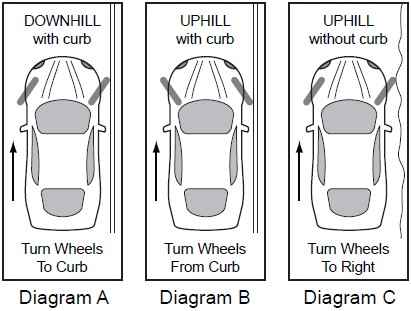
• Do not rely exclusively on the parking brake to hold the car; Curb wheels as recommended by the applicable diagram and put gear selector in park, or shift into first gear or reverse with a manual transmission.
• Diagram A - When parking facing downhill, turn front wheels towards the curb or right shoulder. This will keep from rolling into traffic if the brakes become disengaged.
• Diagram B - Turn the steering wheel to the left so the wheels are turned towards the road if you are facing uphill with a curb. The tires will catch the curb if the car rolls backward.
• Diagram C - When facing uphill without a curb, turn the wheels sharply to the right. If the vehicle rolls, it will go off the road rather than into traffic.
• When parking on a hill, always set the parking brake and move the gear selector into park, or shift into first or reverse gear if your vehicle has a manual transmission.
