
How to install a Wilwood Superlite Rear Brake Kit on your Mustang
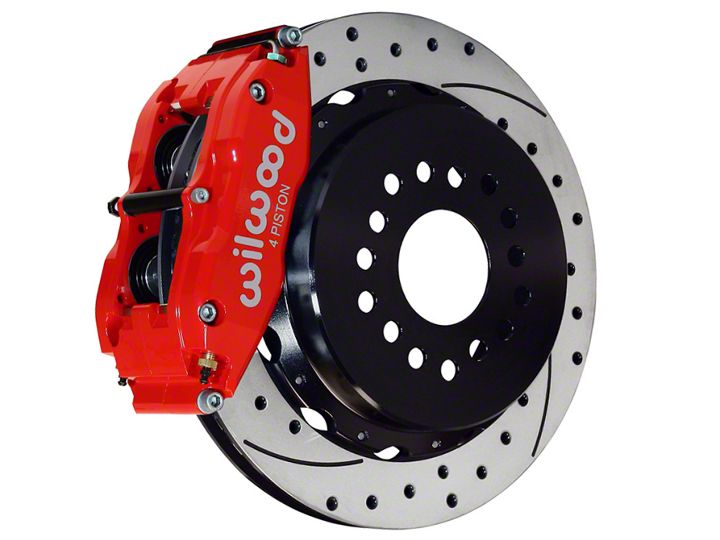
Shop Parts in this Guide
Installation
Important Notice - Read This First
Before any tear-down or disassembly begins, review the following information:
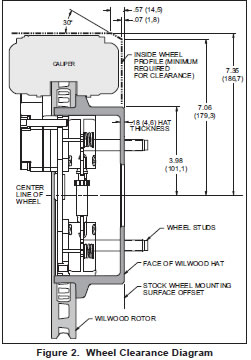
- Review the wheel clearance diagram (figure 2, page 3) to verify that there is adequate clearance with the wheels you will be using with the installation.
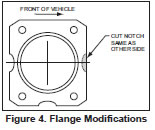
- Minor modifications to the axle flange may be required, see text and figure 4 on page 4.
- Rear brake kits are not supplied with hydraulic lines or fittings and may require the purchase of additional lines or fittings to complete the installation. Wilwood offers an extensive listing of brake lines and fittings on our web site: www.wilwood.com.
- Rear brake kits are not supplied with parking brake cables hardware or adapters. Please see the note in the assembly instructions for vendor recommendations to purchase these parts.
- Due to OEM production differences and other variations from vehicle to vehicle, the fastener hardware and other components in this kit may not be suitable for a specific application or vehicle.
- It is the responsibility of the purchaser and installer of this kit to verify suitability / fitment of all components and ensure all fasteners and hardware achieve complete and proper engagement. Improper or inadequate engagement can lead to component failure.
General Information
Installation of this kit should ONLY be performed by persons experienced in the installation and proper operation of disc brake systems. Before assembling the Wilwood rear axle disc brake kit, double check the following items to ensure a trouble-free installation.
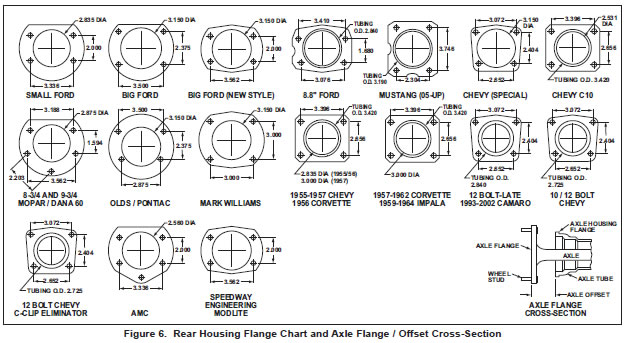
- Make sure this is the correct kit to fit the axle housing flange, not necessarily the rear end make. Many times after market manufacturers put a different make of axle housing flange on the stock rear end housing (see Figure 5).
Example; Big Ford rear ends with Olds-Pontiac flanges, therefore, an Olds- Pontiac rear disc brake kit would be the correct kit to order. Also, shock clearance may be a problem. They may have to be modified and/or relocated to clear the Wilwood kit after final assembly.
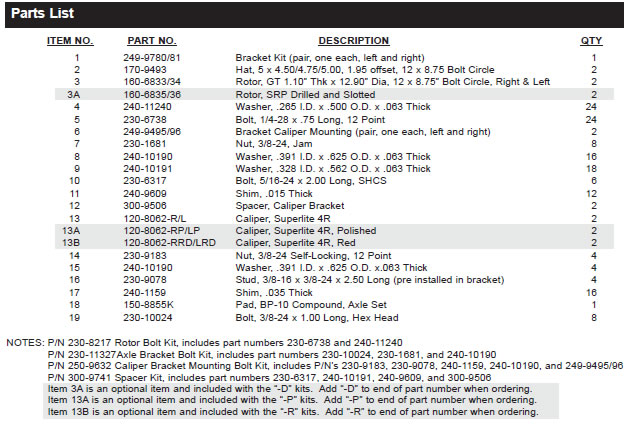
- Inspect the package contents against the parts list to ensure that all components and hardware are included.
- Verify The Following Measurements Before Assembly.
- Bearing outside diameter.
- Axle housing flange mounting pattern to pattern in bracket.
- Stud pattern on axle flange to stud pattern in hat.
- Dimension from wheel side of axle flange to wheel side of axle housing flange (see Figure 6, lower right hand corner). This dimension is critical to ensure proper alignment of the rotor to the caliper, and should match offset given in the kit description.
- Verify that the wheel axle stud size is 0.50” diameter. The Wilwood hats utilized in these kits are drilled for 0.50” diameter wheel studs.
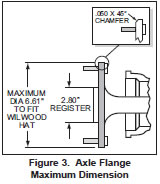
- Maximum axle flange diameter must be no larger than 6.61” w/.050” x 45° chamfer (Figure 3).
Disassembly Instructions
Disassembly Instructions:
- Disassemble the original equipment rear brakes:
Raise the rear wheels off the ground and support the rear suspension according to the vehicle manufacturer’s instructions.
Completely disassemble the stock brake system down to the bare axle housing, removing caliper bracket and dust shield. Remove wheel speed sensor from dust shield (wheel speed sensor will be reinstalled later into new backing plate assembly). Degrease and remove any dings or burrs on the housing flange as well as the axle flange which may interfere with the brake assembly.
NOTE: Reference the vehicle’s dealer or shop manual for proper instructions on the removal of each rear axle shaft.
Axle housing flange may need to be modified by grinding. A relief, the same dimension as the OEM relief at the rear of the housing must be present at the front (of vehicle) side of the housing flange, see Figure 4. This is necessary in order to reinstall the OE wheel speed sensor onto the new backing plate assembly.
Assembly Instructions
IMPORTANT:
- To ensure maximum performance from your parking brake system, the cables must be routed as straight as possible. Bends in the cable can significantly reduce efficiency and thus reduce pull force at the brake. Tight bends must be avoided with a minimum recommended bend radius of 6" to 8".
- Cables should be properly restrained to prevent "straightening" of bends when tension is applied. Restrain movement of cable by affixing the cable sheath to body or chassis by fitting cable clamps at various points over the length of cable or by using original equipment cable attachments points. The clamping method chosen will require that cable sheath be held tightly without movement, crushing or causing interference to the internal cable.
- Cables must be initially pre-stretched by multiple applications of the brake handle, then re-adjusted to correct tension.
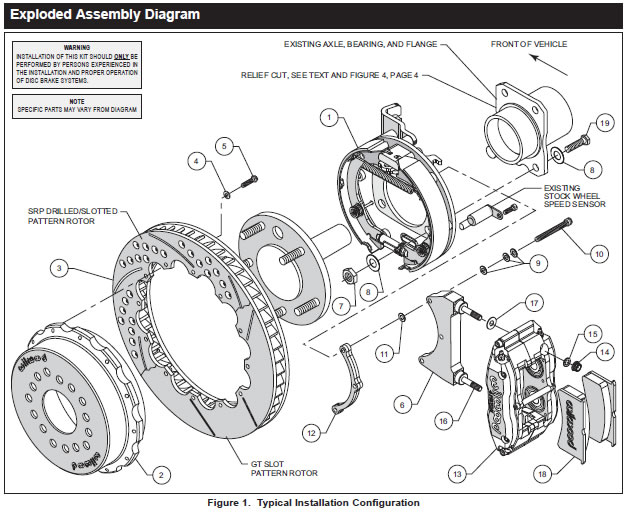
Assembly Instructions (numbers in parenthesis refer to the parts list/diagram on the preceding pages): CAUTION: All mounting bolts must fully engage insert nuts. Be sure to check that all bolts are either flush or protruding through flanged side of insert nut after shimming.
- Slide the bracket kit assembly (1) onto the axle housing flange and secure by sliding bolt (19) through washer (8) through axle housing flange and bracket kit assembly (1), through another washer (8) and attach with bolt (7). Apply red Loctite® 271 to bolt threads (19) and torque to 30 ft-lb. Make sure the bracket kit assembly (1) brake shoes are OUTWARD TOWARDS THE WHEEL. Reinstall the rear axle shaft.
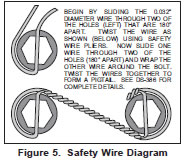
- With the larger I.D. side of the rotor (3) facing away from the hat (2), bolt rotor (3) to hat (2) through the backside of the rotor using washers (4) and bolts (5). Torque bolts (5) in an alternating sequence to 103 in-lb. Safety wire bolts (5) using standard 0.032 inch diameter stainless steel safety wire as shown in Figure 5. Please refer to Wilwood’s data sheet DS-386 (available at www.wilwood.com/Pdf/DataSheets/ds386.pdf) for complete safety wire installation instructions.
- Align the correct hole pattern in the hat (2) with the stud pattern on the axle flange. NOTE: Some OEM and aftermarket axles come with stud sizes larger than 0.50” diameter. Verify stud size and have a qualified machine shop drill the hats to the correct size, if necessary. Slide the hat/rotor assembly (2 and 3) over the wheel studs covering the bracket kit assembly (1) and against the axle flange face. Check to be sure the hat seats squarely against the hub. Install a couple of lug nuts (finger tighten) to keep the rotor/hat assembly in place while continuing with the installation.
- NOTE: Please reference the caution statement at the beginning of the assembly instructions. The caliper mounting bracket assembly (6) should be installed first with clean, dry threads on the mounting bolts (10). Install the bracket from the rear side of the bracket kit assembly (1) y sliding bolt (10) through three flat washers (9), bracket (6), shim washer (11) and finally through the spacer (12), see Figure 1. NOTE: End of bolt should not exceed inside face of insert. The bracket must tighten squarely against the back side of the bracket kit assembly (1). Inspect for interference from casting irregularities, machining ridges, burrs, etc. Use one thin shim (11) between the bracket (6) and spacer (12) during initial trial fitting. • Install one shim (17) over each pre-installed stud (16) on the radial mount bracket (6). Slide the caliper (13) in place over the studs and rotor, then install the washer (15) and lock nut (14) to hold the caliper in place. The caliper bleed screws should be pointing up. Snug the lock nuts (14) and check that the rotor (3) is centered in the caliper (13). Add or subtract .015" shims (11) as necessary between the caliper mounting bracket (6) and the spacer (12) to center the caliper (13).
- Remove the caliper center bridge pad retainer bolt, nut, and tube from the caliper. Slide the brake pads (18) into place. They should install easily without interference. Check that the outside radius of the brake pad is aligned with the outside radius of the rotor. Add or subtract shims (17) between the caliper (13) and mount bracket (6) to gain the proper alignment. Reinstall the center bridge pad retainer tube, bolt, and locknut. The locknut should be snug without play in the bolt or tube. Be cautious not to over tighten.
- Adjust the parking brake shoes outward (using a drum shoe adjustment tool available at your local auto parts store) while turning the hat (2) until a slight drag is felt against the hat/drum. Remove the lug nuts that were holding the hat/rotor in place. Install the wheel and lug nuts. Check to see that the wheel rotates freely without interference.
- Once all clearances have been checked, remove the wheel, caliper, hat/rotor from the bracket kit assembly (1). Secure the caliper mounting bracket (6) to the bracket kit assembly (1) using red Loctite® 271. Torque bolts (7) to 180 in-lb. Reinstall the hat/rotor assembly and again use lug nuts to hold it in place. Lubricate caliper mounting studs and nuts with lightweight oil, reinstall the caliper, torque the caliper nuts (14) to 30-35 ft-lb.
- NOTE: Clevis and cable kits which attach to the parking brake assembly are not included in the Wilwood parking brake kit. Wilwood offers a generic style parking brake cable kit, P/N 330-9371 for this application which can be ordered separately from your local Wilwood dealer or by calling Wilwood customer service at (805) 388-1188.
- NOTE: OEM rubber brake hoses generally cannot be adapted to Wilwood calipers. The caliper inlet fitting is a 1/8-27 NPT. The preferred method is to use steel adapter fittings at the caliper, either straight, 45 or 90 degree and enough steel braided line to allow for full suspension travel and turning radius, lock to lock. Carefully route lines to prevent contact with moving suspension, brake or wheel components. Wilwood hose kits are designed for use in many different vehicle applications and it is the installer's responsibility to properly route and ensure adequate clearance and retention for brake hose components.
- Specified brake hose kits may not work with all Years, Makes and Models of vehicle that this brake kit is applicable to, due to possible OEM manufacturing changes during a production vehicle's life. It is the installer's responsibility to ensure that all fittings and hoses are the correct size and length, to ensure proper sealing and that they will not be subject to crimping, strain and abrasion from vibration or interference with suspension components, brake rotor or wheel.
- In absence of specific instructions for brake line routing, the installer must use his best professional judgment on correct routing and retention of lines to ensure safe operation. Test vehicle brake system per the 'minimum test' procedure stated within this document before driving. After road testing, inspect for leaks and interference. Initially after install and testing, perform frequent checks of the vehicle brake system and lines before driving, to confirm that there is no undue wear or interference not apparent from the initial test. Afterwards, perform periodic inspections for function, leaks and wear in a interval relative to the usage of vehicle.
- Repeat this entire procedure for the other wheel.
- Bleed the brake system. Reference the general information and recommendations on page 7 for proper bleeding instructions.
- Remove the lug nuts that were used to hold the hat/rotor assembly in place during caliper installation. Install the wheel and lug nuts, torque to OEM specifications.
Additional Information and Recommendations
- NOTE: With the installation of after market disc brakes, the wheel track may change depending on the application. Check your wheel offset before final assembly.
- Please read the following concerning balancing the brake bias on 4 wheel disc vehicles.
This brake kit can be operated using the stock OEM master cylinder and proportioning system. However, as with most suspension and tire modifications (from OEM specifications), changing the brakes may alter the front to rear brake bias. Rear brakes should not lock up before the front. Brake system evaluation and tests should be performed by persons experienced in the installation and proper operation of brake systems. Evaluation and tests should be performed under controlled conditions. Start by making several stops from low speeds then gradually work up to higher speeds. Always utilize safety restraint systems while operating vehicle.
Use a Wilwood adjustable proportioning valve if necessary to achieve proper brake balance, or use a Wilwood brake pedal/balance bar assembly with dual master cylinders (requires custom mounting as used in fabricated chassis race cars). A balance bar brake system permits incremental front to rear brake pressure adjustments.
- For optimum performance, fill and bleed the new system with Wilwood Hi-Temp° 570 grade fluid or EXP 600 Plus. For severe braking or sustained high heat operation, use Wilwood EXP 600 Plus Racing Brake Fluid. Used fluid must be completely flushed from the system to prevent contamination. NOTE: Silicone DOT 5 brake fluid is NOT recommended for racing or performance driving.
- To properly bleed the brake system, begin with the caliper farthest from the master cylinder. Bleed the outboard bleed screw first, then the inboard. Repeat the procedure until all calipers in the system are bled, ending with the caliper closest to the master cylinder. If the caliper is fitted with bleed screws on four corners, make sure the bottom bleed screws are tight. Only bleed from the top bleed screws. NOTE: When using a new master cylinder, it is important to bench bleed the master cylinder first.
- If the master cylinder is mounted lower than the disc brake calipers, some fluid flowback to the master cylinder reservoir may occur, creating a vacuum effect that retracts the caliper pistons into the housing. This will cause the pedal to go to the floor on the first stroke until it has “pumped up” and moved all the pistons out against the pad again. A Wilwood in-line 2 lb. Residual Pressure Valve installed near the master cylinder will stop the fluid flowback and keep the pedal firm and responsive.
- Test the brake pedal. It should be firm, not spongy, and stop at least 1 inch from the floor under heavy load. If the brake pedal is spongy, bleed the system again. If the brake pedal is initially firm, but then sinks to the floor, check the system for leaks. Correct the leaks (if applicable) and then bleed the system again. If the brake pedal goes to the floor and continued bleeding of the system does not correct the problem, either air may be trapped in the system, or a master cylinder with increased capacity (larger bore diameter) may be required. Wilwood offers various lightweight master cylinders with large fluid displacement capacities (custom fabricated mounting may be required).
Brake Testing and Pad Bedding
- Make sure pedal is firm: Hold firm pressure on pedal for several minutes, it should remain in position without sinking. If pedal sinks toward floor, check system for fluid leaks. DO NOT drive vehicle if pedal does not stay firm or can be pushed to the floor with normal pressure.
- At very low speed (2-5 mph) apply brakes hard several times while turning steering from full left to full right, repeat several times. Remove the wheels and check that components are not touching, rubbing, or leaking.
- Carefully examine all brake components, brake lines, and fittings for leaks and interference.
- Make sure there is no interference with wheels or suspension components.
- Drive vehicle at low speed (15-20 mph) making moderate and hard stops. Brakes should feel normal and positive. Again check for leaks and interference.
- Always test vehicle in a safe place where there is no danger to (or from) other people or vehicles.
- Always wear seat belts and make use of all safety equipment.

