
How to Install Comp Cams XFI NSR Camshafts on your 2011-2012 Mustang GT
Tools Required
- COMP Cams VCT Limiters (#5493)
- Crankshaft Turning Socket (COMP Cams #4793)
- 1 " Open End Wrench
- Vise
- Torque Angle Gauge
- 10mm Socket (12 point)
- Replacement Bolts Needed: There are many torque-to-yield bolts that should not be reused during this installation. It is a good idea to have the replacements on hand before starting the installation process!
- To order them from a dealership you will need to order the following:
- N806183-S437 Camshaft main cap bolts, 40 needed (10 for each camshaft being installed) BR3Z-6279-A Camshaft bolts, 12 needed (3 for each camshaft) BR3Z-6A340-A Crankshaft pulley bolt
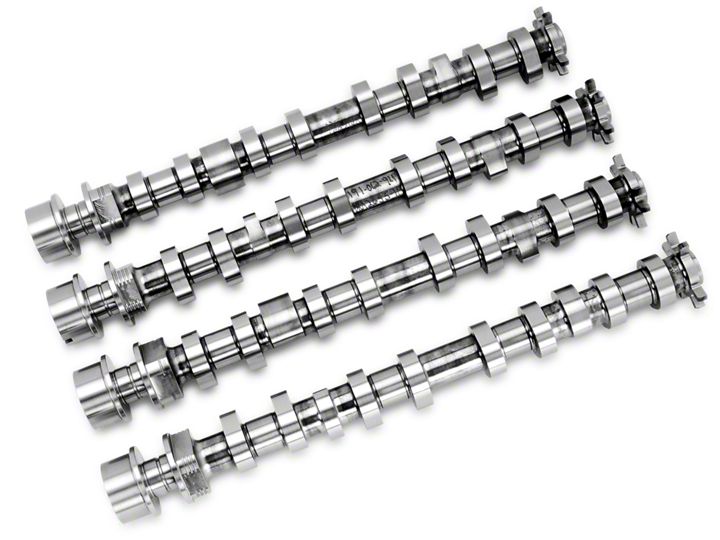
Shop Parts in this Guide
- Comp Cams Stage 1 XFI NSR 220/223 Hydraulic Roller Camshafts (11-14 Mustang GT)
- Comp Cams Stage 2 XFI NSR 228/231 Hydraulic Roller Camshafts (11-14 Mustang GT)
- Comp Cams Stage 3 XFI NSR 236/239 Hydraulic Roller Camshafts (11-14 Mustang GT)
- Comp Cams Stage 1 XFI NSR Blower 220/227 Hydraulic Roller Camshafts (11-14 Mustang GT)
- Comp Cams Stage 2 XFI NSR Blower 228/235 Hydraulic Roller Camshafts (11-14 Mustang GT)
- Comp Cams Stage 3 XFI NSR Blower 236/243 Hydraulic Roller Camshafts (11-14 Mustang GT)
- Comp Cams Phaser Limiter Kit (11-14 Mustang GT)
Installation
Camshaft Removal Preparation
1. Prepare a clean work area and assemble the tools needed for the camshaft installation. It is suggested to use an automotive manual to help determine which items must be removed from the engine in order to expose, remove, and reinstall the timing chains, camshaft actuators/phasers, and camshafts. A good, complete automotive manual will save time and frustration during the installation.
2. Disconnect the negative post of your battery.
3. Remove any coil covers from the engine.
4. Unplug the coils and loosen the bolt holding them into the valve cover, pull the coils out. Then remove the Variable Cam Timing (VCT) actuator electrical connectors from both banks of the engine.
5. Remove the valve covers from both sides of the engine.
6. Remove all eight spark plugs, this will ease rotation of the engine later.
7. Remove water pump, front drive accessories and timing chain cover. Make sure to label, or take pictures of, bolts and their respective positioning to help during reinstallation.
This new engine requires different crank locations when reassembling each bank. During the main timing chain reassembly you will assemble the left bank (driver side) first, and then the right bank (pass. side), remembering that the crank positioning is different for each bank.
Take a moment to notice the difference between the crankshaft keyway and the crankshaft timing marker (Fig. A).
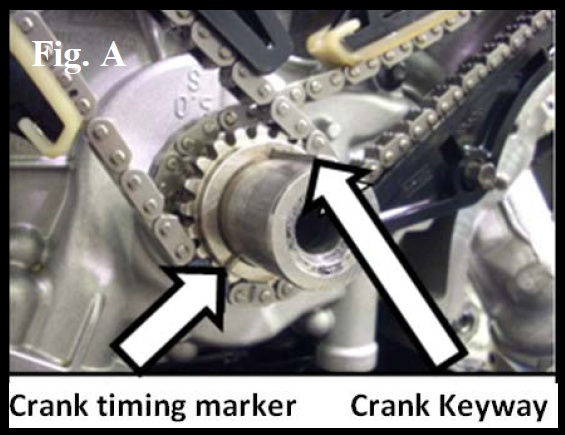
Thecrankshaft keywaywill be used for positioning of the crank during camshaft and timing chain installation.
Thecrankshaft timing markerwill be used for checking chain alignment and final timing verification.
Camshaft Removal and Re-installation
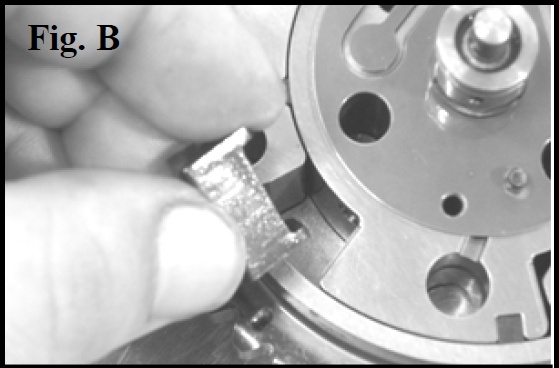
8. Install COMP Cams® VCT Limiters (#5493) per instructions, stop after completing step 20.Do not reinstallthe camshaft to VCT bolts in step 21.Repeat for each cam.
WARNING:When installing COMP Cams® camshafts, youMUSTinstall the COMP Cams® VCT/Phaser Limiters or Adjustable Locking Plates to ensure that you do not crash your pistons and valves together. Not limiting the VCT/Phaser travel will result in catastrophic engine damage (Fig. B.).
9. Rotate the crankshaft until the crankshaft keyway(do not confuse this with the timing mark)is positioned at the twelve o’clock position. (Use COMP Cams® #4793 Crankshaft Socket)
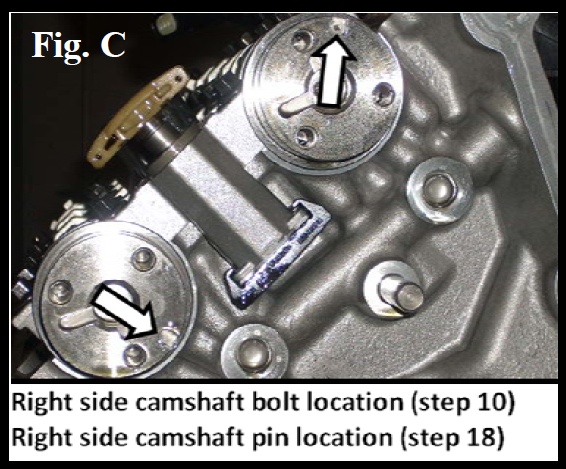
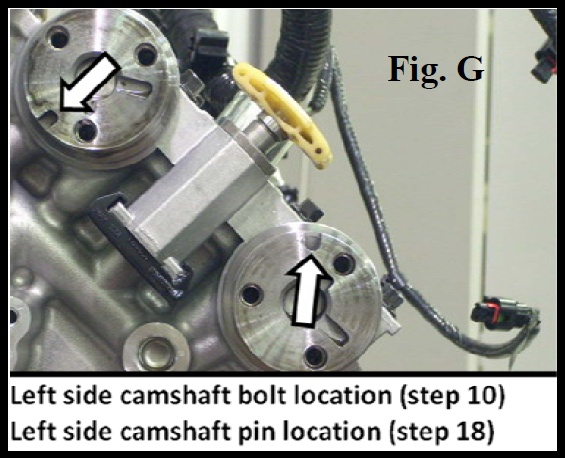
10. Ensure the camshaft bolts are positioned, as pictured in Fig. C. If the camshaft bolts are not in a similar position to the picture, rotate the crank 360° and check again.
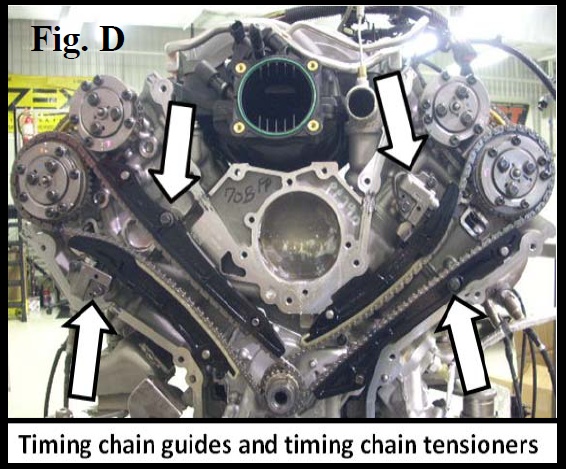
11. Remove main timing chain tensioners, timing chain guides, and main timing chains. (Fig. D) Use a 1½" open end wrench on the flats on the camshaft, just behind the first journal cap, to hold each camshaft while loosening the tensioner bolts. It is advised to have assistance on this part because the camshafts can try to rotate if not held by the wrench. This could cause piston to valve contact.
12. Remove the 6 cam bolts corresponding to the side you are working on. Use the 1 ½" wrench to hold the cams in place.
13. Rotate crankshaft to the nine o’clock, relaxed position, as pictured on this page. If the camshaft bolts are not in a similar position to the picture, rotate the crank 360° and check again.Repeat steps 10-12for the left bank.
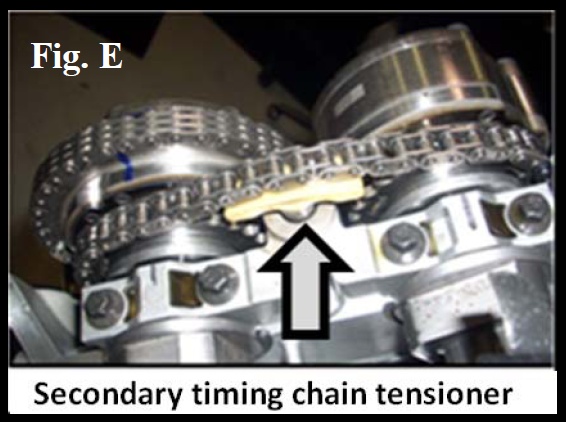
14. Depress the secondary timing chain tensioner and carefully slide off both of the VCT (phasers) and secondary chain together as an assembly. This process is also much easier with another person helping. Take extra time because dropping the phaser assembly could easily damage the phasers.Repeat for the other bank.(See Fig. E)
15. Make note the OEM has labeled each main cap with a number and direction with an arrow.These caps are notinterchangeable. They must be reinstalled exactly where theywere removed from. (See Fig.F)

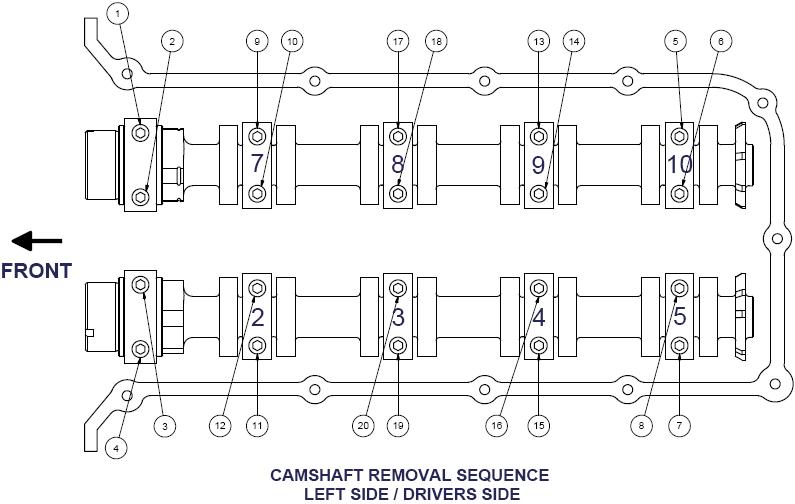
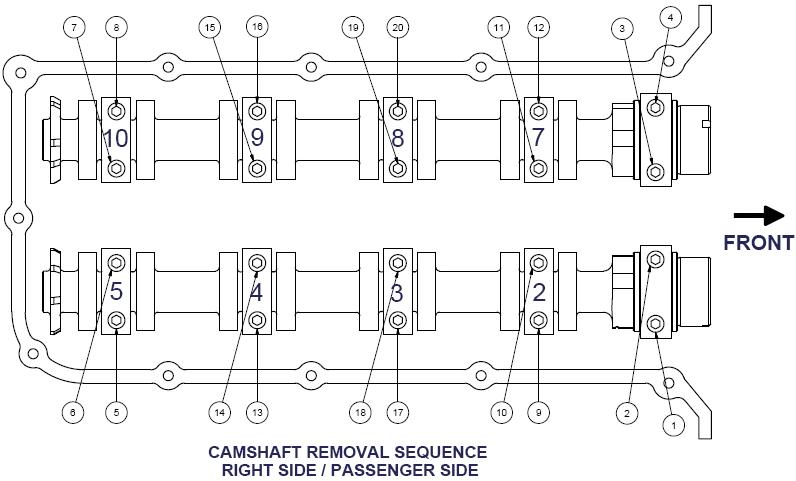
16. On the left bank, using the left bank removal sequence on page 7. Loosen the bolts, labeled 1-20, 1 full turn. Then repeat the sequence loosening the bolts one turn per pass until the caps are all loose. Loosen the bolts the rest of the way and discard. These main bolts are torque-to-yield and cannot be reused.Repeat for the right bank using the right bankremoval sequence on page 8.
17. Lift off the main caps and set aside, remembering they must be installed exactly where they were remove from. Make sure you keep the left and right bank caps separated so they do don’t get crossed during re-assembly.
18. Remove OEM camshafts and set the new COMP Cams® camshafts in place with the pin locations as pictured on this page. Lubricate main cap the bolts, cam journals, and cam lobes generously with supplied COMP Cams® AssemblyLube #103.
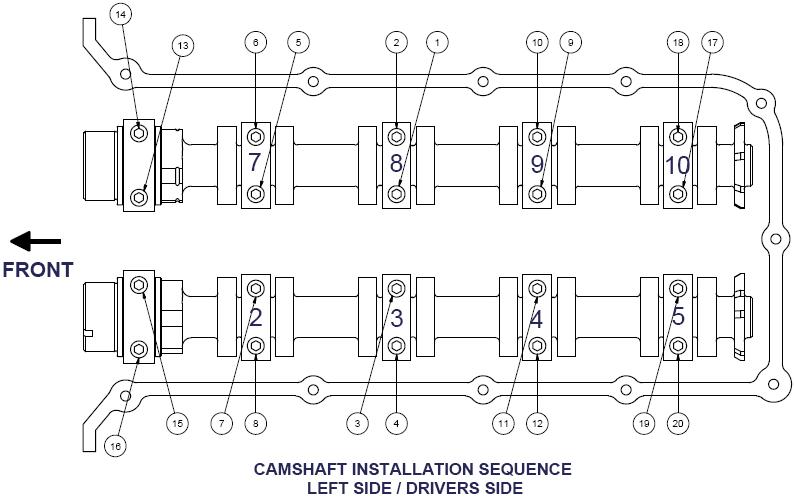
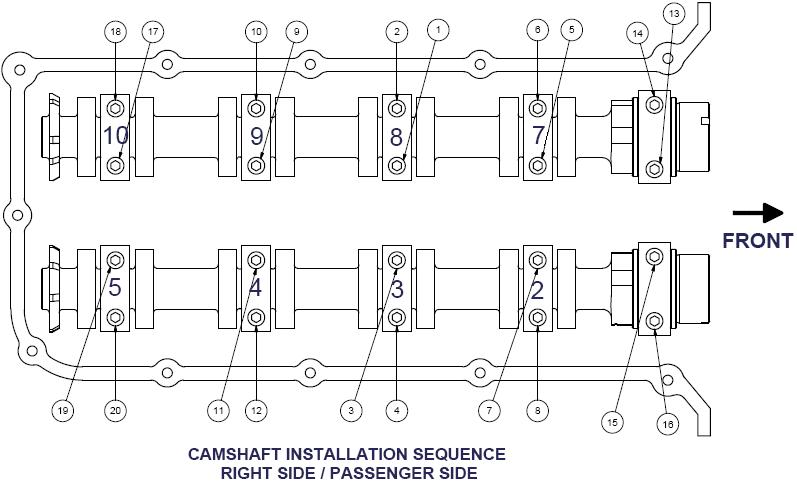
19. To reinstall the camshaft main caps start with new bolts
Ford number N806183-S437 on the Left Bank and use the
sequence on page 7 (Page 8 for right side) while making several passes using 1 turn each pass to carefully ease the camshaft into the journal saddles on the cylinder head. Once all the caps have lightly seated, torque the final pass to 4.4 ft./lb. (53in./lb.) and then, using a torque angle gauge, add 45° of additional clockwise rotation to finish. Repeat for the Right Bank.Note: Be careful to not over torque these bolts!
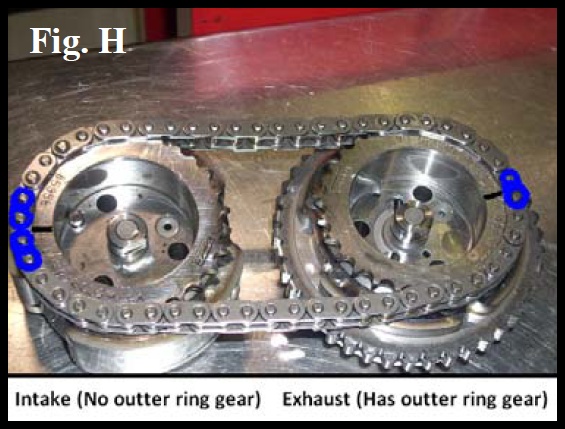
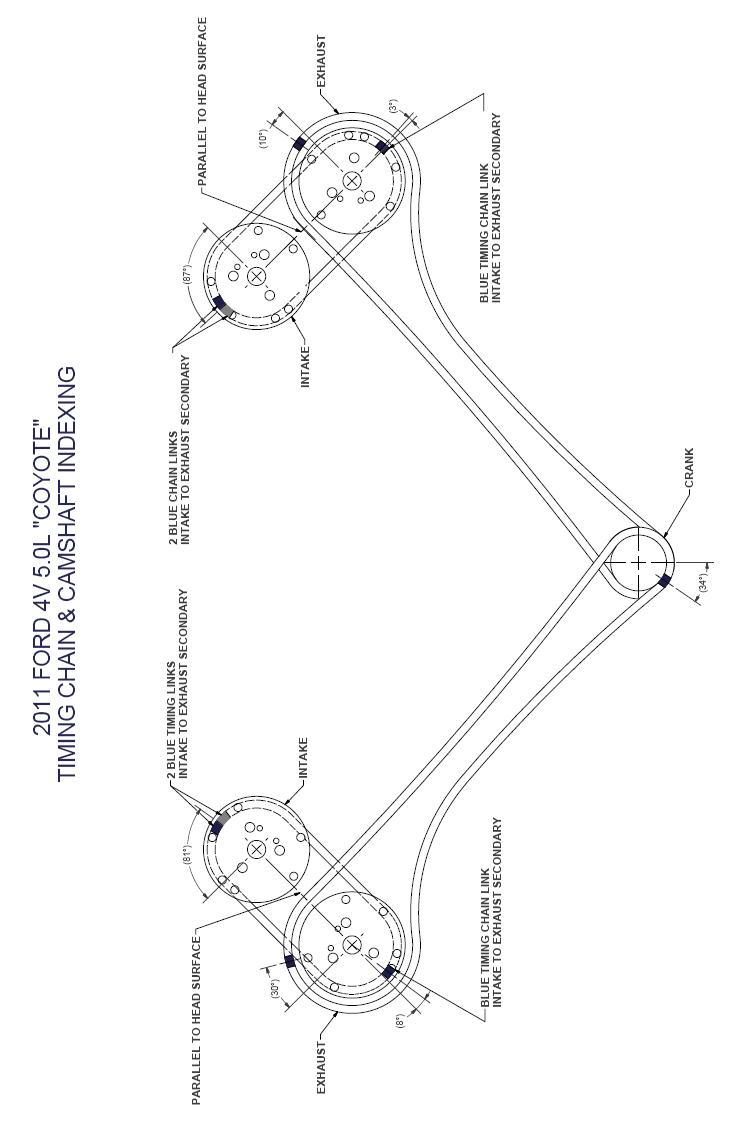
20. On a table top reinstall the secondary chain to the intake and exhaust VCTs (Phasers) for the Left bank. On the secondary chain there are three dark links. Line the single link up with the timing mark on the back of theExhaustphaser. The exhaust phaser has the large outer gear on it that connects to the main chain. Next line the timing mark on theIntakephaser between the two marked links on the chain that are beside each other. (SeeFig. H)
21. Reinstall the phasers and chain as an assembly; they will side on both cams at the same time. You will have to press down the secondary chain tensioner during installation. This part is much easier with another person helping, because dropping the phasers at this point is very easy and could cause a lot of damage.Note:Ensure the chain does not jump a tooth. It is also very critical that both phasers align properly and seat completely into the camshaft.(SeeTip Below)
TIP:
It may be easier to reinstall the phasers, initially, with the secondary tensioner removed. Remember, the phasers are variable so finding the correct position to line up the pins for proper engagement may take some trial and error. This will also allow you see and feel for the proper engagement between the phaser and the camshaft. In the end, this ensures both camshafts and phasers are in a position where the phaser can be installed. If the phasers and cams will not engage you can use a 1½" open ended wrench to twist the camshafts to help with any alignment issues. Once you have both phasers, with chain, installed and engaged to the camshaft properly you can remove them and reinstall the tensioner.
To removethe tensioner,gentlyremove the black retaining clip on the bottom of the phaser. This retaining clip also doubles as the timing chain guide for the secondary tensioner so extra caution not to damage it must be taken. Once the clip is removed, gently tap the tension out from the bottom (Fig. I).
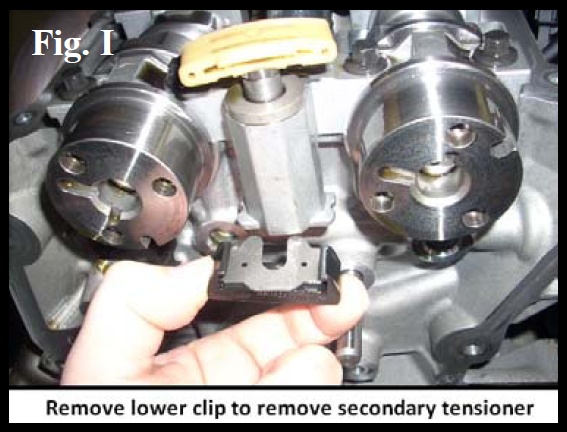
To reinstallthe tensioner, push the tensioner down from the top until it firmly seats and reinstall the retaining clip. Now that the camshafts and phasers are aligned, go back to the start of step number 20.
22. After VCT phasers are installed correctly, reinstall new camshaft bolts, these bolts are torque-to-yield and must be used only once. The Ford replacement part number is BR3Z-6279-A. You will need 12 new bolts to complete this process. Install and torque new cam bolts to 11 ft./lb. and then, using a torque angle gauge, add 90° of additional clockwise rotation. Be sure to hold the camshafts with the 1½ wrench to keep them from rotating and letting the valves contact the pistons.Repeat steps 20-22 for the RightBank.
Left Bank Main Timing Chain and Tensioner Re-installation
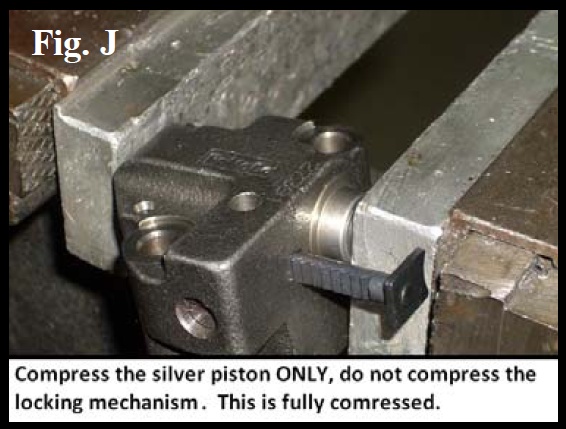
23. Now that your camshafts and VCT phasers are installed you will need to compress and lock the main chain tensioner to allow it to be re-installed. Compress the tensioner piston only. Place it in an aluminum jawed vice and compress until the first recess is flush with the tensioner body, as pictured in Fig. J.
24. Use a small Allen or pick and put it in the hole labeled “1” in Fig. K. This hole contains a toothed gear, use the Allen to depress the spring loaded gear; this will allow the locking mechanism to be retracted. Compress the assembly, with your finger, until the plate on the end of the rod is able to be seated against the face of the tensioner.
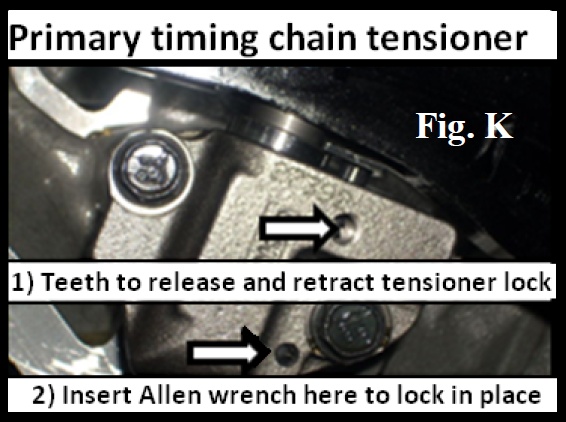
25. Now insert a 5/64" or 1/16" Allen in the hole labeled “2” in Fig. K. Slowly release the jaws and the tensioner should stay compressed.
26.You will need to install the left side bank timing chain first, as it uses the rear position of the crankshaft gear. Rotate the crankshaft until the crankshaft keyway (not timing mark) is at the nine o’clock position. Now align one of the colored chain links with the timing mark on the crankshaft gear and the other colored chain link with “L” timing mark on the phaser gear. You may have to rotate the crankshaft slightly to get everything to align properly.(See Tip Below)
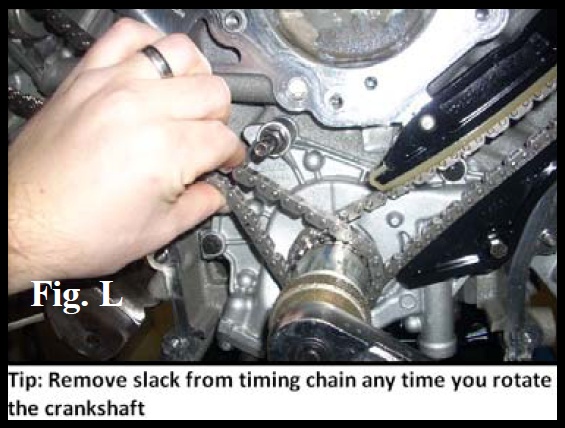
TIP:Whenever you need to rotate the crankshaft, grab the timing chain near the crankshaft gear to remove any slack around the crank gear as you turn it (Fig. L). Without removing this slack it is very common for the chain to jump a tooth, or two, when you start rotating the crank. Not allowing slack on the chain will help ensure the timing chain stays in the proper position.
27. Once the chain is installed, install the timing chain guides. Again you may have to move the crankshaft to allow enough slack to allow you to slide them on.
28. With both left bank guides in place install the tensioner, that is still compressed and locked. Again you may have to move the crankshaft slightly to allow enough slack in the correct side of the chain so the tensioner can be installed. Torque the tensioner bolts and main chain guide bolt to 7 ft./lb. or 84 in./lb.
29. Re-verify that the timing marks on the timing chain align properly with the timing marks on the phaser and crankshaft gear.
30. Release the main timing chain tensioner by pulling out the Allen used in step 23-25. This completes the left side timing chain installation.
Right Bank Main Timing Chain and Tensioner Re-Installation
31. Repeat step 23-25 for the remaining main timing chain tensioner.
32. Rotate the crankshaft until the crankshaft keyway (not timing mark) is at the twelve o’clock position.
Now align one of the colored chain links with the timing mark on the crankshaft gear the other colored
chain link with “R” timing mark on the phaser gear. You may have to rotate the crankshaft slightly to get everything to align properly.
33. Once the chain is installed, install the timing chain guides. Again you may have to move the crankshaft to allow enough slack to allow you to slide them on.
34. With both right bank guides in place install the tensioner that is still compressed and locked. Again you may have to move the crankshaft slightly to allow enough slack in the correct side of the chain so the tensioner can be installed. Torque the tensioner bolts and main chain guide bolt to 7 ft./lb. or 84 in./lb.
35. Re-verify that the timing marks on the timing chain align properly with the timing marks on the phaser and crankshaft gear.
36. Release the main timing chain tensioner by pulling out the Allen used in step 23. This completes the right side timing chain installation.
37. EXTREMELY CRITICAL:Once all four camshafts, timing chains, tensioners, and guides are installed, check to ensure all eight of your marked links on your timing chain are still aligned properly with their respective timing marks. If all eight timing marks are not correct you must disassemble until you reach a point where you can correct the incorrect timing mark(s).(See Timing Chain & CamshaftIndexing illustration below on page 10 for final timing mark locations)
38. Reinstall the front timing cover and water pump. Ensure the water pump seal seals and seats completely.
A new water pump o-ring may be required (Part #F1ZY-8507-A).
39. Reinstall all front drive accessories, including a new crankshaft bolt, Ford Part #BR3Z-6A340-A. The crankshaft bolt torque sequence is as follows:
Step 1:Torque to 66 ft./lb.Step 2:Loosen 1 full turn.Step 3:Torque to 74 ft./lb.
Step 4:Tighten an additional 90°, using a torque angle gauge.
40. Reinstall any remaining parts such as valve covers, spark plugs, coils, covers, etc. Remember to also reinstall any electrical connections, such as the four cam phaser actuators.
Warranty
Competition Cams, Inc. warrants that all of its products are free from defects in material and workmanship, and against excessive wear for a period of (1) one year from the date of purchase. Thislimited warrantyshall cover the original purchaser.
Competition Cams, Inc.’s obligation under this warranty is limited to the repair or replacement of its product.To make a warranty claim, the part must be returned within (1) one year of purchase to the address listed below, freight prepaid. Items covered under warranty will be returned to you freight collect.
It is the responsibility of the installer to ensure that all of the components are correct before installation. We assume no liability for any errors made in tolerances, component selection, or installation.
There is absolutely no warranty on the following: A) Any parts used in racing applications;
B) Any product that has been physically altered, improperly installed or maintained;
C) Any product used in improper applications, abused, or not used in conjunction with the proper parts.
There are no implied warranties of merchantability or fitness for a particular purpose.There are no warranties, which extend beyond the description of the face hereof. Competition Cams, Inc. will not be responsible for incidental and consequential damages, property damage or personal injury damages to the extent permitted by law. Where required by law, implied warranties or merchantability and fitness are limited for a term of (1) one year from the date of original purchase.
This warranty gives you specific legal rights and you may also have other legal rights, which vary from state to state.
Related Guides
-
Installation
-
Installation
-
Installation

